Kubernetes needs a developer platform

Hi there! I’m Oded.
I work for VMware Tanzu as a Senior Lead Solutions Engineer, spreading the message of cloud native development, cloud native platforms on Kubernetes and app transformation.
I helped design large-scale, cloud-native solutions using the microservices architecture running on Pivotal Cloud Foundry and Kubernetes, using Spring Boot and Spring Cloud.
I’m highly skilled in Kubernetes, Java, Spring Boot, Spring Cloud, Apache Kafka, Event Sourcing and DevOps practices.
I enjoy photography, video editing, and the music of the King of Pop.
The container runtime landscape
Kubernetes is the new IaaS.
Whether you’re developing custom applications or purchasing off-the-shelf software from a vendor, the new, modern target runtime are containers, and the container runtime of choice is Kubernetes.
In a rare alignment of the stars for the tech industry, virtually all vendors, private cloud and public cloud providers, are in agreement on a spec and on an API. That's really something. It doesn't have to be the best API in world, or even the most readable, and it doesn’t matter that interaction is mostly done through a wall of YAML. The important takeaway is that it's a language and syntax that almost everyone agreed upon.
But just because the industry agrees on a fundamental, low-level API, doesn't mean that developers should use it. In fact, it probably means the opposite.
The abstraction gap
How often do you develop cloud-based, server side software in C these days? When was the last time you've written something in assembly, if ever? Do you use low-level networking APIs or do you opt for HTTP or gRPC?
We write at higher-level abstractions because they provide us with meaningful benefits:
- Our code is more readable
- We stand on the shoulders of giants who simplified and encapsulated very complicated systems for us
- An abstraction usually provides guardrails. How many times did the type system of Java, or its automated garbage collection, saved you from disaster?
- Underlying low-level APIs may change for better optimization, while our code remains the same
The same can and should be said for Kubernetes. If we truly treat Kubernetes as commodity infrastructure, why do we use it directly? How many developers do you know that have ever seen a vCenter console, or got full admin rights to an AWS console? Hardly any, and for a very good reason.
Developers want to write their business logic and have it run on a Kubernetes cluster.
How? Good question.
Sure, developers need to understand how things work in Kubernetes, and may need to dig deeper into an environment when issues arise, but in their day to day they have so many other things to worry about - business logic, code path optimizations, writing unit tests, merge conflicts, evaluating sources and targets of data - that having to worry about infrastructure is just too much of an overhead. Non-functional requirements can take up a considerable part of a software engineer's time. That is time that could have been spent providing value to the organization with new features, that ultimately provide a better user experience, and eventually more revenue.
A platform that is focused on developer productivity, if done correctly, can remove much of that toil from the day-to-day of a software engineer, otherwise they may spend a large portion of their time building an internal DIY platform.
Let's build an app
In order to fully understand a problem domain, I always like to use a real example. Let's test the hypothesis with a very simple hello world application, written in Java using Spring Boot:
@RestController
class HelloController {
    @Value("${app.message:Hello world!}")
    private String message;

    @GetMapping(value = "/", produces = MediaType.TEXT_PLAIN_VALUE)
    String greeting() {
        // Just return a simple String.
        return message;
    }
}
Simple enough.
Let's add a unit test to make sure our application behaves as expected:
@SpringBootTest(webEnvironment = SpringBootTest.WebEnvironment.RANDOM_PORT)
public class ApplicationTests {
    @Autowired
    private TestRestTemplate webClient;

    @Test
    public void testGreeting() {
        assertThat(webClient.getForObject("/", String.class)).isEqualTo("Hello world!");
    }
}
Great! Our application is now production ready. 😉
Well, not really. We want to run this application in a production-ready environment, preferably as a container so we can gain better isolation than just a JVM runtime, and also to easily scale out horizontally when needed.
Building the OCI image
First of all, we need to containerize our application. But how? The most obvious way to achieve this is to write a Dockerfile. After some googling, we may end up with this example from the Spring guides website:
FROM openjdk:8-jdk-alpine
ARG JAR_FILE=target/*.jar
COPY ${JAR_FILE} app.jar
ENTRYPOINT ["java","-jar","/app.jar"]
Now, this will work, but only if we compile and package our code in advance. Let's deconstruct this Dockerfile line by line:
FROM openjdk:8-jdk-alpineuses a base image from Dockerhub that appears to be based on Alpine Linux and OpenJDK 8. Being bound to JDK 8 is pretty old here at the dawn of 2022, so we may need to google for a better baseline that supports Java 11 or 17.ARG JAR_FILE=target/*.jardeclares an env variable that contains all the jar files in thetargetfolder. We assume there's only one, or else the next command will not work properly.COPY ${JAR_FILE} app.jarcopies the jar file to the root of the container folder structure and renames it toapp.jar.ENTRYPOINT ["java","-jar","/app.jar"]sets the start command for this container - basically run the uber jar using Java. Note the utter lack of anyJAVA_OPTS, tweaking for production or changes to the garbage collection settings. We’re using whatever the defaults are, which are probably not optimized for container runtimes.
Let's build the image:
> docker build -t hello-world:v1 .
...
...
 => [stage-1 1/5] FROM docker.io/library/adoptopenjdk:11-jre-hotspot@sha256:ad6431b2e2a6f8016aa6d79c3f588783af9fdc06cafe131fd0d3faf560914b13         9.8s
 => [internal] load build context                                                                                                                    0.0s
 => => transferring context: 232.93kB                                                                                                                0.0s
 => [stage-1 2/5] RUN useradd -m -s /bin/bash app                                                                                                    0.5s
 => [builder 2/6] RUN mkdir /build                                                                                                                   0.4s
 => [builder 3/6] ADD . /build                                                                                                                       0.1s
 => [builder 4/6] WORKDIR /build                                                                                                                     0.0s
 => [builder 5/6] RUN ./mvnw -B clean package                                                                                                      101.9s
 => [builder 6/6] RUN mkdir -p target/dependency && (cd target/dependency; jar -xf ../*.jar)                                                         0.6s
 => [stage-1 3/5] COPY --from=BUILDER /build/target/dependency/BOOT-INF/lib /app/lib                                                                 0.1s
 => [stage-1 4/5] COPY --from=BUILDER /build/target/dependency/META-INF /app/META-INF                                                                0.0s
 => [stage-1 5/5] COPY --from=BUILDER /build/target/dependency/BOOT-INF/classes /app                                                                 0.0s
 => exporting to image                                                                                                                               0.1s
 => => exporting layers                                                                                                                              0.1s
 => => writing image sha256:1433c6a737757449f2697cee31806f69cb0ffac1ca9ea53acae7153e1868d3f2                                                         0.0s
 => => naming to docker.io/library/hello-world:v1                                                                                                    0.0s
So, this was fairly simple, but also quite script-driven. We basically described a step by step of the how, not the what.
As developers, we are now also responsible for 100% of that how. We need to start thinking about security implications. For example, we probably only want to run our container with user privileges. The same Spring blog post recommends to add a custom user and group and run the container with that user:
FROM openjdk:8-jdk-alpine
RUN addgroup -S spring && adduser -S spring -G spring
USER spring:spring
ARG JAR_FILE=target/*.jar
COPY ${JAR_FILE} app.jar
ENTRYPOINT ["java","-jar","/app.jar"]
Once again, since we as developers are now responsible for 100% of the how, we need to start thinking about optimizations. The sample above takes our large uber jar that can easily reach 150mb or more, and put it in a single layer in the OCI image. What does this mean in practice? It means that for every new build, even for the simplest code change in our custom code, a new 150mb layer (read: tarball) will be created and uploaded to our OCI registry. Later, when pulling the image to our local machines or to a Kubernetes cluster, a 150mb layer will need to be pulled as well. This will happen on every single code change and rebuild of the image. In reality, only a very small sliver of compiled code has changed. Dockerfile treats every new line as its own layer, so it would make a lot more sense to put the third party dependencies in their own layer and have our custom code in its own layer. That way, only a very small layer will need to be uploaded and later pulled. The Spring blog presents the following approach to basically "unzip" the jar file:
FROM openjdk:8-jdk-alpine
RUN addgroup -S spring && adduser -S spring -G spring
USER spring:spring
ARG DEPENDENCY=target/dependency
COPY ${DEPENDENCY}/BOOT-INF/lib /app/lib
COPY ${DEPENDENCY}/META-INF /app/META-INF
COPY ${DEPENDENCY}/BOOT-INF/classes /app
ENTRYPOINT ["java","-cp","app:app/lib/*","hello.HelloController"]
Of course, this sort of Dockerfile is only good if you have a previous step that already compiled and packaged the jar for you, and that's usually not what you want. It would be ideal that the compilation of the source code would be done in a containerized environment as well, to remove any risk of an unknown (and potentially insecure) build environment.
We also took some time to build our image with what we consider good security best practices today, but new CVEs are discovered every day, and patches are released to various Linux distributions, to the JDK and to many frameworks you may be using in your code (hi there, log4j 👋). Since we as developers now need to care about the how, it is our responsibility (or a specific person in the organization) to keep things patched continuously.
Cloud Native Buildpacks to the rescue
Luckily, at least in the world of Spring Boot, we have you covered.
Thanks to Cloud-Native Buildpacks CNCF project, we can create images from source code just by saying what we want, without having to explain the how. Cloud Native Buildpacks are available for various modern languages, and of course for Spring Boot. In fact, the Spring Boot maven plugin provides a command just for that:
mvn spring-boot:build-image
This simple command will build an optimized, production-ready, secure image. I may not care how, although I could dive into the spec if I want to understand how it performs the build lifecycle. I can also override the recommended defaults if I wanted to (for example to change the JDK version from the current default of JDK 11 to an older JDK 8 or a newer JDK 17). Lastly - the generated image is created with sensible defaults such as proper segregation of layers in the OCI image so it would be optimized for storage and pulls later on, and an optimized java start command that is recommend for running in a containerized environment. The important piece here is that I delegated some of the responsibility of my non-functional requirements to a platform. In the case of a simple mvn spring-boot:build-image command, it will go out and build the image using the latest patched layers that are available for the OS and OpenJDK. In case of other platforms that support Cloud Native Buildpacks, such as kpack or its commercial flavor Tanzu Build Service, the builds would be triggered automatically on git commit or when an operator uploads updated buildpacks or OS updates (called: stacks ) to the environment.
So, we have a production-ready image. Great! We can now just deploy to Kubernetes and forget about it.
Well... I guess we still have some things we need to do.
Let's try to get as far as we can with just barebones Kubernetes.
Creating a deployment
We'll begin by tagging our built image and pushing it to a docker registry.
docker tag hello-world my-registry.com/apps/hello-world:v1
docker push my-registry.com/apps/hello-world:v1
Now we can go ahead and create a deployment in our Kubernetes cluster. It is considered a best practice to make changes in Kubernetes in a declarative way, so we can keep our configuration in a versioned repository, thus promoting Infrastructure as Code. Let's use imperative commands to generate the initial declarative yaml skeleton we will need:
kubectl create deployment hello-world --image=my-registry.com/apps/hello-world:v1 --dry-run=client -o yaml > deployment.yaml
The result is a good starting point to describe our deployment:
apiVersion: apps/v1
kind: Deployment
metadata:
  creationTimestamp: null
  labels:
    app: hello-world
  name: hello-world
spec:
  replicas: 1
  selector:
    matchLabels:
      app: hello-world
  strategy: {}
  template:
    metadata:
      creationTimestamp: null
      labels:
        app: hello-world
    spec:
      containers:
      - image: my-registry.com/apps/hello-world:v1
        name: hello-world
        resources: {}
status: {}
We would probably want to change some settings here though. For example, set replica count to 3. We would also need to understand the CPU and memory requirements of our application and set proper Kubernetes resource requests and limits (however, it's best to understand what these settings actually mean). Let's start with an initial settings of 1 core and 384mb of memory, and a max of 1.5 cores and 512mb of memory:
apiVersion: apps/v1
kind: Deployment
metadata:
  creationTimestamp: null
  labels:
    app: hello-world
  name: hello-world
spec:
  replicas: 3
  selector:
    matchLabels:
      app: hello-world
  strategy: {}
  template:
    metadata:
      creationTimestamp: null
      labels:
        app: hello-world
    spec:
      containers:
      - image: my-registry.com/apps/hello-world:v1
        name: hello-world
        resources:
          requests:
            memory: "384Mi"
            cpu: "1000m"
          limits:
            memory: "512Mi"
            cpu: "1500m"
You would probably also want to define the deployment strategy, as this could have implications on the availability of your app. How many replicas can be unavailable at any given time? How many replicas can be updated simultaneously?
apiVersion: apps/v1
kind: Deployment
metadata:
  labels:
    app: hello-world
  name: hello-world
spec:
  replicas: 3
  selector:
    matchLabels:
      app: hello-world
  strategy:
    type: RollingUpdate
    rollingUpdate:
       maxSurge: 25%
       maxUnavailable: 25%
  template:
    metadata:
      labels:
        app: hello-world
    spec:
      containers:
      - image: my-registry.com/apps/hello-world:v1
        name: hello-world
        resources:
          requests:
            memory: "384Mi"
            cpu: "1000m"
          limits:
            memory: "512Mi"
            cpu: "1500m"
We're almost there!
Oh wait. How do I tell Kubernetes where to place each replica? I would like to have a nice spread between available worker nodes for better availability. The below example adds an anti-affinity rule to our deployment:
apiVersion: apps/v1
kind: Deployment
metadata:
  labels:
    app: hello-world
  name: hello-world
spec:
  replicas: 3
  selector:
    matchLabels:
      app: hello-world
  strategy:
    type: RollingUpdate
    rollingUpdate:
       maxSurge: 25%
       maxUnavailable: 25%
  template:
    metadata:
      labels:
        app: hello-world
    spec:
      affinity:
        podAntiAffinity:
          requiredDuringSchedulingIgnoredDuringExecution:
          - labelSelector:
              matchExpressions:
              - key: app
                operator: In
                values:
                - hello-world
            topologyKey: "kubernetes.io/hostname"
      containers:
      - image: my-registry.com/apps/hello-world:v1
        name: hello-world
        resources:
          requests:
            memory: "384Mi"
            cpu: "1000m"
          limits:
            memory: "512Mi"
            cpu: "1500m"
This is getting quite long, isn't it? Oh well, whatever it takes to run our simple hello world app on Kubernetes 🤦🏻♂️
We can finally deploy our application:
> kubectl apply -f deployment.yaml
Let's make sure our app is working as expected:
> kubectl get pods
NAME                           READY   STATUS             RESTARTS   AGE
hello-world-64bccd8549-fqmxv   0/1     CrashLoopBackOff   3          79s
hello-world-64bccd8549-fxgrr   0/1     CrashLoopBackOff   3          79s
hello-world-64bccd8549-rbw2b   0/1     CrashLoopBackOff   3          79s
Oops. What happened? Let's check the logs:
> kubectl logs --selector app=hello-world
Setting Active Processor Count to 4
unable to calculate memory configuration
fixed memory regions require 596880K which is greater than 512M available for allocation: -XX:MaxDirectMemorySize=10M, -XX:MaxMetaspaceSize=84880K, -XX:ReservedCodeCacheSize=240M, -Xss1M * 250 threads
ERROR: failed to launch: exec.d: failed to execute exec.d file at path '/layers/paketo-buildpacks_bellsoft-liberica/helper/exec.d/memory-calculator': exit status 1
Seems like our resource requests and limits were too low. Until Spring Native is officially GAed with much lower memory footprint requirements and faster startup times, we're still bound to our memory-hungry JVM. Still, this is a reminder that it is our responsibility to tweak the deployment configuration to a production-ready state. After changing the deployment yaml to a limit of 768Mi, we can try again:
> kubectl apply -f deployment.yaml
deployment.apps/hello-world configured


> kubectl get pods
NAME                           READY   STATUS             RESTARTS   AGE
hello-world-5ff7bfb9ff-wgnj6   0/1     Pending            0          38s
hello-world-64bccd8549-fqmxv   0/1     CrashLoopBackOff   5          5m20s
hello-world-64bccd8549-fxgrr   0/1     CrashLoopBackOff   5          5m20s
hello-world-64bccd8549-rbw2b   0/1     CrashLoopBackOff   5          5m20s
Hmm... seems like our rollout is stuck in Pending state. We probably didn't take into consideration the correct relationship between our RollingUpdate strategy, the Node Anti-Affinity rules and the number of available worker nodes, so we are stuck in a form of deadlock. Again, it is your responsibility to take these matters into consideration.
Let's change our deployment.yaml to allow for up to 50% of the replicas to be unavailable. This may or may not be an acceptable solution in your production environment. The final deployment.yaml now looks like this:
apiVersion: apps/v1
kind: Deployment
metadata:
  labels:
    app: hello-world
  name: hello-world
spec:
  replicas: 3
  selector:
    matchLabels:
      app: hello-world
  strategy:
    type: RollingUpdate
    rollingUpdate:
       maxSurge: 25%
       maxUnavailable: 50%
  template:
    metadata:
      labels:
        app: hello-world
    spec:
      affinity:
        podAntiAffinity:
          requiredDuringSchedulingIgnoredDuringExecution:
          - labelSelector:
              matchExpressions:
              - key: app
                operator: In
                values:
                - hello-world
            topologyKey: "kubernetes.io/hostname"
      containers:
      - image: my-registry.com/apps/hello-world:v1
        name: hello-world
        resources:
          requests:
            memory: "384Mi"
            cpu: "1000m"
          limits:
            memory: "768Mi"
            cpu: "1500m"
Let's check the results:
> kubectl apply -f deployment.yaml
deployment.apps/hello-world configured

> kubectl get pods
NAME                           READY   STATUS    RESTARTS   AGE
hello-world-5ff7bfb9ff-mph2v   1/1     Running   0          99s
hello-world-5ff7bfb9ff-pmkxx   1/1     Running   0          95s
hello-world-5ff7bfb9ff-xrtdx   1/1     Running   0          99s
Finally.
Exposing the deployment
Now that our app is deployed, we need to expose it to the world. We can again use the imperative route to generate our declarative yaml:
kubectl expose deployment/hello-world --port 8080 --target-port 8080 --dry-run=client -o yaml > service.yaml
Our service.yaml looks like this:
apiVersion: v1
kind: Service
metadata:
  creationTimestamp: null
  labels:
    app: hello-world
  name: hello-world
spec:
  ports:
  - port: 8080
    protocol: TCP
    targetPort: 8080
  selector:
    app: hello-world
status:
  loadBalancer: {}
Let's apply it:
> kubectl apply -f service.yaml
service/hello-world created

> kubectl get svc
NAME          TYPE        CLUSTER-IP      EXTERNAL-IP   PORT(S)    AGE
hello-world   ClusterIP   10.100.25.211   <none>        8080/TCP   2m5s
Our service is exposed with type ClusterIP, which means it is only accessible inside the cluster. We did not expose using a service type LoadBalancer. Does our Kubernetes cluster even support a service type of LoadBalancer? It is very IaaS specific. In public cloud providers such as EKS/AKS/GKE, you get it out of the box. In VMware Tanzu distributions you get several options to choose from. In a local Minikube or kind cluster, the answer is probably "nope". In other distros - YMMV.
At any case - we don't want to expose our application using an external IP address. We're not animals. We want a nice, beautiful URL.
For that, we need an to use an Ingress.
Adding an Ingress
In order to create ingresses in Kubernetes, we need an Ingress Controller .
Who installs that? There are quite a few choices available, such as NGINX, Contour, HAProxy and many others. The choice of ingress is probably a decision that should not be made solely by the development team.
In our case, let's install Contour, since it's fast and lightweight:
kubectl apply -f https://projectcontour.io/quickstart/contour.yaml
We now need to map our public or corporate DNS to point to the External IP that the ingress controller exposed. In case of Contour, we can find it with the following command:
> kubectl get svc -n projectcontour
NAMESPACE             NAME     TYPE           CLUSTER-IP       EXTERNAL-IP                                                                        PORT(S)                      AGE
tanzu-system-ingress  envoy    LoadBalancer   10.100.101.15    ab915484edcec4e5ea4b532aa8a5340c-62fc50737cb73a64.elb.eu-west-2.amazonaws.com      80:30656/TCP,443:30358/TCP   2d4h
The External IP in my case is a host name since I'm running on AWS. For other providers, you'll probably get a real IP address.
We now need to tell our corporate domain or external domain registrar to map all traffic of certain addresses to the new ingress endpoint. We can have some fun and install an External DNS service in our cluster, which would even register the URLs for us, but for now we'll keep it simple. Let's map all *.apps.odedia.org to the hostname provided by AWS. I configured my domain registrar as follows:

Finally, we can create an ingress.yaml to describe our entry point. It's kind of a pain to use imperative commands with ingress so it's better to write the yaml ourselves. Contour also has a Custom Resource Definition called HTTPProxy which makes setting up routes easier, but we'll stick to the "standard" Ingress configuration for now:
apiVersion: networking.k8s.io/v1
kind: Ingress
metadata:
  name: hello-world-ingress
  annotations:
spec:
  rules:
  - host: hello.apps.odedia.org
    http:
      paths:
      - pathType: Prefix
        path: /
        backend:
          service:
            name: hello-world
            port:
              number: 8080
We're telling the ingress that any request to hello.apps.odedia.org should be routed to the internal service hello-world that we created in the previous step.
Let's apply it:
> kubectl apply -f ingress.yaml
ingress.networking.k8s.io/hello-world-ingress created

> kubectl get ingress
NAME                  CLASS    HOSTS                   ADDRESS                                                                         PORTS   AGE
hello-world-ingress   <none>   hello.apps.odedia.org   ab915484edcec4e5ea4b532aa8a5340c-62fc50737cb73a64.elb.eu-west-2.amazonaws.com   80      8m59s
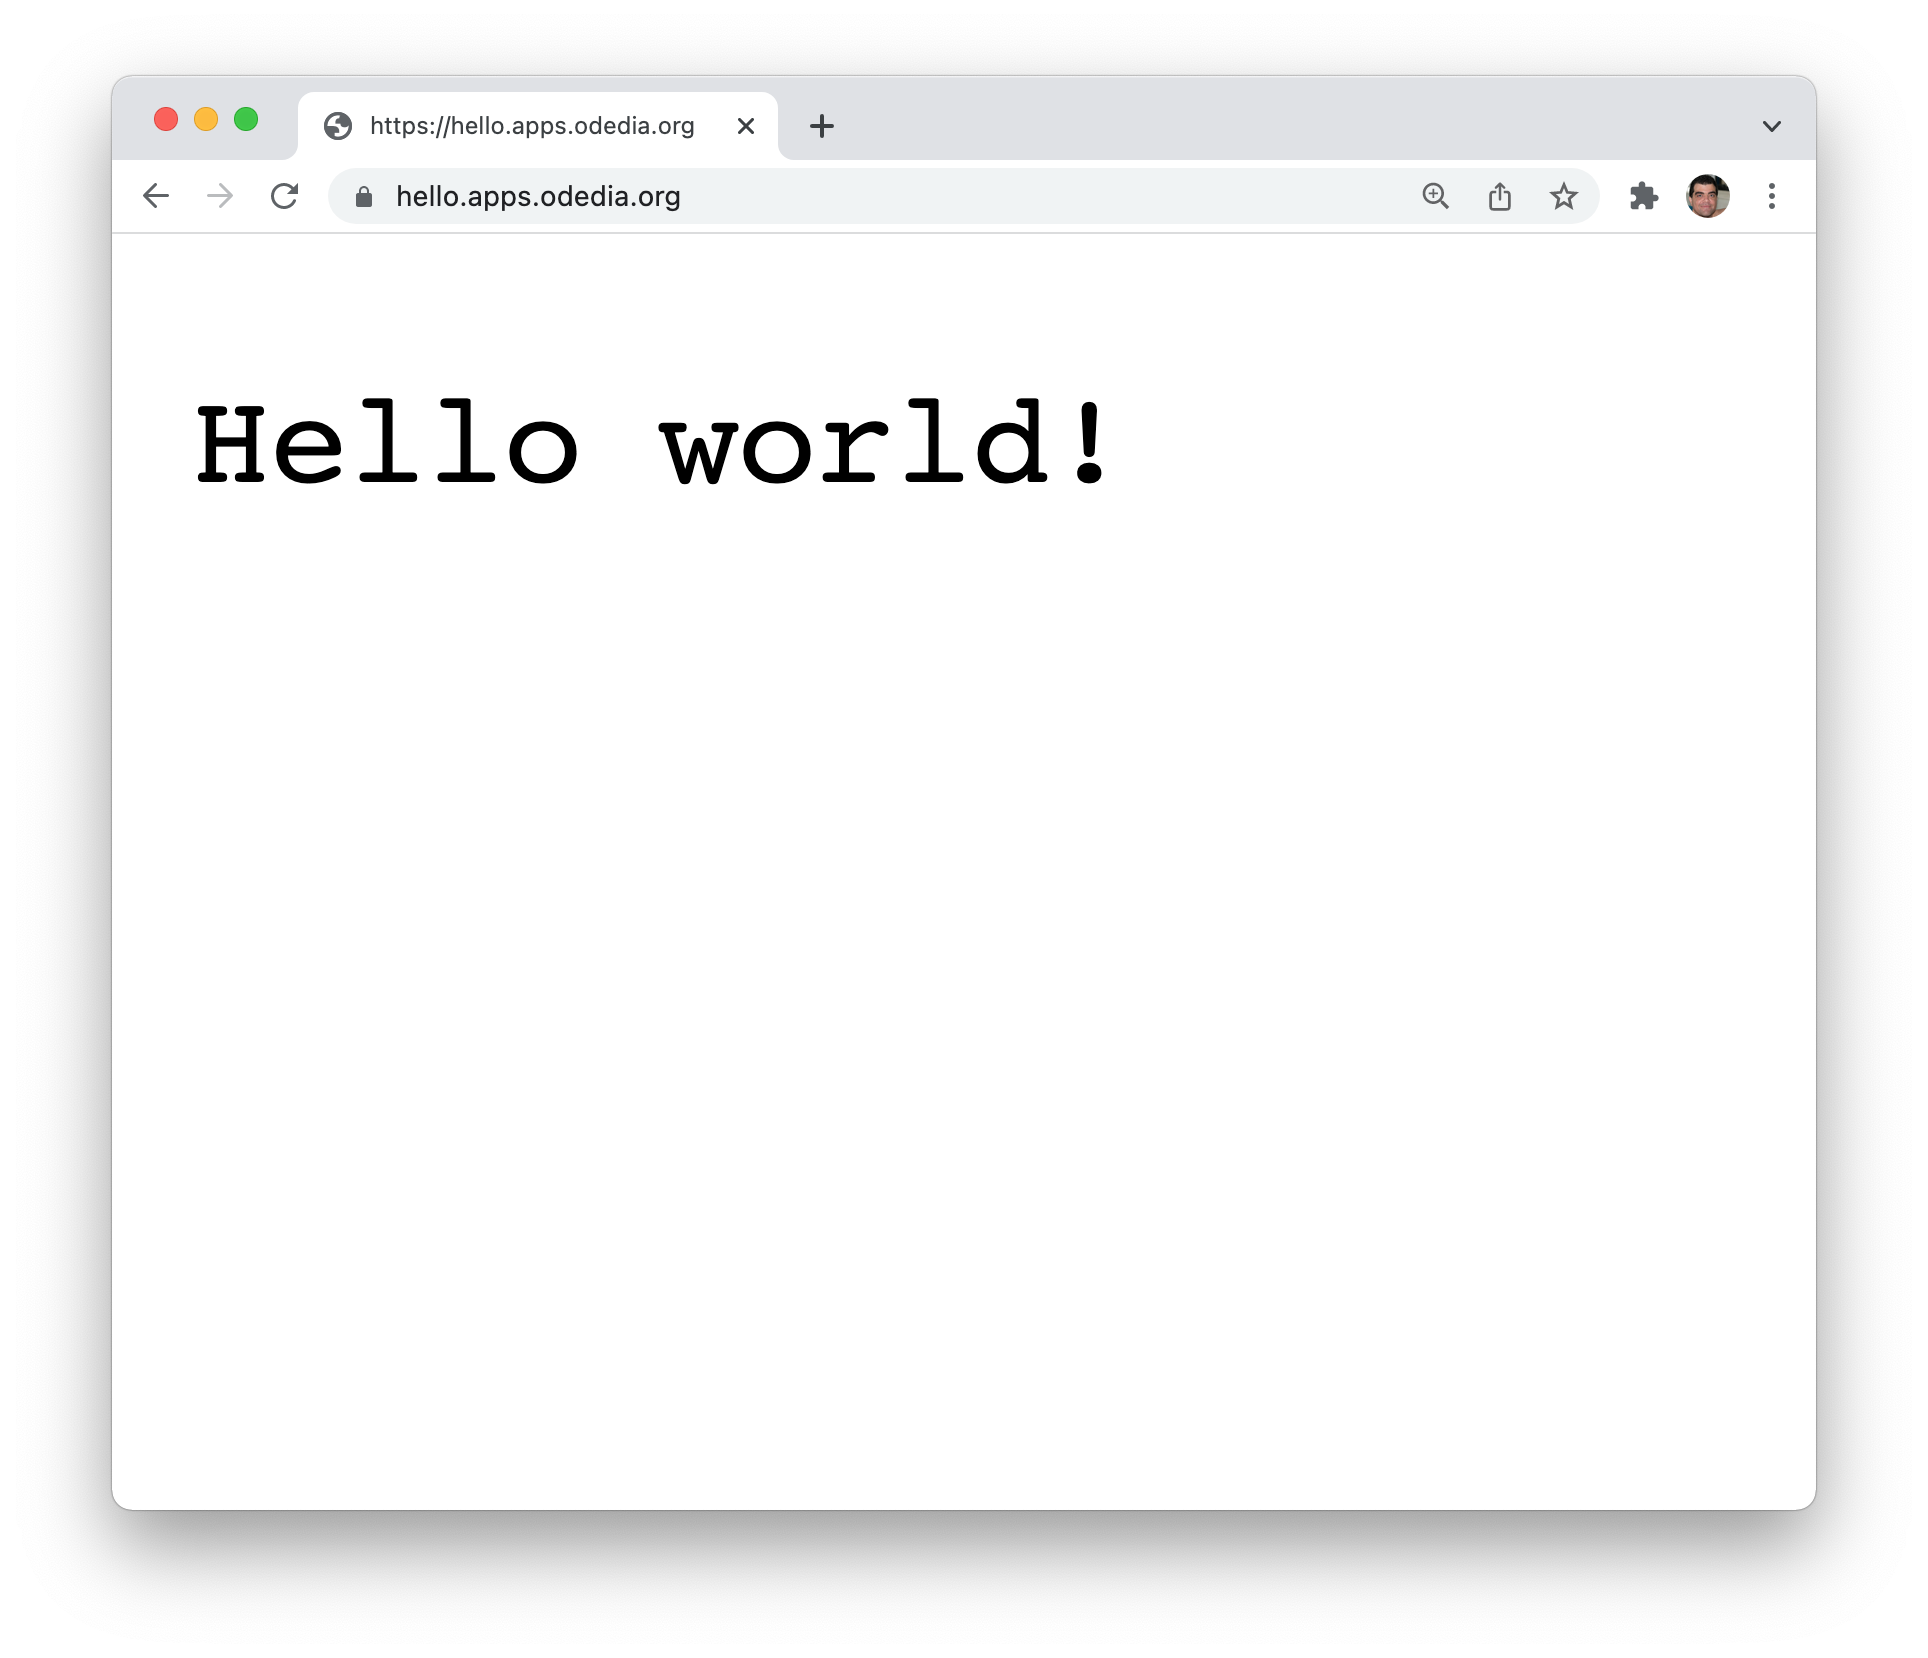
We finally have our application accessible through a web browser.

Although... I don't like this Not Secure part in the address bar. I would love to have it served as https://, since the greeting is top secret and should probably be encrypted in transit. I need to setup a TLS secret to make my application run as expected.
Creating free TLS certificates can be done via Let's Encrypt. Obtaining the certificate is beyond the scope of this article, but suffice to say that you can use anything from a TXT record in your domain registrar, to automating the process by installing cert-manager in your Kubernetes cluster.
Reality check
Remember that part in the beginning where we implemented our "Hello world" as a RestController? That was the only business logic we actually implemented so far. Everything else is just getting the plumbing to work.
Securing the ingress endpoint
Ok, so we have a signed certificate, somehow. We have our private key and public cert. Let's install it in our Kubernetes cluster:
> kubectl create secret tls hello-world-tls --cert=fullchain.pem --key=privkey.pem
secret/hello-world-tls created
We need to update our ingress with the TLS secret reference. I'm also adding an annotation to force SSL redirection:
apiVersion: networking.k8s.io/v1
kind: Ingress
metadata:
  name: hello-world-ingress
  annotations:
    ingress.kubernetes.io/force-ssl-redirect: "true"
    kubernetes.io/ingress.class: contour
spec:
  tls:
  - secretName: hello-world-tls
    hosts:
    - 'hello.apps.odedia.org'
  rules:
  - host: hello.apps.odedia.org
    http:
      paths:
      - pathType: Prefix
        path: /
        backend:
          service:
            name: hello-world
            port:
              number: 8080
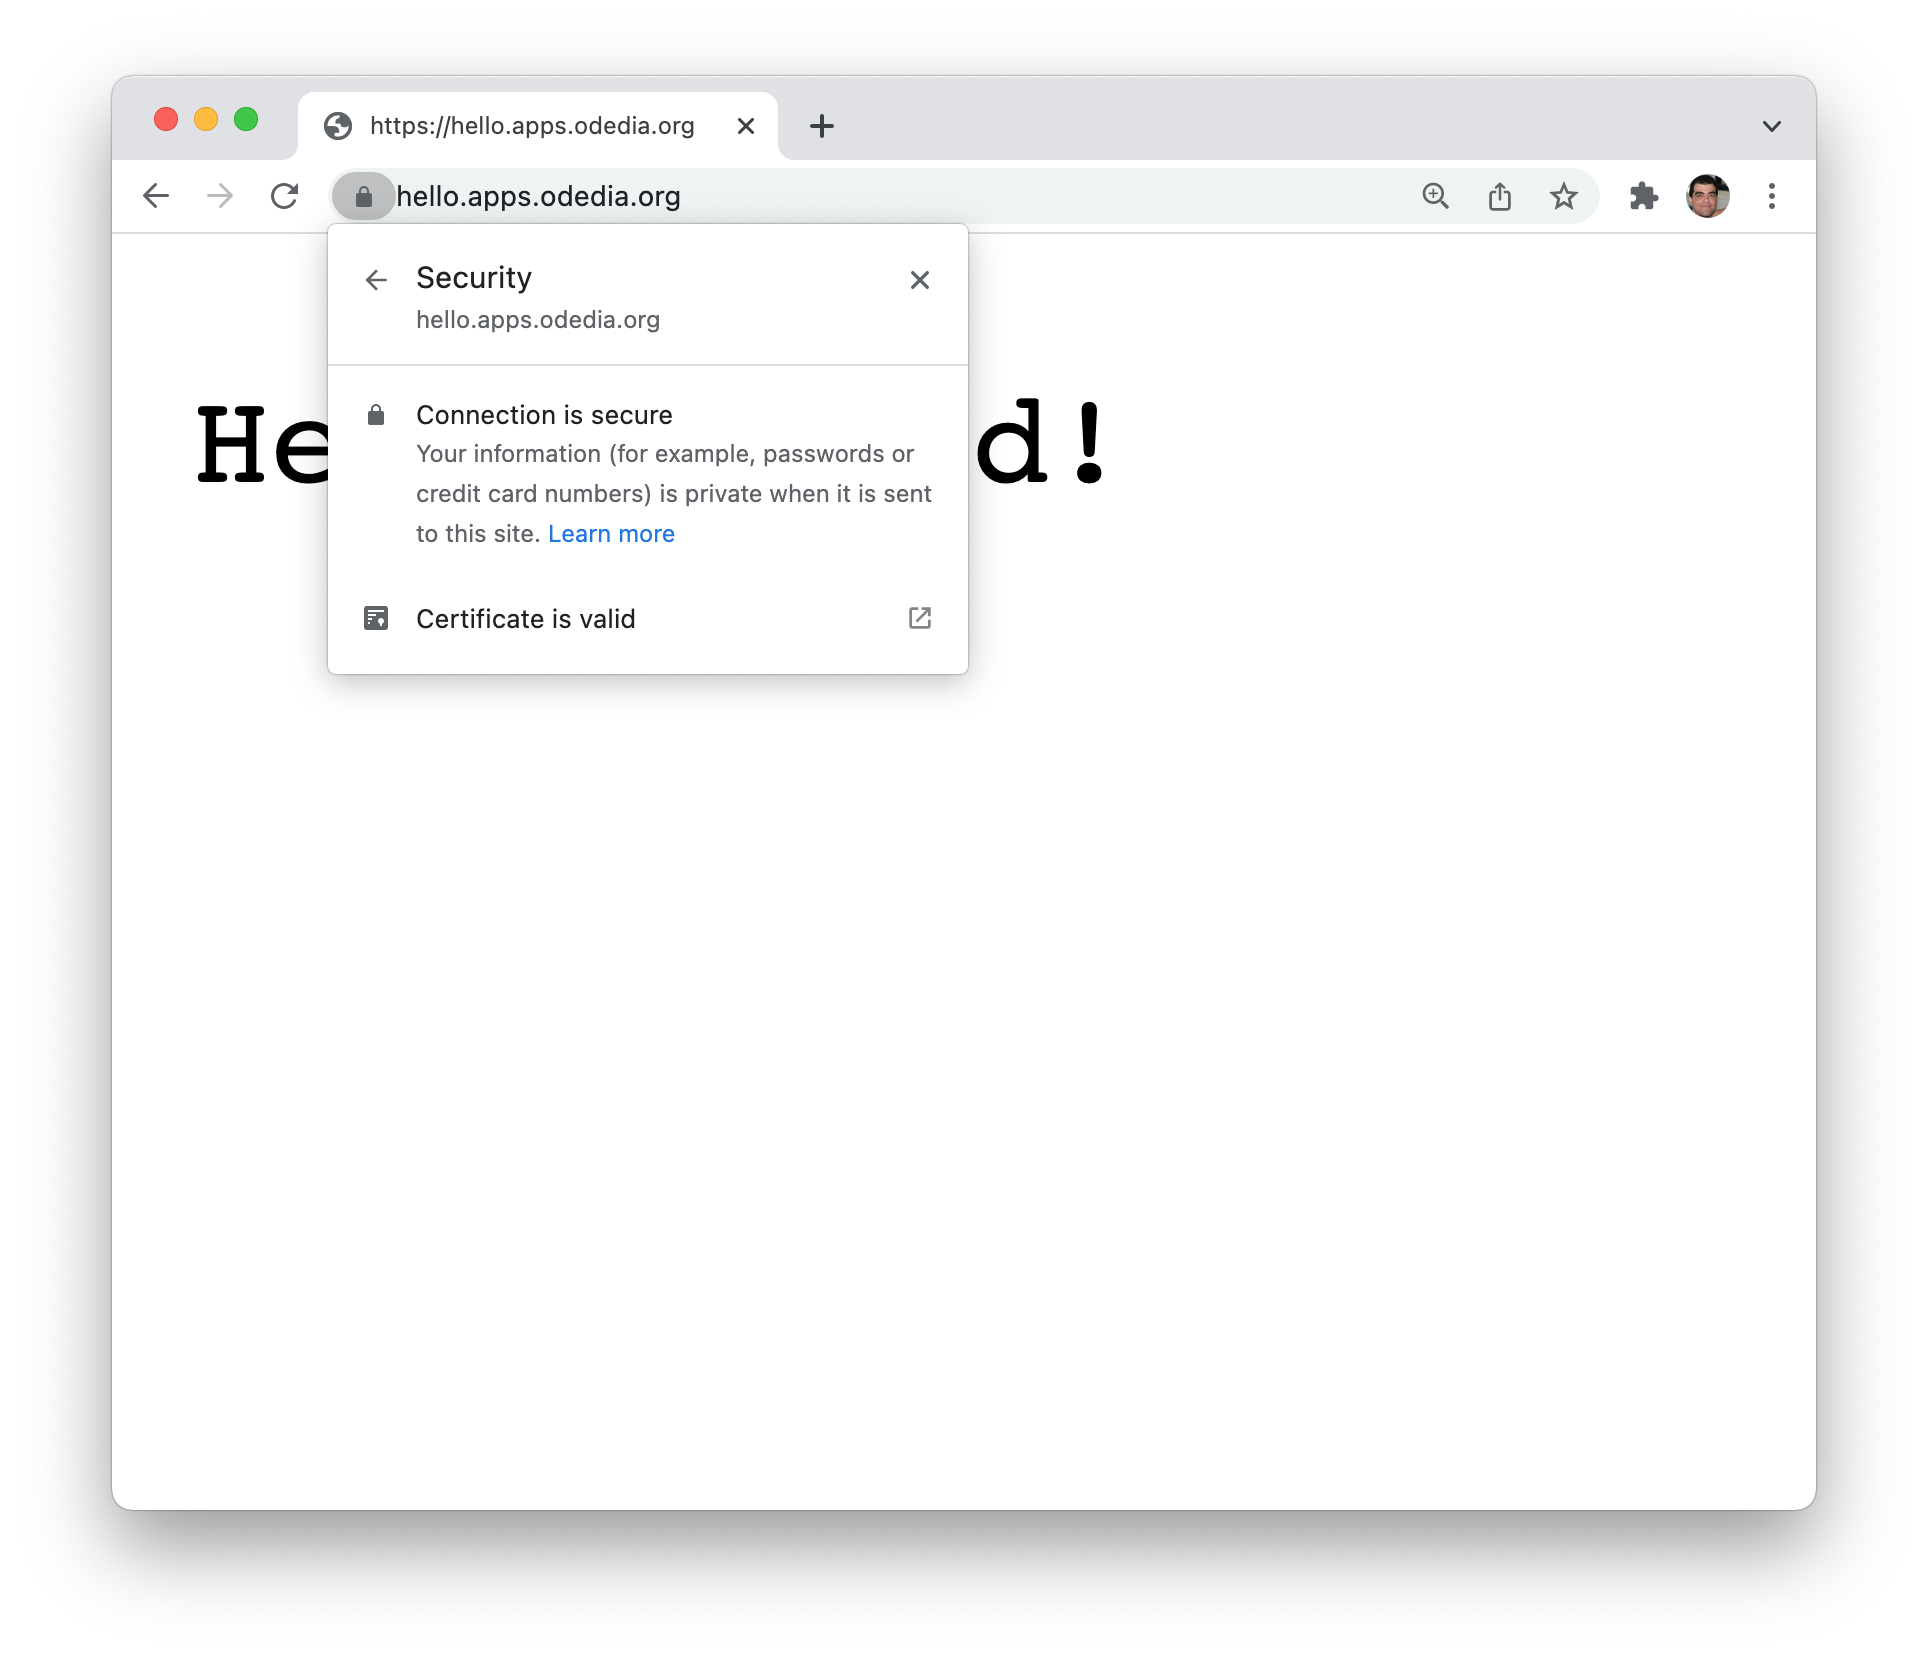
Et voilà!
Just to be sure - we can see our connection is secure.
We're just getting started
We finally did it. We deployed our application to Kubernetes. We're done!
Well, not really... Turns out that developing new features is a never-ending task. We just got a new feature request to change the greeting to "Hello, everybody!". We now need to:
- Update our code
- Build, tag and push a new image
- Update and apply the deployment yaml
Is that all?
Of course not. There are still a lot of things we need to consider. To name just a few:
- How do new deployments get triggered? Will it be on every new push to the OCI registry?
- How will you reference the new image in your deployment? You need to have some sort of process to update the image reference with the new tag or its sha256 signature (please, don't use the
latesttag ). Will you use a templating solution such as helm charts? Perhaps other solutions such asyttandkappfrom the carvel toolset? - Come to think of it, what are we going to use for CI/CD? We have Jenkins, Azure Devops, Concourse, ArgoCD, Spinnaker, Tekton and many more. Each has its advantages and disadvantages. Tools like Jenkins and Concourse seem better at the CI part, since they are stateless and are not "Kubernetes aware". Tools like ArgoCD and Spinnaker make more sense for the CD part, since they are aware of what is currently in your clusters.
- What happens when you have a sudden spike in traffic? Can your deployment autoscale? We hardly considered it with our current, simple deployment. Will it only autoscale based on CPU/Memory using a Horizontal Pod Autoscaler, or will it be based on end-user experience and latency, using solutions such as Knative?
- Our application is ridiculously simple. A real app will probably at the very least connect to a database, a cache or a message broker. How do you intend to connect to such backing services? Who installs these backing services? How will you keep the credentials to those services safe?
- How will you perform blue-green deployments? What happens if a release has bugs, do you have a rollback strategy?
- How on earth are you going to debug this thing? Your applications should probably expose a debug port when testing against a local Kubernetes cluster during inner loop development, but disable it completely in other (pre-prod/production) scenarios.
- While on the subject of inner loop - how fast can you iterate on your code changes? If you'll have to do the whole docker build-tag-push + update deployment dance for each code change, you won't get much coding done. You may be looking at tools such as Skaffold , Tilt and/or Kustomize to improve iteration times, but you're still the one who has to write the configuration.
- What is your multi-cluster strategy? Moving from dev environment, to test, to pre-prod and eventually production - each is probably a separate Kubernetes environment, perhaps on different cloud providers. How will you make sure everything is setup correctly to accept the same application (Ingress controllers, TLS certificates, service accounts, Knative(?) etc.)
- How will you monitor the application? Will you use Prometheus and Grafana? Who's responsible to operate this service? Will you use a SaaS solution instead? How will you monitor application-specific KPIs such as HTTP Requests, logging levels, app-level environment variables etc.? These are not automatically exposed at a pod level.
- Here's a good one: Who handles security patching? Imagine you have 500 microservices running in production, and suddenly a new log4j-level exploit is released. How will you patch things as quickly and safely as possible? Moreover - how will you even know that your app is vulnerable?
There's just... too many stuff. Things that must be done, but are really just "glue" to get some code out the door.
Kubernetes needs a developer platform
- Developers should develop
- They should focus on writing code, and thinking about their code logic
- They care about connecting to third party services - their database, cache layer, message broker, legacy environment etc.
- They don’t really care about infrastructure, until things stop working
- They don’t really care about SSL certs, networking and all that jazz
Obviously, this is nothing new. Many companies and open source projects are trying to solve the developer crisis on Kubernetes. There are solutions from Weaveworks , Okteko , Ambassador , Digital Ocean, Red Hat and many more.
At Pivotal (now VMware Tanzu ), our approach is somewhat unique. As the creators of Spring, we love the idea of inversion of control . That principle is what allows Spring to autoconfigure itself to your needs without you having to tell it every single little tidbit. It's often referred to as the Hollywood principle: don't call us, we'll call you. Convention over configuration is a powerful feature, because most of the time, the default established conventions are exactly what you want. Wouldn't it be great to apply the same principals to a developer platform on Kubernetes?
The fact is, we already solved many of these challenges years ago by building a beloved, production-ready, enterprise-ready Platform-as-a-Service that is trusted by many Fortune 500 organizations. Pivotal Cloud Foundry (now Tanzu Application Service) allows developers to focus on their code, just cf push their application to an automated environment, easily connect to backing services, and enjoy automatic security patching whenever the platform operator upgrades the platform to a newer version. Back in the day, our haiku was:
Here’s my code
Run it on the cloud for me
I don’t care how
I compared the benefits of using Cloud Foundry instead of Kubernetes four years ago (that's exactly four years ago).
However, the landscape in our ever-changing industry has changed quite a bit during those four years:
- Kubernetes is the new IaaS. This was thought of as the future in 2017, but in 2022, it is just the present. Any container solution that doesn't use Kubernetes is losing points. Cloud Foundry is using BOSH and runs an (excellent) container runtime called Diego. Customers want the new IaaS.
- The reality is - sometimes, we do care how. Sometimes we want to dig deeper and make changes. If our company invested in a particular solution, we want to be able to integrate it easily into our developer platform. I'd say Cloud Foundry is 80% opinionated, 20% customizable, which is mind-blowing spectacular when you agree with those opinions. However, sometimes customers want a ratio that is skewed more towards the customizable part.
- In Kubernetes - everything is Infrastructure as Code. Some aspects in the Cloud Foundry ecosystem are imperative only, such as creating a backing service with
cf create-service. This requires a bit of scripting to get a new Cloud Foundry org/space to the desired state. You also can'tcf pusha git repo - you can only push a local directory. - IDE integration is good, but not spectacular. In order to debug a container running on the platform, developers needed to setup ssh tunneling using the
cf sshcommand. - Setting up a local Cloud Foundry environment for a developer requires booting a resource-intensive virtual machine, and it lacks 1:1 parity with a full-blown Cloud Foundry installation.
- Working with multiple Cloud Foundry environments ("Foundations") is not a first-class feature. Developers basically need to login to env a,
cf push, then login to env b, andcf pushagain. The full footprint of a Cloud Foundry installation is also rather resource-intensive, reaching around 10 virtual machines for a minimal installation.
Still, nothing can compete with the magic of giving just source code to a platform, and see an application served as a secured URL at the other side of that command. The result is basically what we did in this article and much more, with just a single command - cf push.
Looking forward
At Tanzu, we're building a developer platform for Kubernetes that tries to solve all these challenges and more. Tanzu Application Platform is our modern, cloud-native, Kubernetes-native Platform as a Service. Note: TAP is currently beta, not all features described below will be available at GA.
In the past year, I've had the privilege to contribute my thoughts (and rants...) to a group of very smart people inside Tanzu from R&D and the field, in order to make Tanzu Application Platform better and more aligned with real-world customer needs.
The idea is to take the same Inversion of Control concepts we love in Spring, and apply it to a developer platform for Kubernetes.
Also, if Kubernetes is indeed the new IaaS, we should be able to install the platform on any Kubernetes. This would remove the need for things like BOSH, for example. BOSH exists because no common multi-cloud infrastructure API existed when Cloud Foundry was built, so we had to build it ourselves. Now that we have such API with Kubernetes, TAP can technically run on any Kubernetes distro - EKS, GKE, AKS, Tanzu Kubernetes Grid, vSphere with Tanzu, OpenShift, Rancher, Tanzu Community Edition on AWS/Azure/Docker, Minikube, kind etc. (Disclaimer: not all Kubernetes distros are officially certified by VMware Tanzu).
TAP relies heavily on the notion of Custom Resource Definitions. This allows it to extend the Kubernetes API with additional features that would enable developers to interact with the platform at a higher level of abstraction. A platform operator only needs to install the platform once with a simple install command on a given Kubernetes cluster. The installation would take care of cross-cutting concerns such as configuring the Ingress, installing a container runtime such as Knative, setup automatic image building, scanning and signing, setup automatic build triggers on git commit, enable autoscaling of instances based on user activity, enable application monitoring and much more. Moreover, since we're using standard Kubernetes resources here, a platform operator can take almost any of the opinionated components in the platform and replace them with something else. The operator gets to choose how much he or she wants to move that slider of 80% opinionated, 20% customizable. If I were to create a Haiku for TAP, it would probably be something like:
Here’s my code
Run it on Kubernetes for me
Although my platform operator really cares how, I just want it to work
Ok, maybe I need to work on it some more 😄. But you get the idea. You get to choose the level of exposure to the underpinnings of the platform as it fits your needs.
Here's a good example for this: TAP uses Knative as its runtime. You may decide you couldn't care less and just use the equivalent of cf push in TAP (which is tanzu apps workload create, by the way), but you may also decide you do care, and use the kn Knative cli to see what goes on with the Knative revisions under the hood. You can always just use kubectl to see the primitives themselves (Pods, ReplicaSets etc.), and TAP has a very nice UI to see all runtime resources. Also, if for some reason your organization chooses to avoid Knative, your platform operator may choose something else, such as a deployment yaml like we used in this article.
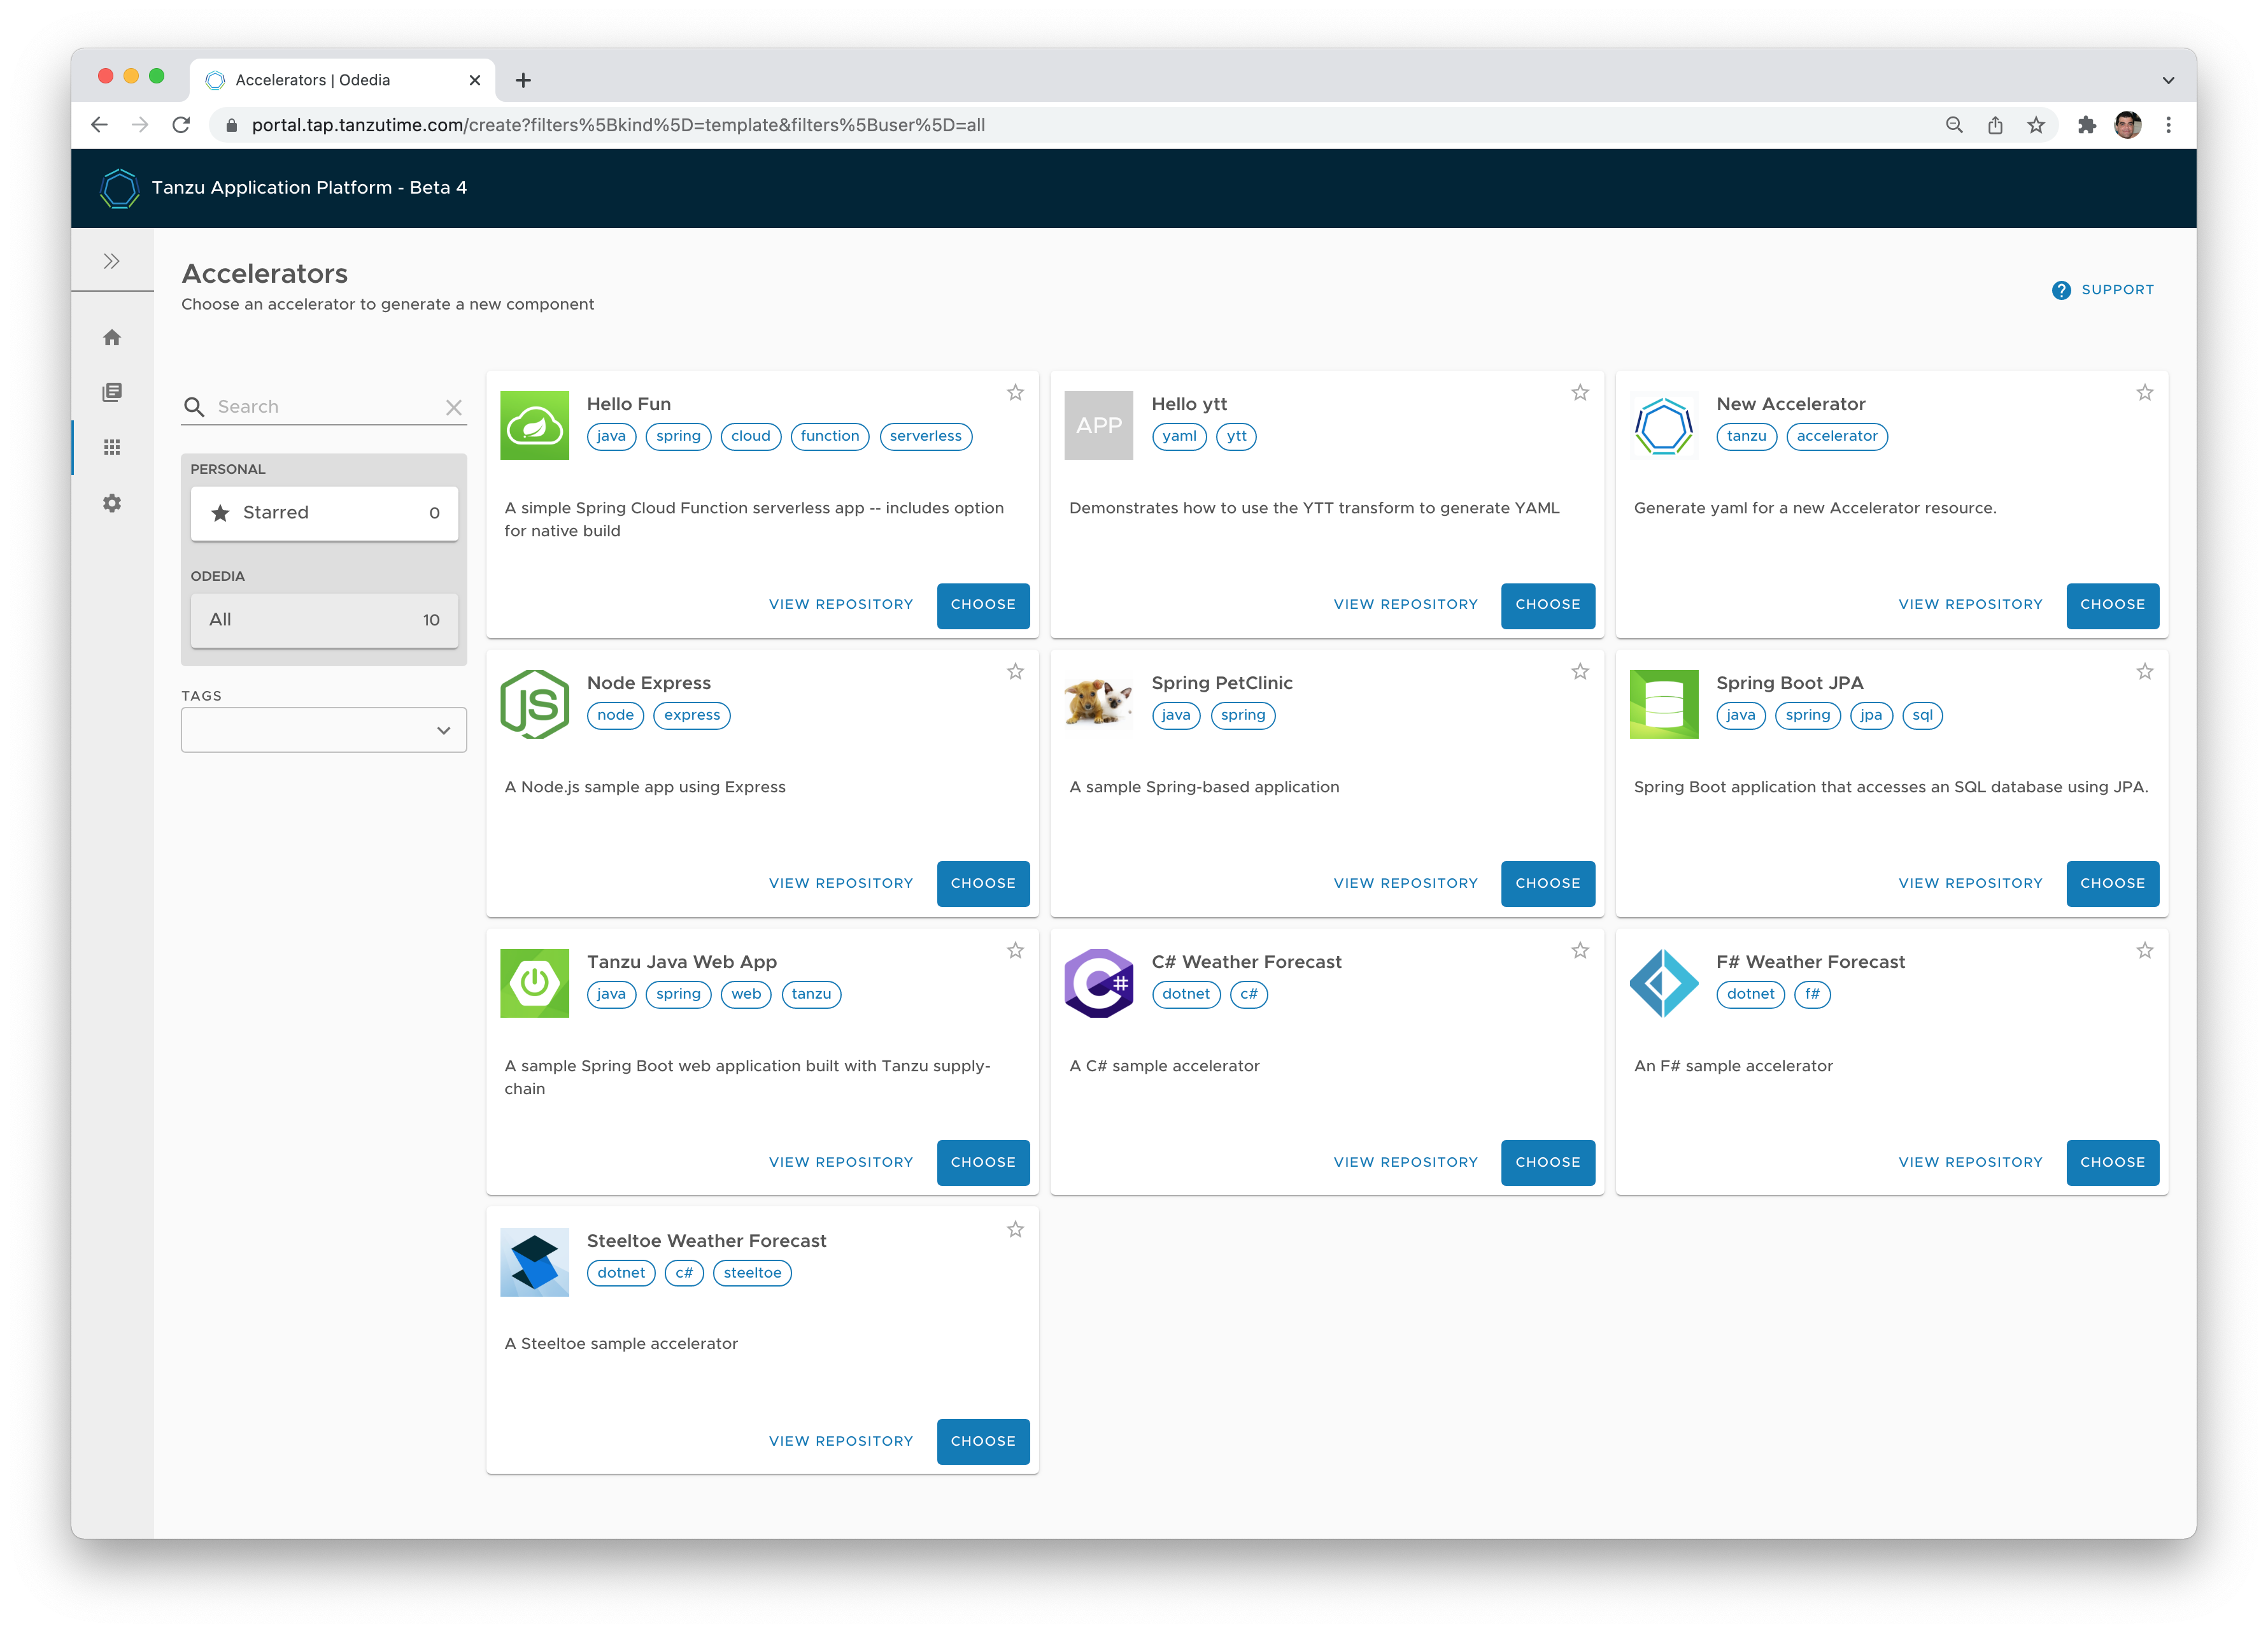
Here are some of the capabilities that TAP solves as a development platform for Kubernetes:
- Developers start with production-ready templates for their source code. An architect or project manager can expose to his team templates provided by Tanzu, or create his own, based on specific corporate requirements. You can also choose just how much customizations you want to expose to the developers. This removes a lot of overhead for "getting started", and also applies company-wide policies for what makes a good starting point for development.
- Go from source to URL in 90 seconds. That's basically everything we implemented in this article. We took all the learnings from Cloud Foundry and implemented it in a Kubernetes-native paradigm. Cloud Native Buildpacks are still the secret sauce of open source that builds our production-ready images.
- IDE integration. You can continue development against a live container running in a local or a remote Kubernetes cluster, including live updates based on any code change, and even remote debugging.
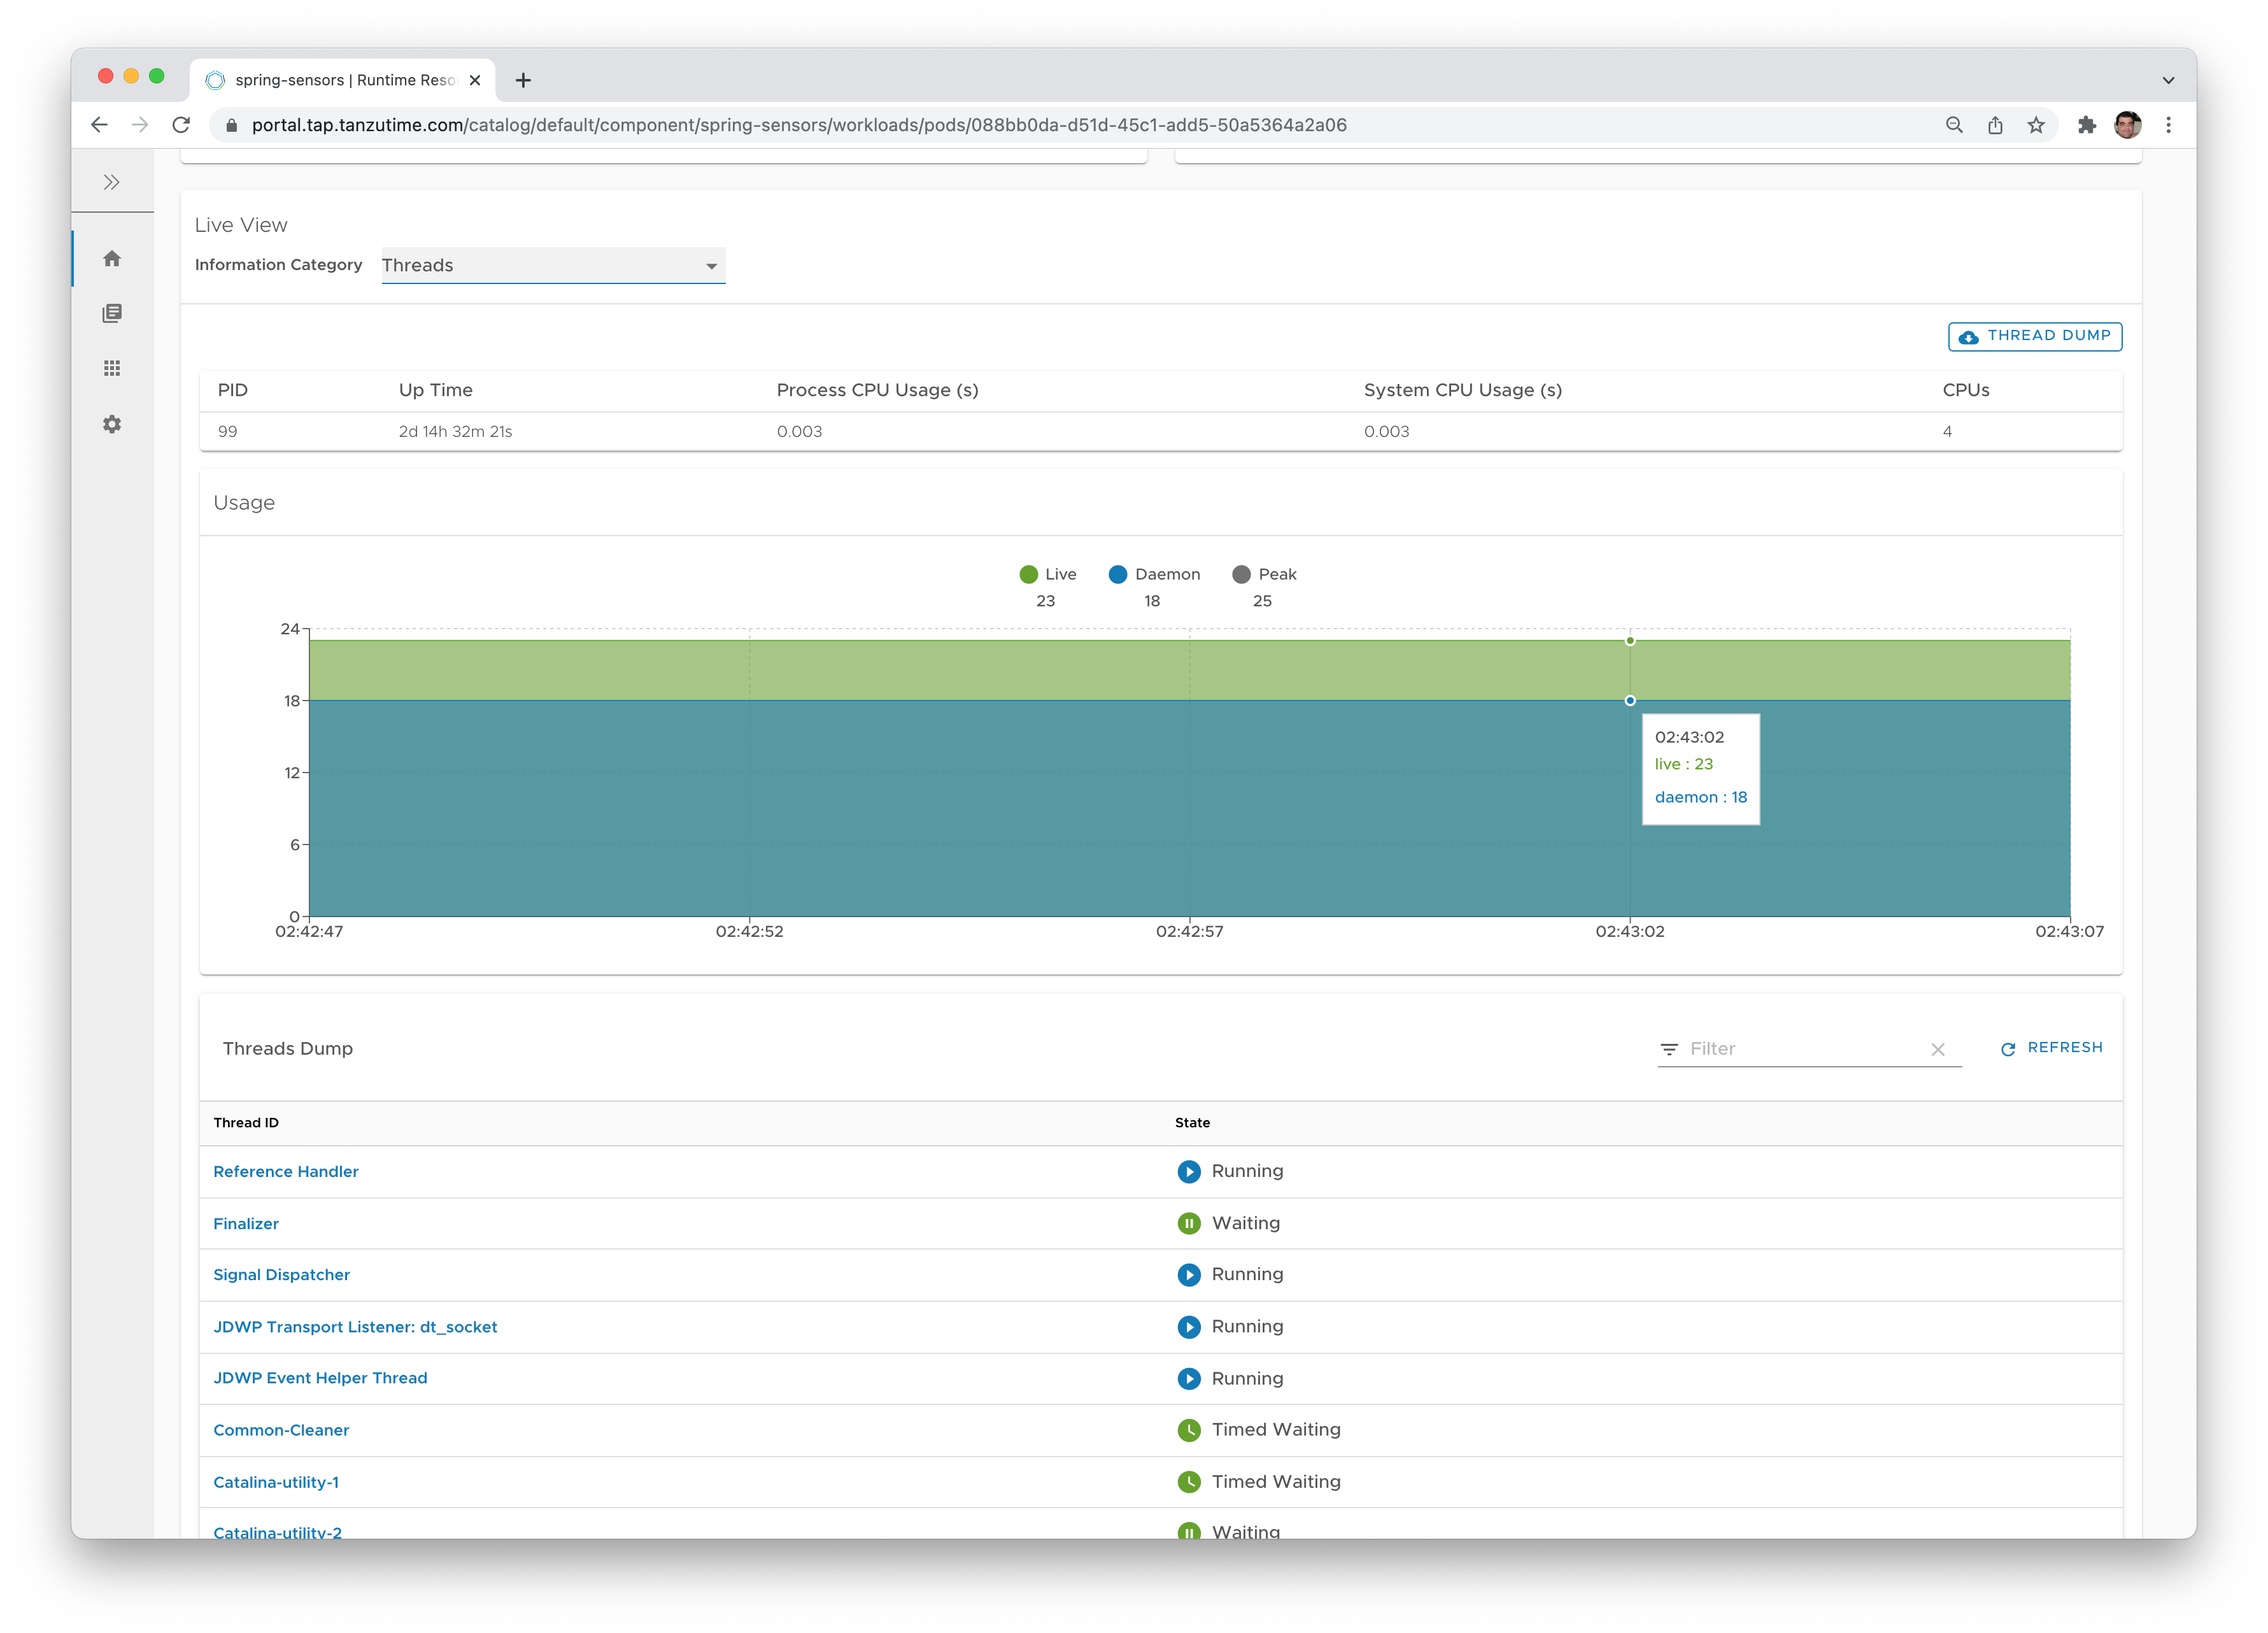
- Application-specific monitoring - HTTP requests, env variables, deployed configuration and Beans (in Spring), even change the logging level of a particular class at runtime if you want to.
- Multi-cluster support. Take an artifact from source to production, while moving the deployable artifact across different clusters.
- Image security scanning, patching and signing. Cloud Native Buildpacks will patch the OS level and the middleware. Scanning and signing will also alert you on CVEs in your own code or dependencies, and optionally block deployment to the cluster if the CVE is critical.
- The ability to perform service bindings to backing services - declare a desired access to a service such as RabbitMQ based on its name, and the platform will bind the service to your application. For some popular services, it will even auto-configure Spring to connect to the service with zero configuration. This makes your app 100% portable since no IPs or passwords are hanging around your source code (and potentially end up in your git repo by mistake).
- Service binding can also be cross-cluster. Setup a services cluster for your message brokers and databases, and a workload cluster for your apps.
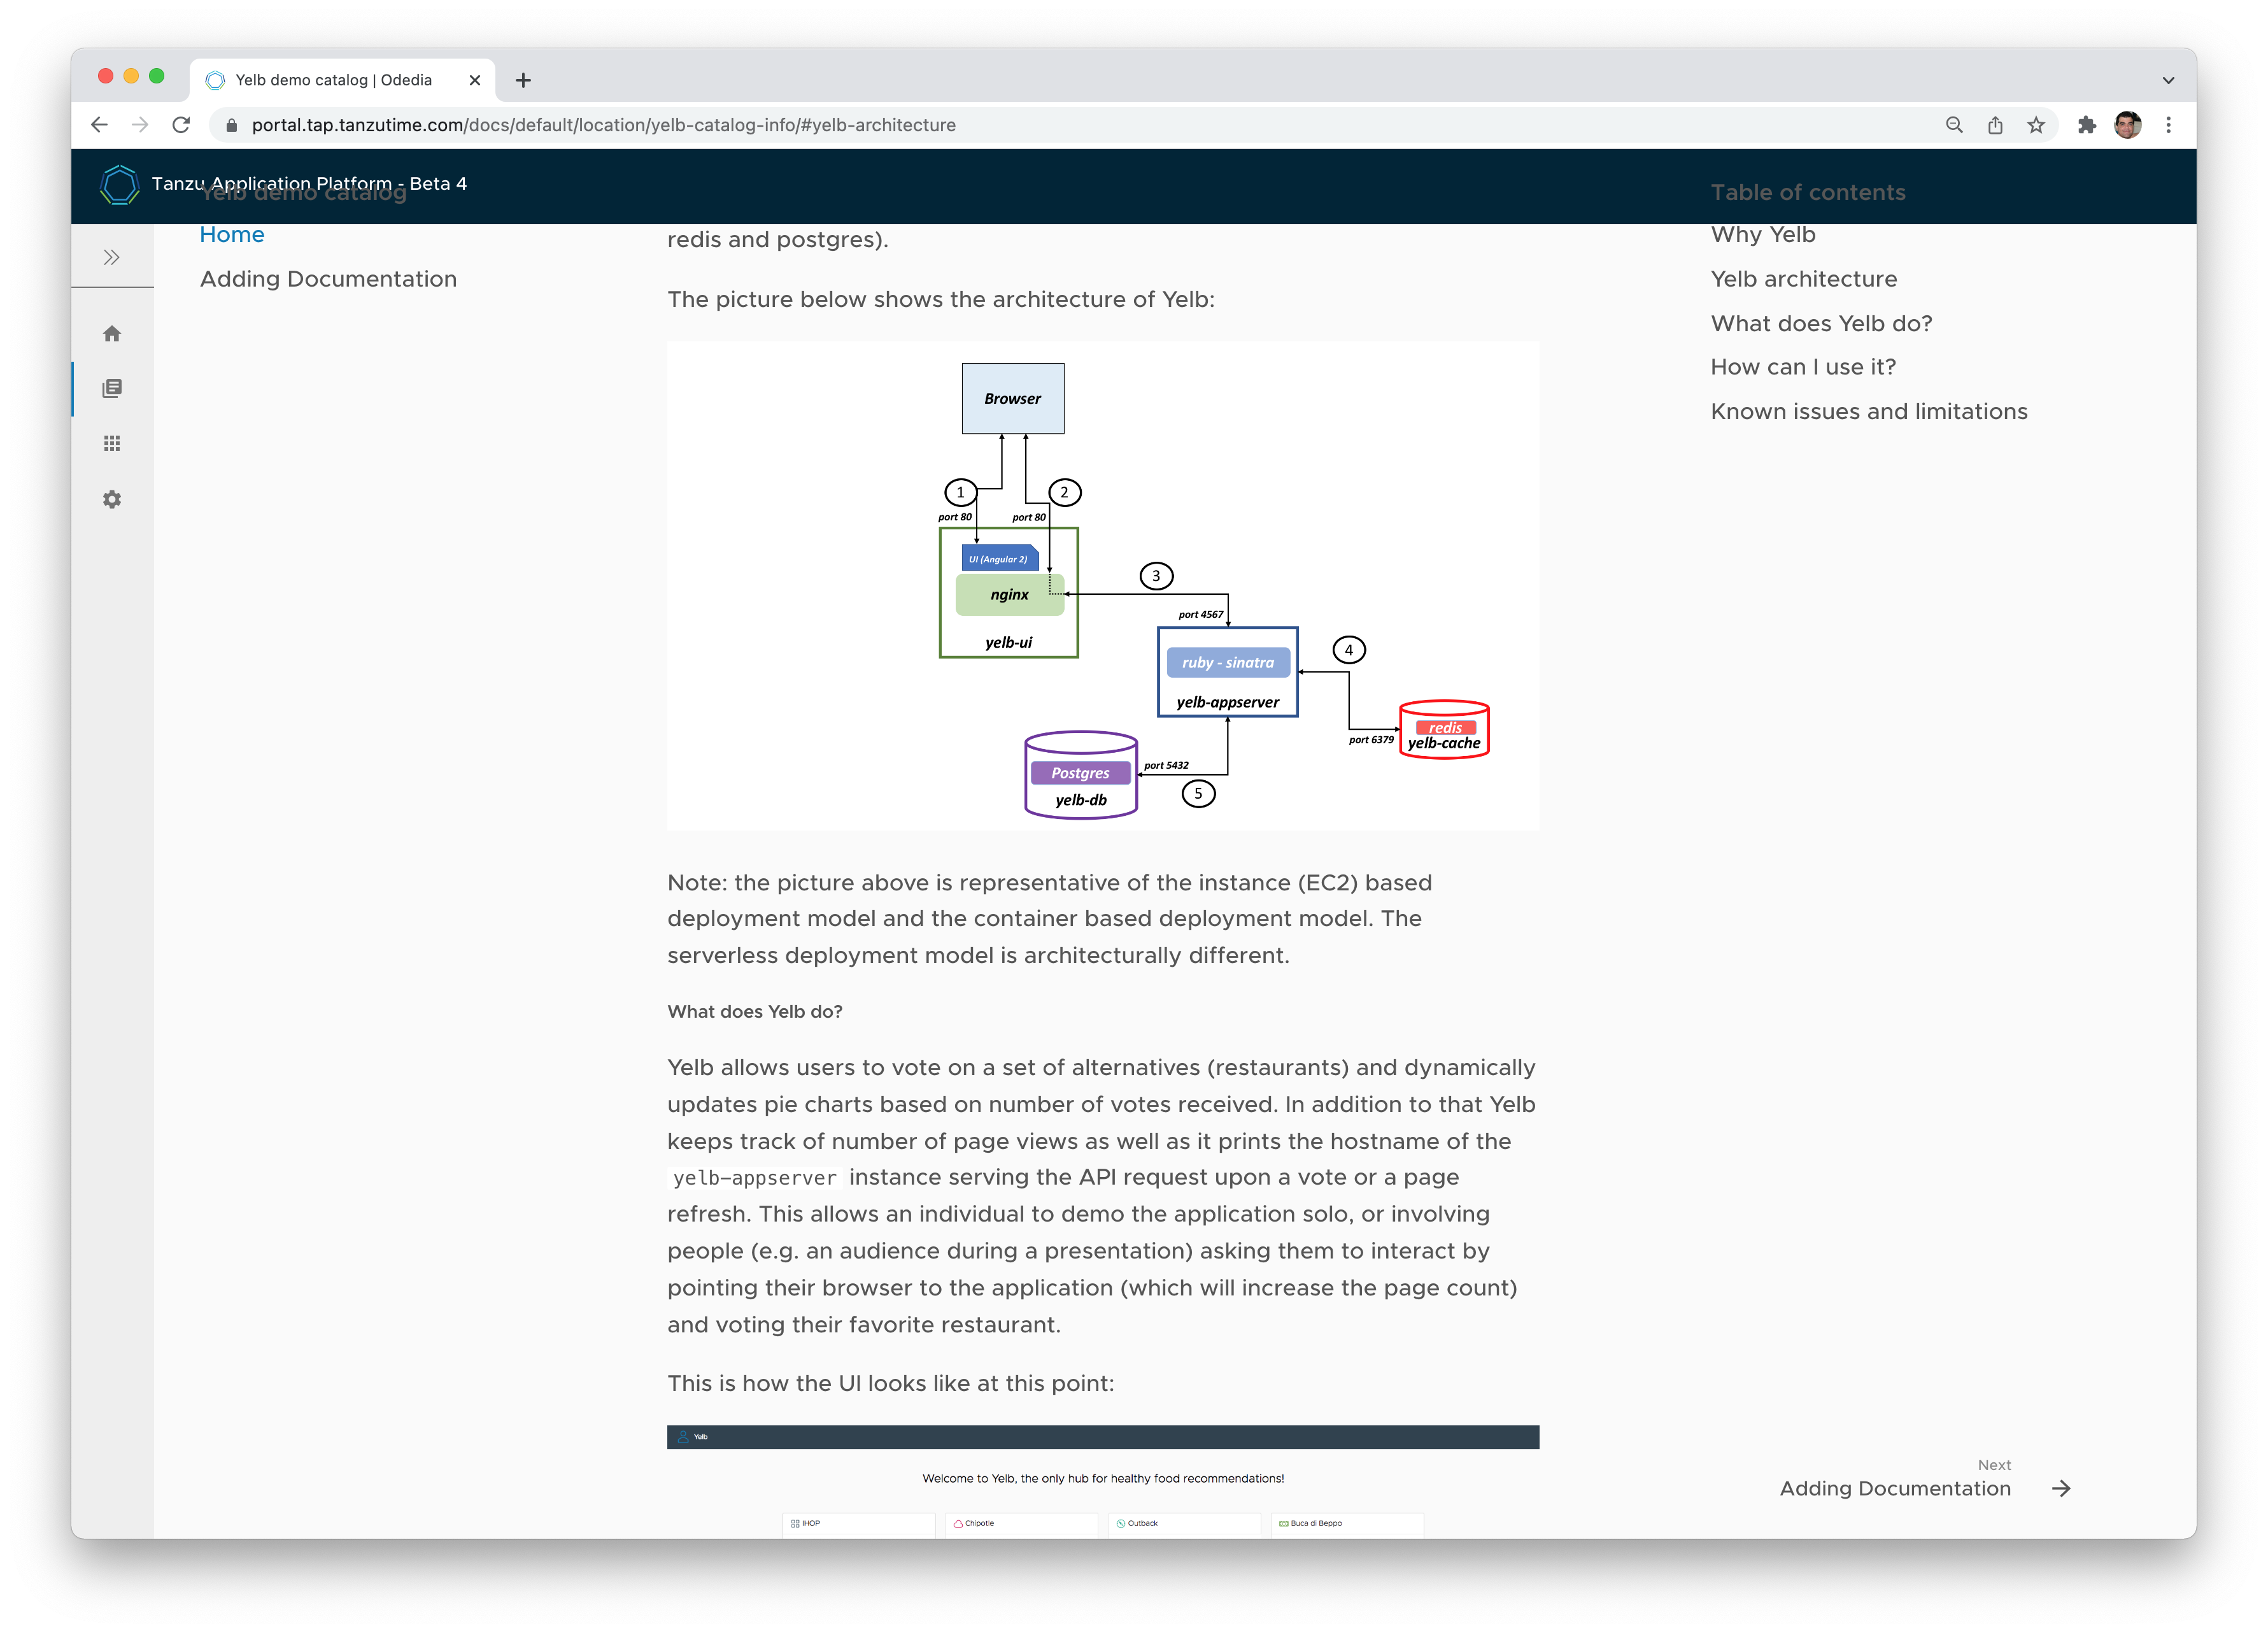
- UI dashboards that display information about your apps, their runtime state, and even allow you to write wiki-style documentation for your microservices.

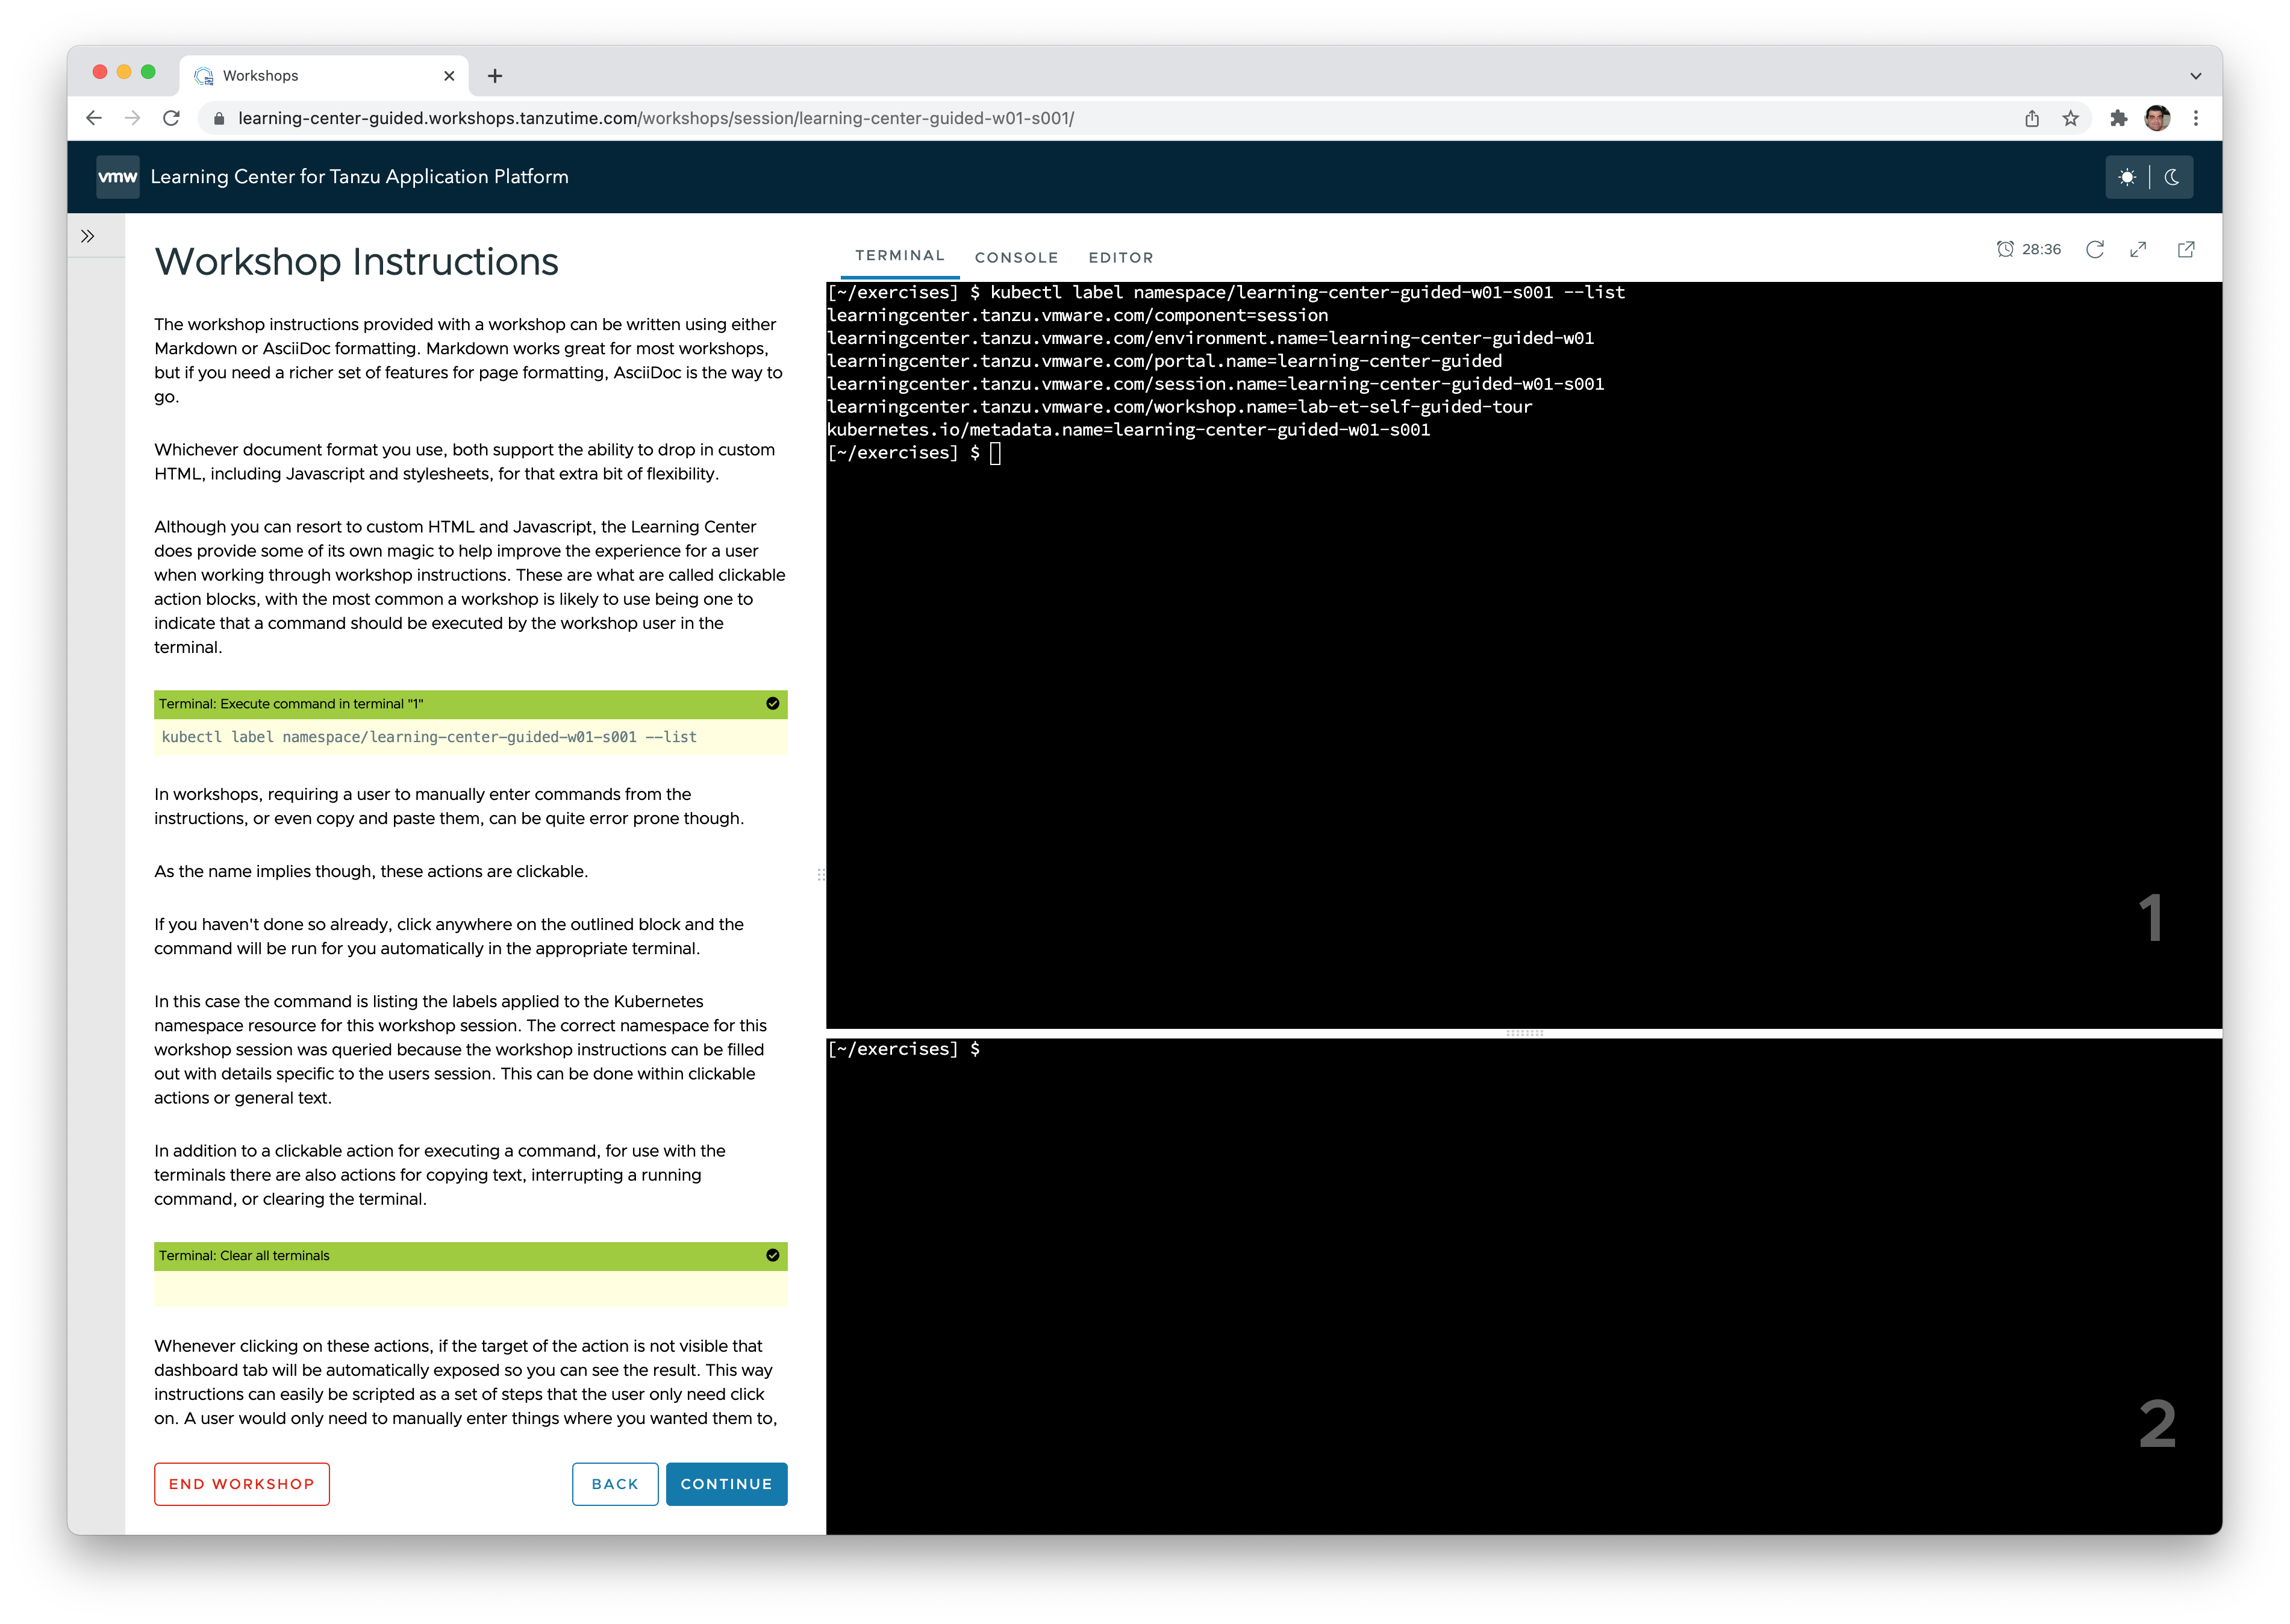
- Access to workshops developed in-house or by third parties, using a web-based workshop environment that gives every student access to a Kubernetes namespace and even web-based VSCode (Just bring a Chrome browser and an Internet connection).
I plan to create several getting started guides, tutorials and videos around TAP in the coming months, so be sure to subscribe for updates if you're interested.
Conclusion
Kubernetes was not my first choice as a developer. I always felt it is too low level for me to get things done. It seems that even the co-founder of Kubernetes agrees with this. At Spring One 2021, Craig McLuckie said that they never meant for developers to interact directly with the wall of YAML:
That is why I love Cloud Foundry so much. It allows me to focus on my code, and have the infrastructure get out of the way.
But there is a lot to be said on the benefits of using a ubiquitous infrastructure API. The benefits are massive. Vendor lock-in is basically non existent. Just use whatever fits your needs and your budget.
Creating a platform that is focused on developer productivity on Kubernetes lets you enjoy the best of both worlds. Developers can keep focusing on their code, platform operators can choose the best tech stack that matches their requirements, IT can operate low-level Kubernetes, and the security team can be alerted whenever a security issue may arise (and in many cases, automatically patch it).
Epilogue
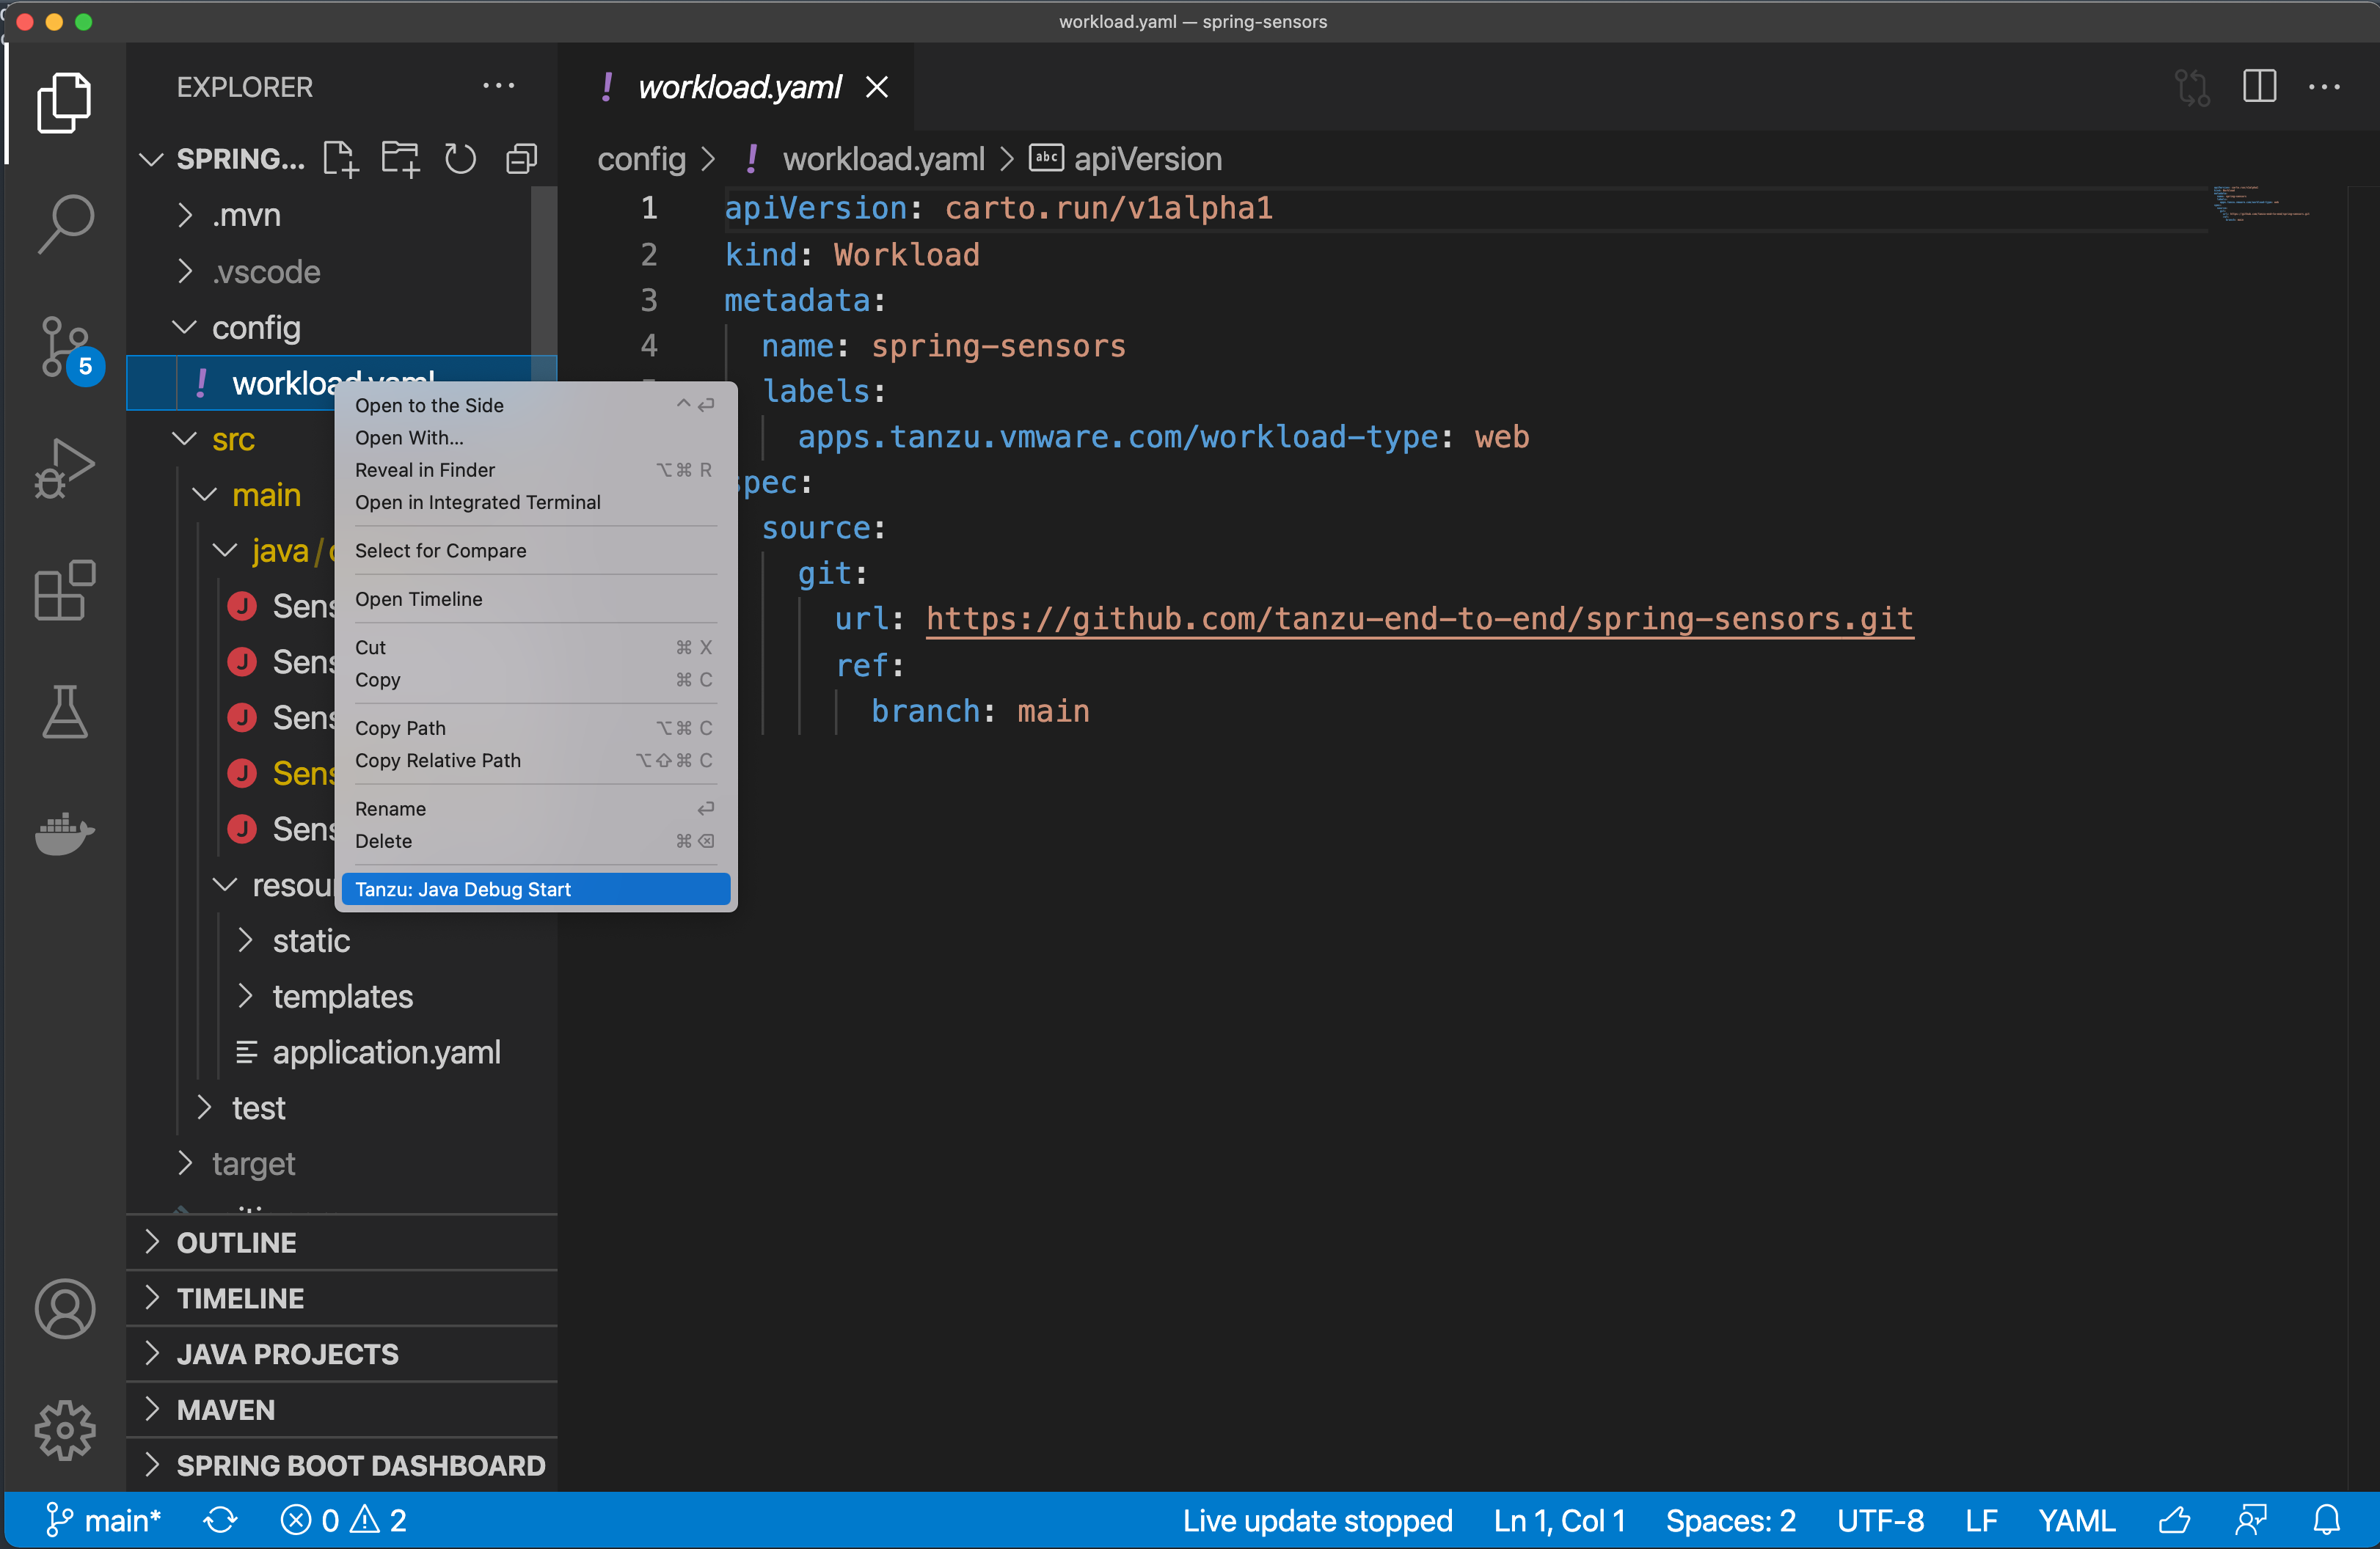
So, how would I get the same results (and much more - for example automatic autoscaling based on HTTP traffic) as our example above, using Tanzu Application Platform? Here it is (The yaml is auto-generated and it not a part of the command):
> tanzu apps workload create tanzu-java-web-app \
--git-repo https://github.com/odedia/spring-on-k8s \
--git-branch main --type web --yes

Create workload:
      1 + |---
      2 + |apiVersion: carto.run/v1alpha1
      3 + |kind: Workload
      4 + |metadata:
      5 + |  labels:
      6 + |    apps.tanzu.vmware.com/workload-type: web
      7 + |  name: tanzu-java-web-app
      8 + |  namespace: default
      9 + |spec:
     10 + |  source:
     11 + |    git:
     12 + |      ref:
     13 + |        branch: main
     14 + |      url: https://github.com/odedia/spring-on-k8s

Created workload "tanzu-java-web-app"
To get the URL, just ask for it:
> tanzu apps workload get tanzu-java-web-app
# tanzu-java-web-app: Ready
---
lastTransitionTime: "2022-01-01T01:56:14Z"
message: ""
reason: Ready
status: "True"
type: Ready

Workload pods
NAME                                                   STATE       AGE
tanzu-java-web-app-00002-deployment-6f4cd7cb8c-w9shd   Running     66s
tanzu-java-web-app-build-1-build-pod                   Succeeded   2m16s
tanzu-java-web-app-config-writer-6wllp-pod             Succeeded   92s

Workload Knative Services
NAME                 READY     URL
tanzu-java-web-app   Ready   http://tanzu-java-web-app-default.apps.odedia.org
For more information on Tanzu Application Platform, check out the download page and the docs.
Special thanks to Thomas Risberg, Timo Salm and Lekha Pillai for providing feedback on this article