Event-Driven for the Enterprise: Spring Cloud Stream, Spring Cloud Data Flow and Project Riff

Hi there! I’m Oded.
I work for VMware Tanzu as a Senior Lead Solutions Engineer, spreading the message of cloud native development, cloud native platforms on Kubernetes and app transformation.
I helped design large-scale, cloud-native solutions using the microservices architecture running on Pivotal Cloud Foundry and Kubernetes, using Spring Boot and Spring Cloud.
I’m highly skilled in Kubernetes, Java, Spring Boot, Spring Cloud, Apache Kafka, Event Sourcing and DevOps practices.
I enjoy photography, video editing, and the music of the King of Pop.
The Java Messaging Service (JMS) has been around since 2001. The idea was was simple: separate consumers from producers by introducing a message broker between them. Producers write to a queue or a topic, and consumers subscribe to that queue or topic. The producers and the consumers would thereby be decoupled from each other.
While JMS was great for its time, new technologies provided better performance and new features. Like Java EE itself, the JMS specification simply didn’t keep up. Just like Spring and Spring Boot gradually became the de-facto “standard” for writing enterprise Java applications, message broker technologies evolved as well.
There are two dominant players in this space today: RabbitMQ, and Apache Kafka.
RabbitMQ
RabbitMQ is a message broker that originally implemented the AMQP specification, and has since evolved on its own. Neither AMQP nor RabbitMQ specification conform to the JMS API, although some basic compatibility is supported.
RabbitMQ provides a different model for publishing messages, using the concept of exchange topics. While JMS producers write messages to a JMS queue directly, RabbitMQ producers write them indirectly to an exchange topic. From there it can be routed to a specific queue if needed. This provides an additional layer of abstraction for dealing with routing at the message broker level itself.
Other benefits are improved performance, and client implementations in multiple languages.
Apache Kafka
Apache Kafka is a complete rethinking of what a message broker should be. If JMS and RabbitMQ thought of the message broker as a temporary placeholder for message queueing, Kafka considers itself as a full-blown, persistent event store — a database, if you will. The immediate differentiator is that with Kafka — messages are not deleted. They are still available if a new consumer comes along. A retention policy allows you to cleanup messages after a certain time, but this timeframe can be weeks, months or even years, based on your capacity and requirements.
The concept of queues does not exist with Apache Kafka — you only have topics. The consumers can act as a single consumer group — which results in a queue-like behaviour, but that’s all managed on the client side.
As a side effect — clients are able to “go back in time” and replay old messages if needed. A new consumer group can read messages from the first available message.
Matt Stine recently provided a good analogy of a classic message broker compared to Apache Kafka:
The Need for Abstraction
All these advances in message broker technologies are great, and I didn’t even mention proprietary solutions from cloud providers such as Amazon Simple Queue Service (SQS) or Azure Service Bus.
However, JMS still had one advantage that got lost during this transition: Portability.
Granted, the JMS specification (and the Java EE spec in general) was never pure plug-and-play as it promised to be. Switching between Java EE providers was not an easy task. A Java EE veteran like myself vividly remembers an attempt to migrate from Bea Weblogic to IBM WebSphere, and it was not for the faint of heart. However, we at least had some basic API compatibility to work with. What do you do with 2 or 3 message brokers that were never written with portability or compatibility in mind?
In this article, I’ll review 3 solutions that try to provide abstraction layers on top of message brokers, for different purposes. These solutions are: Spring Cloud Stream, Spring Cloud Data Flow and Project Riff.
Spring Cloud Stream
Spring Cloud Stream builds on top of concepts and development done for earlier Spring frameworks, such as Spring Messaging and Spring Integration.
The idea behind Cloud Stream is a very typical Spring concept: Talk to me in abstractions, I’ll figure out the implementation details at runtime based on configuration and dependency management. Think of it as Inversion of Control for message brokers: You do not instantiate the message broker client, Spring Cloud Stream handles the specific client interaction for you at runtime.
Spring Cloud Stream supports Apache Kafka and RabbitMQ. A Redis implementation was deprecated early on, but I suspect it might make a return in the future thanks to Redis 5’s new Streams feature.
Cloud Stream uses the concept of Message Channels.
- Your code talks to these abstract channels, which represent an input or an output.
- You specify a dependency on a specific message broker — either
spring-cloud-starter-stream-kafka or spring-cloud-starter-stream-rabbit. - You provide configuration properties that defines what these abstract channels actually translate to at runtime — which topic/queue should messages go to? What is the ip and port of the message broker?
Let’s take a simple example (code can be found as part of my spring cloud demo). We will expose a REST endpoint that sends a message to an output channel:
What did we do here?
- We autowired a MessageChannel that is marked as an @Output Channel (line 6).
There are two channels in Spring Cloud Stream that you get out of the box, but you can easily create your own. The built-in input channel is called a Sink. The built-in output channel is called a Source. - We send a message to the channel (line 15).
Oh , and by the way — you read it correctly, the output channel is called… source 🤨. Confusing? I think so, especially for first-timers.
Quick tip: when you start working with Spring Cloud Stream, simply define your own channels to make them more meaningful. It’s very easy to do, here’s a definition of MyBeerOutput.output, which is more clear to me than Source.output:
The last piece of code is to enable binding to the channel, so Spring will know that this is something that should be auto-configured at runtime:
Ok, so we reviewed what we did in the code. But more importantly, what did we not do?
- We did not tell Spring Cloud Stream what message broker we are going to use.
- We did not define the actual name of the queue/topic to send the message to.
- We did not import any client libraries for any message broker — if you’ll take a look at the imports, you’ll only see them belonging to Spring Cloud Stream and Spring Messaging:
So, what’s left? dependency management and configuration, ofcourse.
Add a dependency to the pom.xml — spring-cloud-starter-stream-kafka if you use Kafka, spring-cloud-starter-stream-rabbit if you use RabbitMQ.
<dependency>
    <groupId>org.springframework.cloud</groupId>
    <artifactId>spring-cloud-starter-stream-kafka</artifactId>
</dependency>
Then, in your properties file, configure the channel’s target in the configuration. Something like this for RabbitMQ:
Or this for Apache Kafka:
We moved all our implementation concerns to dependency management and configuration. The code is completely portable. This is not just some theoretical promise — I once actually moved from RabbitMQ to Apache Kafka after the project was complete. It required zero code changes.
We just saw an example of the producer. To complete the picture, let’s have a look at the consumer-side, which is a different Spring Cloud Stream application:
In this code:
- We define a @StreamListener that targets our abstract input channel. In Spring Cloud Stream, the default input channel is called a Sink. Like before, you can define your own custom input channel.
- We execute the method that is annotated as @StreamListener by saving the message to a database. The payload is passed as an argument to the method.
- We @EnableBinding to the Sink input to have Spring Cloud Stream autoconfigure the channel for us, based on configuration.
- Like before — we did not define any specific message broker topics and did not import any specific kafka or rabbitmq clients — that is managed by the framework.
Note: Besides a Source and a Sink, Cloud Stream also supports the concept of a Processor. A processor accepts a source, performs an operation on it, and sends it to a Sink. So it’s both a Source and a Sink. We’ll see it in more detail in the next section.
All that is left is to add the proper dependency to pom.xml like before, and configure the properties as needed.
Here’s a configuration for Kafka:
And here’s a configuration for RabbitMQ:
Notice how we now configure the channel that’s called “input” (spring.cloud.stream.bindings.input.destination), while before we configured the channel called output (spring.cloud.stream.bindings.output.destination). These correlate to the names of the channels we configured in the code itself (Source.output = “output” and Sink.input = “input”).
Having an abstraction layer for two or more message brokers can be a challenging task. You face the risk of aiming for the lowest common denominator. A good example for that are recent features like Kafka Streams or KSQL. A specific message broker may choose to go down one route that has no feature parity on the other message broker, so the abstraction layer might be impacted. Spring Cloud Stream does provide support for KStreams and gives total configuration access to the underlying frameworks, but the further you go down an implementation detail, you’re more likely to be coupled to that implementation — and then the whole point of Cloud Stream might be lost. So, keep in mind that you gain a lot of portability but also potentially lose some customisation opportunities, as is the case with any abstraction.
Spring Cloud Data Flow
So, Cloud Stream is great, but messaging applications are rarely single-app solutions — Even our own little demo above required two. You still have to design the entire end-to-end flow yourself. What happens when your flow consists of 10 or 20 apps? How do you monitor that? How do you define best practices? Surely you’re not the first developer to receive an event from some FTP server and write to a database, right?
More importantly, how would you visualise the entire pipeline so your managers will know what the heck you’re working on all day? 😉
That’s where Spring Cloud Data Flow comes in.
Instead of focusing on the single app and reinvent the wheel every time, SCDF lets you design the entire flow and reuse pre-defined components if those fit your needs. Of course, you can always write your own components.
As an added benefit, SCDF gives you a bird’s eye view of your messaging pipeline with a useful UI dashboard.
Lastly — you get the ability to deploy the entire pipeline to a variety of cloud environments, such as Cloud Foundry, Kubernetes or Apache Mesos. For our demo, we’ll use a local server of SCDF.
Note:Pivotal Cloud Foundry includes an Ops Manager tile that your ops team can install to support Spring Cloud Data Flow (installation instructions are available here).
To run a local SCDF server, download the docker-compose yaml file with this command:
curl -O https://raw.githubusercontent.com/spring-cloud/spring-cloud-dataflow/v1.5.0.RELEASE/spring-cloud-dataflow-server-local/docker-compose.yml
Then startup the docker-compose with this command (you need to have docker installed locally):
DATAFLOW_VERSION=1.5.0.RELEASE docker-compose up
You can see that docker started 3 containers: the dataflow server, apache kafka and zookeeper (which is required by kafka)

We already see one differentiator here — SCDF provides an opinionated view on the message broker to use, and it even spins one up for you if you wish. You can change the default from Kafka to RabbitMQ by manipulating the docker-compose.yml file, but we’ll use the default for now.
Navigate to the dataflow dashboard which runs on http://localhost:9393/dashboard. You are introduced to a list of available SCDF apps:
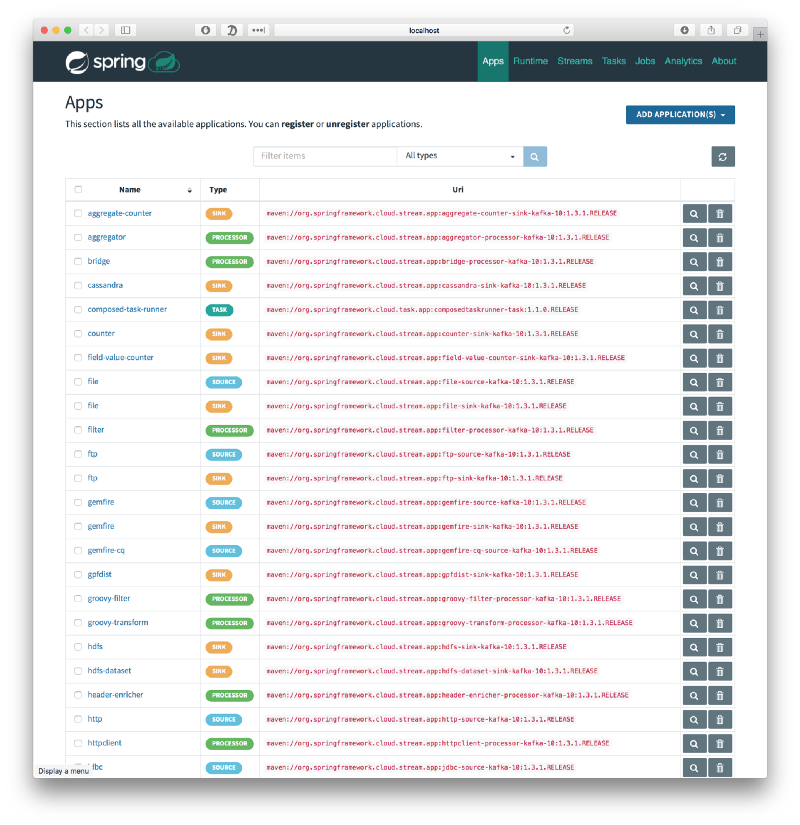
The options are too many to list. You have the ability to read or write to/from file systems, stdout or s3; read or write to/from http or JDBC endpoints, apply transformations, and many other options.
These are all building blocks that you can use when you create your pipeline. The building blocks are categorised into — surprise surprise — Source, Sink and Processor. So as you might have already guessed — SCDF uses Spring Cloud Stream behind the scenes to create the pipeline.
Note: SCDF also allows you to execute Spring Cloud Tasks — cloud-native, short-lived apps. Think of it as Spring Batch for cloud environments. These processes start up, execute, and gracefully shutdown after the task is complete. We won’t talk about Spring Cloud Task in this article, for more details please review the documentation.
So, how do we create a pipeline in SCDF? Well, let’s try to create one in the UI (a command line tool is also available). SCDF has a nice domain specific language (DSL), but the easiest way to learn the language is to play with the UI and see the DSL being generated at the top of the page.
Go to the Streams tab and start dragging out an http source, a transform processor and a log sink, and connect the 3 components:
Double click the transform processor, and click the little configuration icon to list the available properties for this processor:
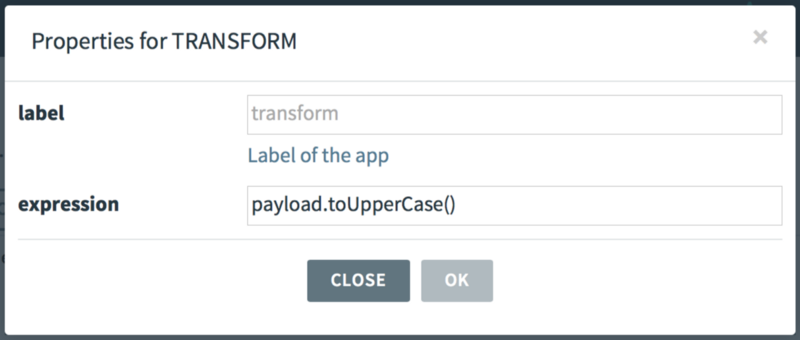
Enter “payload.toUpperCase()” in the expression textbox. A transform allows you to manipulate a String, and toUpperCase() simply converts the String to uppercase.
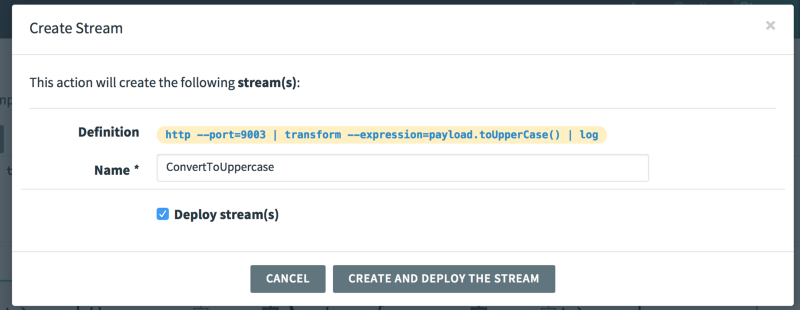
Once you have all the boxes connected, you created a pipeline. The DSL exposes a REST endpoint, the data you provide to the endpoint is passed as a pipe to the transform processor, and the output of the transformation is passed out to a log file.
The whole pipeline can be described in this simple DSL:
http --port=9003 | transform --expression=payload.toUpperCase() | log
Notice the nice use of the | (pipe) symbol to indicate the move from a source to a sink, similar to the Unix pipe command.
Click “Create Stream” and check the “Deply Stream(s)” checkbox:
The pipeline (called “stream” in SCDF) is now being created. SCDF creates the different components that run in this pipeline. These components are simply Spring Boot apps that are available in a maven repository. You can see which artifact is being used by investigating the Runtime tab. For example, the http source is taken from the following maven repository URL:
maven://org.springframework.cloud.stream.app:http-source-kafka-10:1.3.1.RELEASE
SCDF also creates the needed topics in Apache Kafka to deliver the messages between the various components.

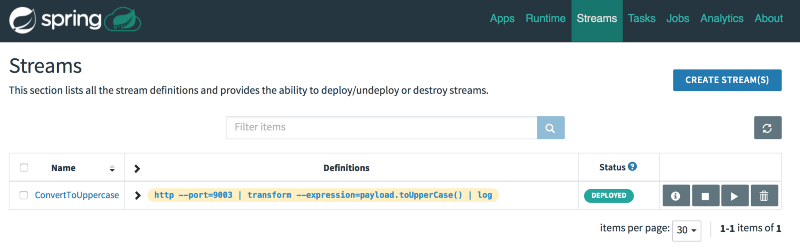
Once complete, the pipeline is marked as “Deployed”. This pipeline will accept an http request, transform it to uppercase, and write it to a log file.
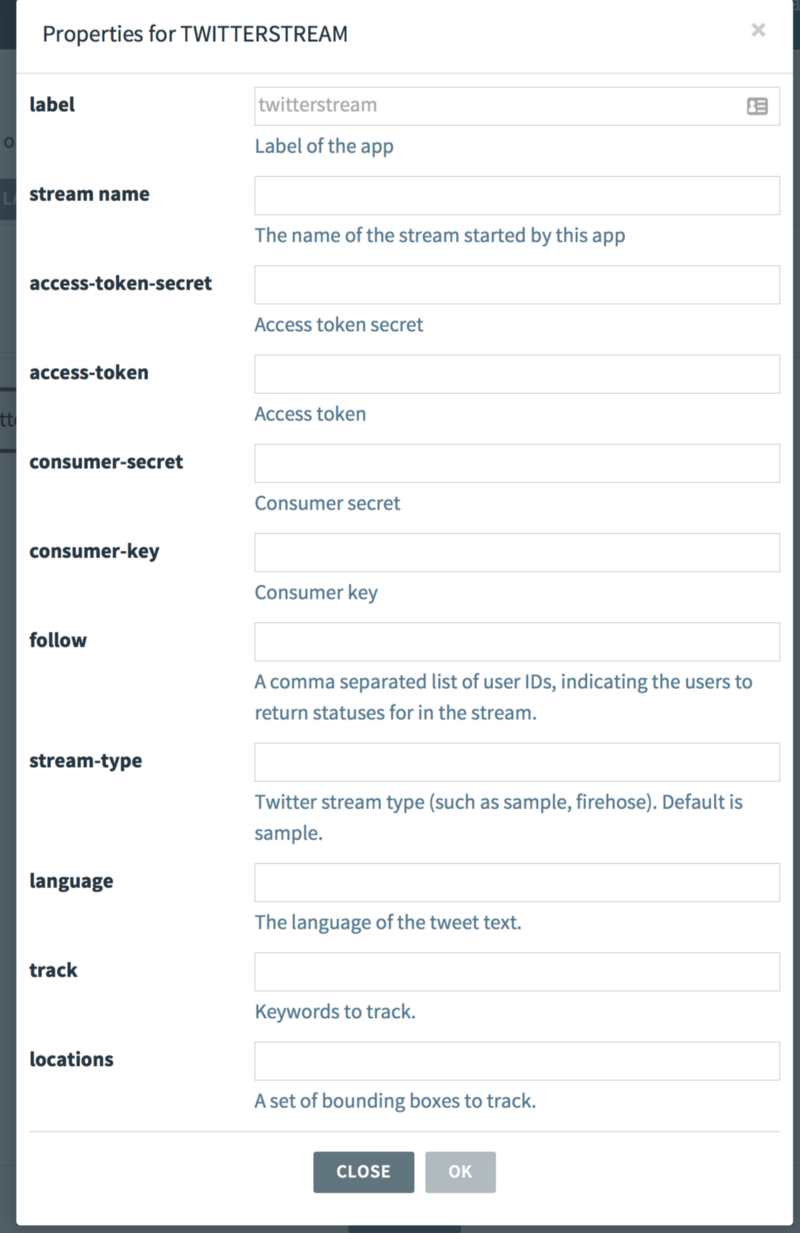
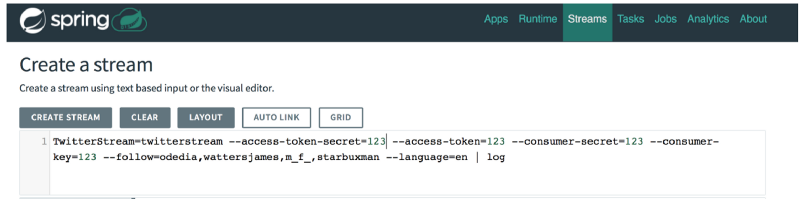
Now, we could use this pipeline as is, but let’s modify it a little to understand how easy it is to . Instead of an http source, we’ll use a twitterstream source. Create a new pipeline and paste the DSL from above as a starting point:
http --port=9003 | transform --expression=payload.toUpperCase() | log
How, delete the http source from the GUI and drag a twitterstream source instead

Click the twitterstream configure icon and enter your twitter API keys. You can create a developer API key at this URL, simply copy and paste the keys and secrets from your generated twitter app (my keys are not shown below for security purposes). Make sure to add some users in the “follow” textbox:
The generated DSL now looks like this:
Deploy the stream.
To check the output of the log, click the Runtime tab and copy the stdout path for twitterstream.log:
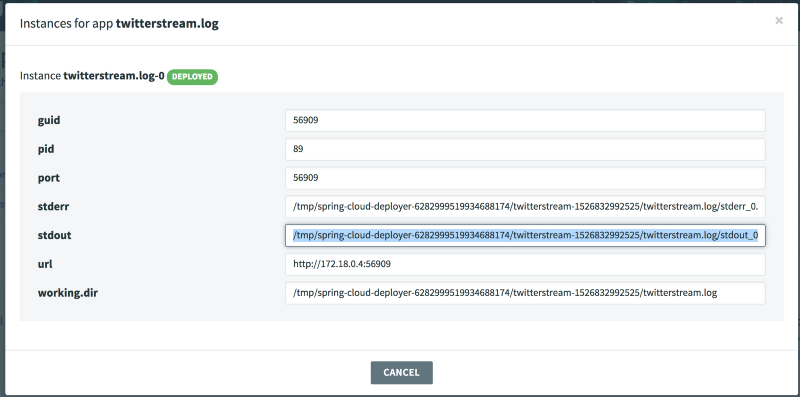
Then, from the command line, run the following command to view the logs:
docker exec -it dataflow-server tail -f <copy log path here>
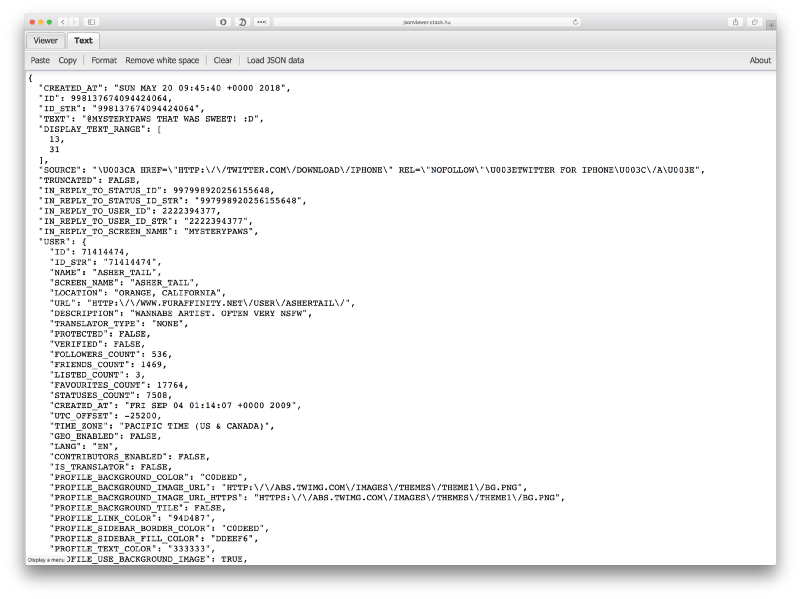
You should see something like this — a stream of tweets from the followers you listed, all converted to uppercase:
2018–05–20 09:45:40.962 INFO 376 — — \[ -L-2\] log-sink : {“CREATED\_AT”:”SUN MAY 20 09:45:40 +0000 2018",”ID”:998137674094424064,”ID\_STR”:”998137674094424064",”TEXT”:”@MYSTERYPAWS THAT WAS SWEET! :D”,”DISPLAY\_TEXT\_RANGE”:\[13,31\],”SOURCE”:”\\U003CA HREF=\\”HTTP:\\/\\/TWITTER.COM\\/DOWNLOAD\\/IPHONE\\” REL=\\”NOFOLLOW\\”\\U003ETWITTER FOR IPHONE\\U003C\\/A\\U003E”,”TRUNCATED”:FALSE,”IN\_REPLY\_TO\_STATUS\_ID”:997998920256155648,”IN\_REPLY\_TO\_STATUS\_ID\_STR”:”997998920256155648",”IN\_REPLY\_TO\_USER\_ID”:2222394377,”IN\_REPLY\_TO\_USER\_ID\_STR”:”2222394377",”IN\_REPLY\_TO\_SCREEN\_NAME”:”MYSTERYPAWS”,”USER”:{“ID”:71414474,”ID\_STR”:”71414474",”NAME”:”ASHER\_TAIL”,”SCREEN\_NAME”:”ASHER\_TAIL”,”LOCATION”:”ORANGE, CALIFORNIA”,”URL”:”HTTP:\\/\\/WWW.FURAFFINITY.NET\\/USER\\/ASHERTAIL\\/”,”DESCRIPTION":"WANNABE ARTIST. OFTEN VERY NSFW”,”TRANSLATOR\_TYPE”:”NONE”,”PROTECTED”:FALSE,”VERIFIED”:FALSE,”FOLLOWERS\_COUNT”:536,”FRIENDS\_COUNT”:1469,”LISTED\_COUNT”:3,”FAVOURITES\_COUNT”:17764,”STATUSES\_COUNT”:7508,”CREATED\_AT”:”FRI SEP 04 01:14:07 +0000 2009",”UTC\_OFFSET”:-25200,”TIME\_ZONE”:”PACIFIC TIME (US & CANADA)”,”GEO\_ENABLED”:FALSE,”LANG”:”EN”,”CONTRIBUTORS\_ENABLED”:FALSE,”IS\_TRANSLATOR”:FALSE,”PROFILE\_BACKGROUND\_COLOR”:”C0DEED”,”PROFILE\_BACKGROUND\_IMAGE\_URL”:”HTTP:\\/\\/ABS.TWIMG.COM\\/IMAGES\\/THEMES\\/THEME1\\/BG.PNG”,”PROFILE\_BACKGROUND\_IMAGE\_URL\_HTTPS”:”HTTPS:\\/\\/ABS.TWIMG.COM\\/IMAGES\\/THEMES\\/THEME1\\/BG.PNG”,”PROFILE\_BACKGROUND\_TILE”:FALSE,”PROFILE\_LINK\_COLOR”:”94D487",”PROFILE\_SIDEBAR\_BORDER\_COLOR”:”C0DEED”,”PROFILE\_SIDEBAR\_FILL\_COLOR”:”DDEEF6",”PROFILE\_TEXT\_COLOR”:”333333",”PROFILE\_USE\_BACKGROUND\_IMAGE”:TRUE,”PROFILE\_IMAGE\_URL”:”HTTP:\\/\\/PBS.TWIMG.COM\\/PROFILE\_IMAGES\\/701530693575118848\\/4-V4NNG6\_NORMAL.JPG”,”PROFILE\_IMAGE\_URL\_HTTPS”:”HTTPS:\\/\\/PBS.TWIMG.COM\\/PROFILE\_IMAGES\\/701530693575118848\\/4-V4NNG6\_NORMAL.JPG”,”DEFAULT\_PROFILE”:FALSE,”DEFAULT\_PROFILE\_IMAGE”:FALSE,”FOLLOWING”:NULL,”FOLLOW\_REQUEST\_SENT”:NULL,”NOTIFICATIONS”:NULL},”GEO”:NULL,”COORDINATES”:NULL,”PLACE”:NULL,”CONTRIBUTORS”:NULL,”IS\_QUOTE\_STATUS”:FALSE,”QUOTE\_COUNT”:0,”REPLY\_COUNT”:0,”RETWEET\_COUNT”:0,”FAVORITE\_COUNT”:0,”ENTITIES”:{“HASHTAGS”:\[\],”URLS”:\[\],”USER\_MENTIONS”:\[{“SCREEN\_NAME”:”MYSTERYPAWS”,”NAME”:”CAPTAIN WHISKERS”,”ID”:2222394377,”ID\_STR”:”2222394377",”INDICES”:\[0,12\]}\],”SYMBOLS”:\[\]},”FAVORITED”:FALSE,”RETWEETED”:FALSE,”FILTER\_LEVEL”:”LOW”,”LANG”:”EN”,”TIMESTAMP\_MS”:”1526809540662"}
Here’s the same JSON in a formatted view:
Congratulations, you created your first pipeline!
So, what does this abstraction level give us?
- We were able to visualise our pipeline.
- We were able to use out-of-the-box components.
- We didn’t have to deploy the apps ourselves — SCDF would deploy the apps for us. This might only be a nicety on local development environments, but extremely powerful on a full-scale cloud platforms such as Cloud Foundry or Kubernetes.
- We can use a domain-specific language for easy, declarative programming.
- We did not have to deal with defining the topics, or connecting these topics to input/output channels. As you recall, with Spring Cloud Stream, you had to provide the topic destinations in the configuration. You also had to manage the relationships between output channels and input channels yourself — each app was its own silo. With SCDF, you just declare your connection pipes and that configuration is done for you automatically.
- Although we did not show it, SCDF also lets you gain analytics and metrics about your pipeline.
Project Riff (and Pivotal Function Service)
Note: This section of the article was revised once Knative became the base platform for Project Riff.
Project riff will be the highest abstraction level of the three. I say “will” since it’s still a work in progress.
Project Riff is a serverless solution. A serverless solution, among other things, takes the responsibility of scaling your applications from 0 to N.
With Spring Cloud Stream, you wrote the app, and then deployed it. It was up to you to define the number of instances. Sure, with certain cloud providers you can define autoscaling, but those autoscaling solutions usually respond to CPU load or increased HTTP latency, not to lags in a message broker. Also — autoscaling solutions do not scale to zero. Scaling to zero means that some controller needs to run on the platform to redeploy terminated apps on demand, based on workloads.
Spring Cloud Dataflow deployed the app for you and allowed you to connect the apps nicely. However, you still had to define a scaling factor, which is 1 by default. For example, you could provide a properties file during deployment to define the instance count, something like this for the http source:
deployer.http.count=3
Or, you could modify the scaling count in the UI:
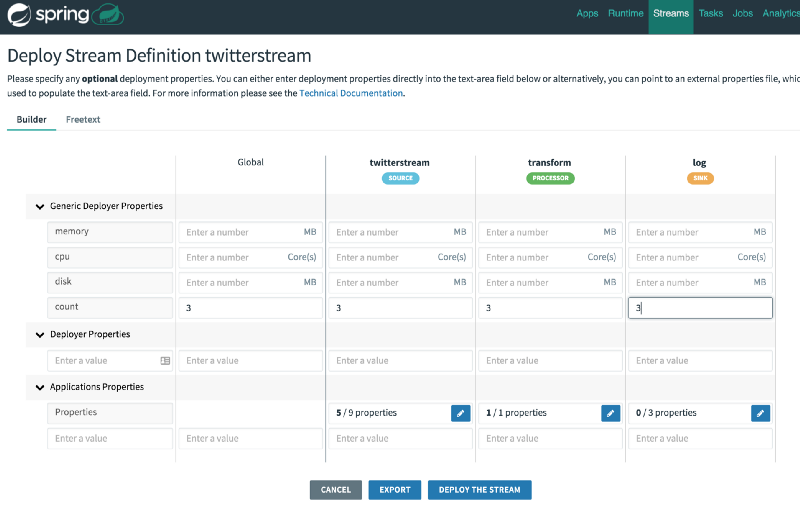
However, as you can see, this instance count is not dynamic and does not change based on workloads. Also, it does not scale to zero. This requires you to always run your pipeline at max expected capacity since you cannot respond to changes dynamically. Scaling to zero is important, especially when dealing with public cloud providers, since it saves compute resources, which quickly translate to savings in money.
Lastly, with SCDF you were limited to Spring Cloud Stream and Spring Cloud Task apps.
Project Riff was designed from the ground up to be a highly opinionated Function-as-a-Service platform.
Project Riff runs on Kubernetes and nothing else. Unlike SCDF, it is not deployable to Cloud Foundry’s Pivotal Application Service (PAS) or Apache Mesos. Also, there is no “Local development server” option. If you want to run Project Riff locally, you should spin up a local Kubernetes cluster such as minikube.
Although originally it was implemented with its own custom base layer, it has recently shifted to run on top of Knative.
Knative is an open source project with major contributions from the likes of Google and Pivotal. It was designed to allow for more opinionated serverless workloads to run on top of Kubernetes. It provides very basic primitives so that other projects (such as Project Riff) can use to build a more developer and operator friendly platform. These primitives are:
Serving: Scale to zero, request-driven compute model
Build: Cloud-native source to container orchestration
Events: Universal subscription, delivery and management of events
As you can see, even the burden of managing the events infrastructure is taken out of the hands of the developer. The underlying platform for delivering these events on Google’s GKE is most likely to be Google PubSub. On a different service provider, it might uses Apache Kafka. The important point, however, is that this abstractions tries to tell you “that’s none of your business” 😄. You should focus on writing functions that take inputs and produce outputs. That’s it. The platform will take care of the rest.
Project Riff scales each function independently of other functions, at runtime, based on the Serving and Events primitive of Knative. This lets you run an optimised pipeline based on the actual workloads at each step of the, without overpaying when you don’t have to. Users of AWS Lambda will feel right at home.
Note: Project Riff is still under development, version 0.1.0 as of this writing.
The last differentiator is that Project Riff is a polyglot solution. You can write your apps in various languages, and even the Java-based version does not require you to use Spring Cloud Stream at all. Simply implementing a java.util.Function that accepts an input and returns an output is a legitimate use case. There is no message broker to manage in your application code. This is handled by the platform.
As of this writing, the supported functions for riff can be written in node, go, java, python and shell scripts.
Before diving into a demo of riff, a word of caution: when you start using riff, you might think to yourself that something is not right: There’s sure a lot of boilerplate setup required for riff to work — how is this the highest abstraction layer again?
First, as already mentioned, riff is still under development.
Second, it requires a Kubernetes cluster, with the additional Knative extension. If you already have one, you’ll require less steps to get going. Kubernetes is a portable container runtime, which makes riff one of the very few portable FaaS runtimes that do not incur a vendor lock-in.
Third — riff is the baseline open source project for a future enterprise offering from Pivotal called Pivotal Function Service (PFS). PFS is not generally available yet, and the end goal is still unclear to me, however I suspect that once you have a Pivotal Cloud Foundry cluster up and running, it will be extremely easy to deploy a function to it. PCF today is composed of two execution environments: Pivotal Application Service (PAS) and Pivotal Container Service (PKS). PAS is the good old Platform-as-a-Service that makes it dead-simple to deploy applications with a simple command. For example:
cf push -p app.jar my-app
Would push a spring boot application to PAS, and handle all the container creation, routes setup and other requirements for you.
PKS on the other hand, is a vanilla Kubernetes cluster. You get enterprise features to easily create clusters, upgrade clusters with zero downtime and much more, but once the cluster is setup — you’re in Kubernetes land, for better or worse. Knative adds the basic primitives to support basic serverless functionality, but still requires dealing with kubernetes-style yaml files, and actually creating the baseline kubernetes cluster that supports Knative:
PFS, I suspect, will automatically use PKS, and provision Kubernetes resources on demand, without the developer even knowing about it. That would really allow you to focus on writing the functions themselves and nothing more. The underlying message broker might not even be exposed to you — it is a Function-as-a-Service after all, right? I should write my functions and PFS should take care of the rest. I can envision something as simple as this to deploy a node function that has “numbers” as an input channel:
cf push-func `--name square --input numbers -p square.js`
Note: The above does not exist, I made it up as a thought experiment. You’re more likely to use the riff cli like we’ll see below even with PFS.
PFS sounds cool, but it’s the future. Today, we have Project Riff itself, which is still an incredible open source solution for serverless functions on any Kubernetes platform that includes the Knative extension.
If you’ll go to the Project Riff website, you’ll see a setup guide to get you going. For local development, you’ll need to install minikube. Originally, riff worked with helm charts, but that’s old news now that riff uses Knative. A simple command with the riff cli would startup all required containers for serverless development, including istio and Knative componenets:
riff system install --node-port
Once done, you’ll have a deployment of the riff system running in your kubernetes cluster.
Let’s create a pipeline that receives a String, converts it to uppercase, then sends it to another process to reverse the result. We’ll use Node for the uppercase function and Java for the reverse function.
Riff Setup
This article once contained a quickstart guide for riff, but since then the project moved on to use Knative. Since it doesn’t provide much benefit to copy-paste the getting started guide from the project riff website, I suggest you’ll use that guide and then return here.
I will update this article with updated riff+Knative tutorial very soon, in the meantime, I’m keeping the original tutorial based on project riff 0.6 that is now totally obsolete :).
***
Once you’re done with that boilerplate setup, we can write some functions.
Create a new folder called uppercase and in it, write a javascript file called uppercase.js with the following contents:
module.exports = x => x.toUpperCase();
The javascript converts the input string to uppercase. Fun.
Now, let’s run this function:
riff create node --name uppercase --input inputstring --filepath .
We’re creating a node function called uppercase, that would listen on the inputstring input. The function will be built using the contents of the current working directory.
The output shows that riff is creating a docker image for us, and deploys it to kubernetes:
Building image …
\[STDOUT\] Sending build context to Docker daemon 6.144kB
\[STDOUT\] Step 1/3 : FROM projectriff/node-function-invoker:0.0.8
\[STDOUT\] — -> 6b42d1262422
\[STDOUT\] Step 2/3 : ENV FUNCTION\_URI /functions/uppercase.js
\[STDOUT\] — -> Using cache
\[STDOUT\] — -> 29cbf35657a9
\[STDOUT\] Step 3/3 : ADD uppercase.js ${FUNCTION\_URI}
\[STDOUT\] — -> Using cache
\[STDOUT\] — -> 8c70ce86a974
\[STDOUT\] Successfully built 8c70ce86a974
\[STDOUT\] Successfully tagged odedia/uppercase:0.0.1
Applying resources in .

function “uppercase” created
topic “inputstring” created
In the other window we can see that the function and related topic have been deployed:
Every 1.0s: kubectl get functions,topics,pods,deployments

NAME AGE
functions/uppercase 1m

NAME AGE
topics/inputstring 1m

NAME DESIRED CURRENT UP-TO-DATE AVAILABLE AGE
deploy/uppercase 0 0 0 0 1m
Cool! let’s try to run this function.
riff publish -i inputstring -d hello -r
We’re publishing an event to the “inputstring” input and passing the data “hello”. We also add -r to indicate that we expect a response, since it is not always required to wait for a response.
The result:
Posting to http://127.0.0.1:32254/requests/inputstring
**HELLO**
riff published the request via its built-in HTTP gateway and returned an uppercase version of the input string. That’s another part where it differentiates from the previous frameworks — you get an HTTP entry point for your pipelines out of the box.
Looking at the monitoring dashboard, we see that the pod has been created and deployed:
Every 1.0s: kubectl get functions,topics,pods,deployments

NAME AGE
functions/uppercase 23s

NAME AGE
topics/inputstring 23s

NAME READY STATUS RESTARTS AGE
po/uppercase-59cfdbdd4f-pd88s 2/2 Running 0 23s

NAME DESIRED CURRENT UP-TO-DATE AVAILABLE AGE
deploy/uppercase 1 1 1 1 23s
Perhaps even more importantly, after 15 seconds of inactivity, the pod self-terminates:
Every 1.0s: kubectl get functions,topics,pods,deployments

NAME AGE
functions/uppercase 4m

NAME AGE
topics/numbers 4m

NAME DESIRED CURRENT UP-TO-DATE AVAILABLE AGE
deploy/uppercase 0 0 0 0 4m
Alright, now we want to add another element to the pipeline — the output of “uppercase” should be the input for “reverse”. Let’s do it now.
Create a Java class as follows:
We defined a java.util.function.Function @Bean that accepts a String as input, and returns a String as output. In our case, the input would come from the output of node’s “uppercase” function, but we can also send events to the uppercase input directly from the HTTP gateway.
Notice the lack of any channel definition? That’s something that is now handled by the platform itself.
The code simply returns a reversed version of the input string.
Here’s the pom.xml that you can use to build the function:
The full function project is available here.
Ok, let’s create our java function. From the top project folder, run:
riff create java -i uppercase -a target/reverse-1.0.0.jar — handler=’uppercase&main=functions.ReverseApplication’
We’re telling riff to create a java function. The input will come from the “uppercase” input. The artifact to use is the Spring Boot app reverse-1.0.0.jar artifact. The handler indicates which function inside the jar to execute — that would be the “uppercase” method inside functions.ReverseApplication.
If all is well, you should see the following output:
iMac5k:reverse odedia$ **riff create java -i uppercase -a target/reverse-1.0.0.jar --handler='uppercase&main=functions.ReverseApplication'
**Initializing /Users/odedia/Downloads/java-function-invoker-master/samples/reverse/reverse-topics.yaml
Initializing /Users/odedia/Downloads/java-function-invoker-master/samples/reverse/reverse-function.yaml
Initializing /Users/odedia/Downloads/java-function-invoker-master/samples/reverse/Dockerfile
Building image ...
\[STDOUT\] Sending build context to Docker daemon  18.21MB
\[STDOUT\] Step 1/5 : FROM projectriff/java-function-invoker:0.0.6
\[STDOUT\] 0.0.6: Pulling from projectriff/java-function-invoker
\[STDOUT\] ff3a5c916c92: Already exists
\[STDOUT\] 5de5f69f42d7: Pulling fs layer
\[STDOUT\] fd869c8b9b59: Pulling fs layer
\[STDOUT\] 316ab7cd4aa9: Pulling fs layer
\[STDOUT\] 565c3b7489b3: Pulling fs layer
\[STDOUT\] 206d60d79eb3: Pulling fs layer
\[STDOUT\] 206d60d79eb3: Waiting
\[STDOUT\] 565c3b7489b3: Waiting
\[STDOUT\] 5de5f69f42d7: Verifying Checksum
\[STDOUT\] 5de5f69f42d7: Pull complete
\[STDOUT\] 565c3b7489b3: Download complete
\[STDOUT\] 206d60d79eb3: Verifying Checksum
\[STDOUT\] 206d60d79eb3: Download complete
\[STDOUT\] 316ab7cd4aa9: Verifying Checksum
\[STDOUT\] 316ab7cd4aa9: Download complete
\[STDOUT\] fd869c8b9b59: Verifying Checksum
\[STDOUT\] fd869c8b9b59: Download complete
\[STDOUT\] fd869c8b9b59: Pull complete
\[STDOUT\] 316ab7cd4aa9: Pull complete
\[STDOUT\] 565c3b7489b3: Pull complete
\[STDOUT\] 206d60d79eb3: Pull complete
\[STDOUT\] Digest: sha256:46ce2ddd370620191437719dcf631c697a8c43229f5949f30509d5b9d020e5e9
\[STDOUT\] Status: Downloaded newer image for projectriff/java-function-invoker:0.0.6
\[STDOUT\]  ---> 13e9bc3b5102
\[STDOUT\] Step 2/5 : ARG FUNCTION\_JAR=/functions/reverse-1.0.0.jar
\[STDOUT\]  ---> Running in d772e756b4c0
\[STDOUT\] Removing intermediate container d772e756b4c0
\[STDOUT\]  ---> 267b6bb25be1
\[STDOUT\] Step 3/5 : ARG FUNCTION\_HANDLER=uppercase&main=functions.ReverseApplication
\[STDOUT\]  ---> Running in b61ef41e1f26
\[STDOUT\] Removing intermediate container b61ef41e1f26
\[STDOUT\]  ---> f6d6a951eef6
\[STDOUT\] Step 4/5 : ADD target/reverse-1.0.0.jar $FUNCTION\_JAR
\[STDOUT\]  ---> 882fb4de9ece
\[STDOUT\] Step 5/5 : ENV FUNCTION\_URI file://${FUNCTION\_JAR}?handler=${FUNCTION\_HANDLER}
\[STDOUT\]  ---> Running in e8d1543b4e1e
\[STDOUT\] Removing intermediate container e8d1543b4e1e
\[STDOUT\]  ---> 00b55e62c01a
\[STDOUT\] Successfully built 00b55e62c01a
\[STDOUT\] Successfully tagged odedia/reverse:0.0.1
Applying resources in .

**function "reverse" configured
topic "uppercase" configured**
We can verify it works by publishing a message to the “uppercase” input:
iMac5k:reverse odedia$ riff publish -i uppercase -d "hello" -r

Posting to http://127.0.0.1:32254/requests/uppercase

**olleh**
Putting it all together
Now, let’s connect our two functions.
Delete the original uppercase function we wrote:
riff delete uppercase --all
Now, create it again, but this time we’ll provide an output as well as an input:
riff create node --name uppercase --input inputstring **\--output uppercase** --filepath . --force
— force indicates to override the previously generated Dockerfile and yaml configuration.
Verify you have the two functions running:
iMac5k:uppercase odedia$ **riff list**
Listing function resources

NAME        AGE
**reverse     2m
uppercase   4m**
Finally, send a message to the “inputstring” input. The uppercase node function will receive the message, convert it to uppercase, then send it to the “uppercase” output. Our java application will accept the input uppercased String, reverse it, and return it to the http gateway:
iMac5k:uppercase odedia$ riff publish -i inputstring -d "hello" -r

Posting to http://127.0.0.1:32254/requests/inputstring

**OLLEH**
Summary
Event processing, or message handling, or event sourcing (I could find at least 5 more acronyms if I really wanted to) is a fundamental concept in well-written micro services, which is why so much work is invested in this field. In this article, I reviewed 3 abstractions that try to create a better development experience. All 3 abstractions allowed you to process messages and respond to events, but they also differed in meaningful ways:
- In Spring Cloud Stream, you had to create the message broker and define the topics yourself.
- In Spring Cloud Dataflow, the message broker and topics were created for you, but you still had to use the provided building blocks, or write custom components using Spring Cloud Stream or Spring Cloud Task — meaning Java. No polyglot here. Also — your code still knew about the concept of “some channel”. Lastly, your scaling capabilities were limited.
- In Project Riff — your code is a function. Like most functions, it accepts a parameter and returns a value. That’s it. Forget about channels, that’s not a thing anymore. You now think in functions. The responsibility of talking to a channel/topic is delegated to the platform, which is now Knative on top of kubernetes. You can write your functions in various supported languages.
- Note that SCDF still has a nice benefit that (currently) doesn’t exist in Project Riff — SCDF gives you this nice UI dashboard for your entire pipeline. Since these are early days of Project Riff, I suspect it will gain this capability eventually, or more likely — that Spring Cloud Dataflow will be able to visualise Project Riff pipelines.
I hope you’ve found this article interesting. Now go out there and connect some streams.
Good luck and happy coding!
Oded S.