Introduction to Spring Session Redis

Hi there! I’m Oded.
I work for VMware Tanzu as a Senior Lead Solutions Engineer, spreading the message of cloud native development, cloud native platforms on Kubernetes and app transformation.
I helped design large-scale, cloud-native solutions using the microservices architecture running on Pivotal Cloud Foundry and Kubernetes, using Spring Boot and Spring Cloud.
I’m highly skilled in Kubernetes, Java, Spring Boot, Spring Cloud, Apache Kafka, Event Sourcing and DevOps practices.
I enjoy photography, video editing, and the music of the King of Pop.
In the beginning, there was the servlet container. And it was good.
With it, we got the infrastructure for session management , a.k.a. the HttpSession. The idea behind it was simple: The server would bind the session to a unique token and send that token to the browser. The browser would send the token with each request, usually in the form of a cookie, and the server would identify the browser session for that token on the server side. This simple solution allowed us to build stateful web applications over the stateless HTTP protocol.
For better or worse, you could use a load balancer that supported sticky sessions to route the same client to the same instance. That allowed us to have multiple server instances in a production environment.
And then there was the cloud… and with them, microservices.
Suddenly, you no longer had a couple of instances that needed to know the session details. You had hundreds, if not thousands of instances, in a typical production environment.
Additionally, the chances of having a particular instance die in production grew exponentially. Virtual machines and containers may die and resurrect based on the cloud infrastructure you were using, and your application had to accept the fact that a single instance WILL fail at some point, thus kicking out all the users routed to that instance.
Lastly, HttpSession clearly became an anti-pattern. It does not conform to the cloud-native 12 factors app guidelines, specifically factor #6:
“Twelve-factor processes are stateless and share-nothing. Any data that needs to persist must be stored in a stateful backing service, typically a database.”
Clearly, the HttpSession stores stateful data about its users, and as such it makes the entire process stateful. You bind the process with the data, which creates a tight coupling and an expectation that the process will never fail ungracefully.
We needed a better solution.
Spring Session
For many scenarios, the industry moved on to fully stateless authentication mechanisms such as Java Web Tokens. And those are great! Mostly…
For mobile applications, JWT seems like the way to go. For classic web applications, including single-page applications such as those based on Angular, there are still major benefits for server-side session management.
That’s where Spring Session comes in. I love the idea behind this framework. In a very Spring Boot fashion, the idea is as follows: replace an existing implementation with an abstraction layer that can be one of many implementations at runtime, based on your runtime dependencies.
For Spring Session specifically, this meant replacing the HttpSession with an implementation of your choice. There are quite a few of them available out of the box, and if you’re bored you can implement your own:
- HttpSession with Redis
- HttpSession with Pivotal GemFire
- HttpSession with JDBC
- HttpSession with Mongo
- HttpSession with Hazelcast
From the list above, Spring Session Redis was one of the first implementations and is still one of the most popular.
Redis
Redis is an in-memory database that is perfect to managing resources such as sessions, which require very fast access times and the ability to self-expire. The database is single-threaded, And as such can make optimisations that promise performance of up to millions of operations per second (in theory…).
RedisLabs Enterprise is a commercial solution that allows you to easily manage and monitor a clustered redis environment. It also allows you to access an entire Redis cluster via a simple proxy endpoint.
According to Redislabs’ latest survey, redis is mostly used for caching and user session management.
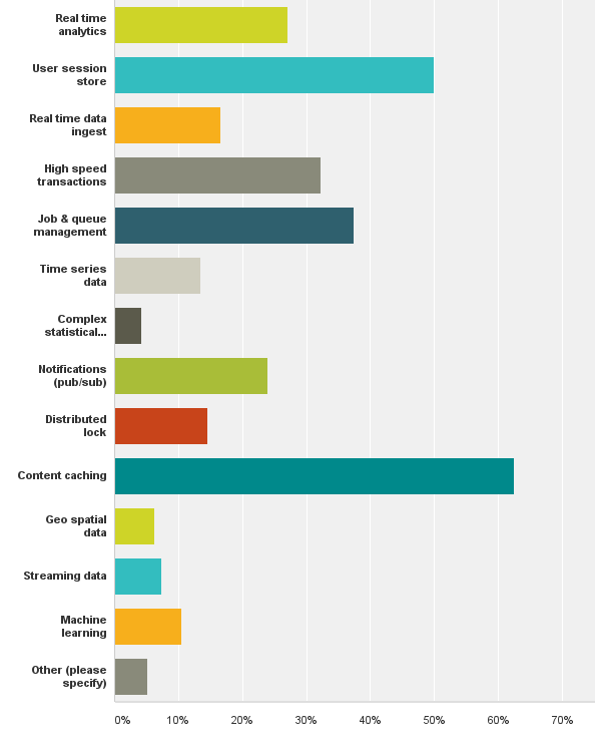
Redislabs 2016 survey results
Since the session no longer resides as part of the application itself and is instead stored in a database, it conforms to factor #6 above.
Installing Redis
Redis is written in C, and can be installed on any linux or unix based system. If you’re using a Mac, I highly recommend using homebrew to install the database. Although not officially supported, you can run redis on windows as well.
As an alternative to the open source version, you can download a trial version of Redislabs Enterprise here.
Execute brew install redis to get started:
odedsh02-mac:~ odedsh$ brew install redis
Updating Homebrew…
\==> Auto-updated Homebrew!
Updated 2 taps (caskroom/cask, homebrew/core).
\==> New Formulae
\==> Downloading https://homebrew.bintray.com/bottles/redis-4.0.2.sierra.bottle.1.tar.gz
\==> Downloading from https://akamai.bintray.com/bf/bff73385bc94ceba943c4f880bc4f6fe9a3286c86cdda236da4088244048595
######################################################################## 100.0%
\==> Pouring redis-4.0.2.sierra.bottle.1.tar.gz
\==> Caveats
To have launchd start redis now and restart at login:
brew services start redis
Or, if you don’t want/need a background service you can just run:
redis-server /usr/local/etc/redis.conf
\==> Summary
🍺 /usr/local/Cellar/redis/4.0.2: 13 files, 2.8MB
Source Code
In this demo, we will build a simple API that returns some dummy order information.
- The orders will reside in an order-management microservice.
- The microservice will only be accessible through an API Gateway. We’ll be using Zuul Gateway proxy for that.
- With this setup, we’ll be able to see how two separate servers in different codebases can use the same session stored in Redis.
The source code for this demo is available here. The configuration repository for the application can be found here.
Setting up a work environment
As a baseline for any decent Spring Cloud application, we will require at least a configuration server to host our property files and a service discovery solution. We will use Spring Cloud Config Server and Spring Cloud Netflix Eureka, respectively.
Head over to start.spring.io and create a config server:
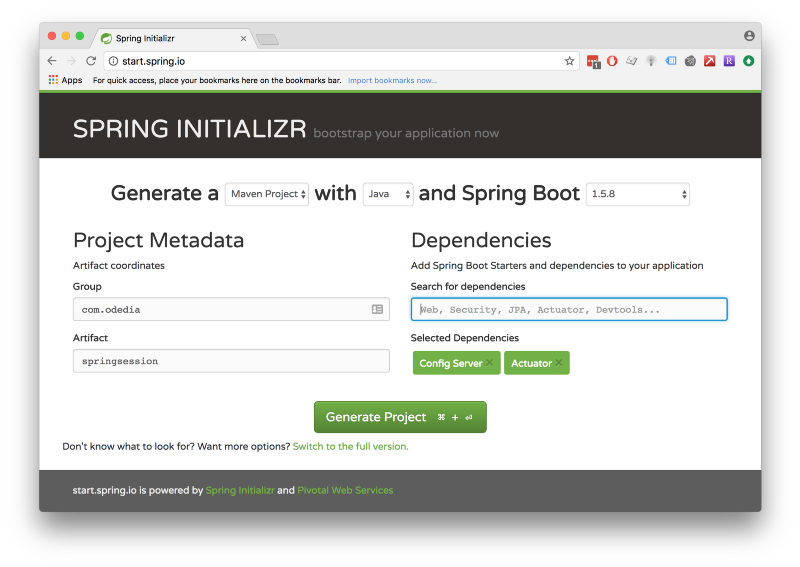
Config Server with minimal required settings
Repeat the process for Eureka Discovery Server:
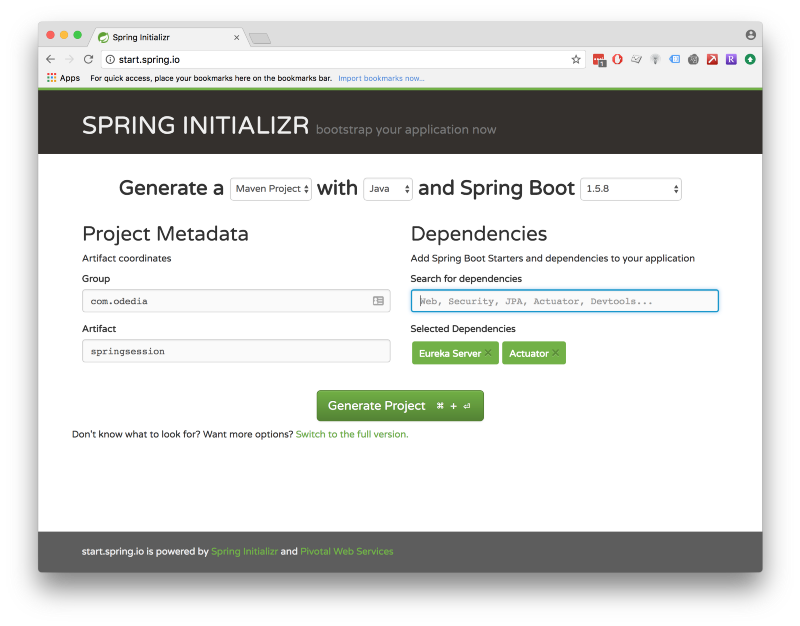
Eureka Server with minimal required settings
Make sure your redis database runs in the background by running redis-server in the terminal:
Service Discovery
Our service discovery application is very simple:
This simple, one-class application annotated with @EnableEurekaServer boots a eureka server for us.
Let’s have a look at its bootstrap.yml:
We set the port to the default 8761 eureka port, and make sure that the server would not register with itself by setting register-with-eureka and fetch-registry to false.
Config Server
The config server is also quite simple:
- We @EnableConfigServer to tell Spring that this application serves configuration files to other servers in the cloud environment
- We @EnableDiscoveryClient so that the config server itself would register with Eureka.
The bootstrap.yml for the config server is as follows:
We set the backing git repository for configuration files by setting the spring.cloud.config.server.git.uri property.
- We register the server with eureka and fetch the eureka registry.
- We’re using a “Discovery First” configuration server. Using a config server with a Eureka backend allows us to scale the config server if needed, and allows other applications in the system to find the config server automatically without knowing its IP address or hostname.
Now that our infrastructure is in place, let’s move on to the API Gateway.
Zuul Gateway
Our gateway requires several dependencies:
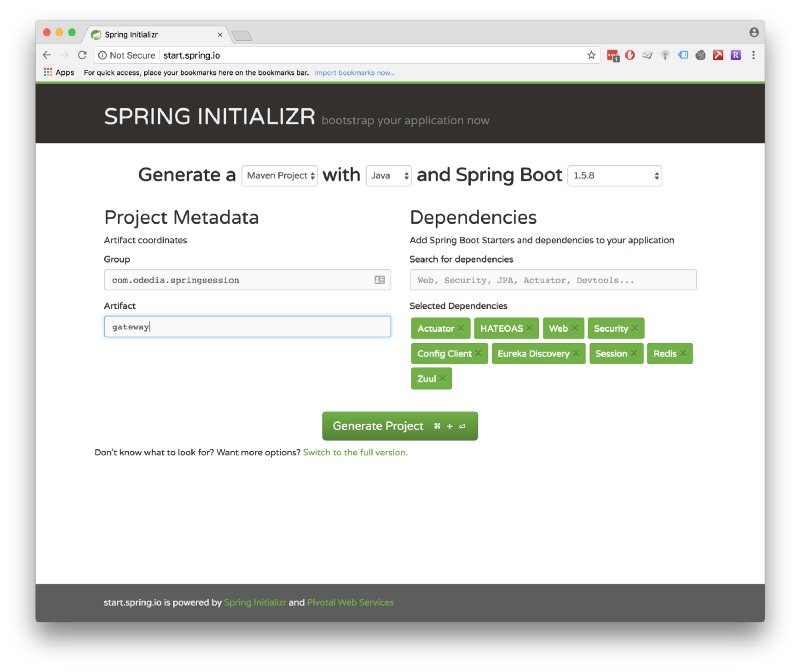
- We added dependencies for Web development along with Actuator and HATEOAS since these, in my mind, are a mandatory baseline for every Spring-based web application.
- Security will add Spring-Security to our project. By default it would protect resources with HTTP basic authentication.
- Session will add spring session to our project, and will override the default HttpSession.
- Redis will add spring-data-redis to our application, which would talk to a redis database.
Let’s review the GatewayApplication class:
- We register with Eureka to advertise ourselves to other servers and be able to find other servers.
- We @EnableZuulProxy in order to route incoming requests to downstream servers based on configuration. Zuul is a powerful framework, but for this demo we will use the basic feature of forwarding requests.
- We @EnableWebSecurity in order to configure our application as a web application protected by Spring Security. Without this annotation, session management would not work.
- In a real-world environment, we’d usually define our own @Configuration class for spring security by extending WebSecurityConfigurerAdapter, and implement additional security parameters such as other authentication mechanism, filters etc.
- Lastly, we @EnableRedisHttpSession. This tells Spring to replace the baseline Apache Tomcat HttpSession object with Spring Session Redis.
The application.yml for the gateway defines several important parameters:
- We tell Spring Session what kind of backing datastore we want to use for our session management by setting the spring.session.store-type parameter. As mentioned above, there are several store types such as JDBC, GemFire etc.
- Since we don’t define the connection details to redis, it defaults to localhost:6379. To define different connection details, set the properties for spring.redis.host and spring.redis.port accordingly.
- We define a username and password for authentication. By default, Spring Security uses HTTP Basic Authentication using the parameters security.user.name and security.user.password.
- We override the default setting for zuul.sensitiveHeaders. By default, Cookie, Set-Cookie and Authorization headers are all considered sensitive and therefore are not forwarded down from the gateway level to other servers. In this example, we decided to allow a session id that is passed as a cookie to be forwarded down to other servers, so we removed Cookie from the sensitiveHeaders list.
The LoginManagementResource class defines a login and logout rest APIs. Note that these are not mandatory. Any REST API call that would receive a valid username and password with HTTP Basic Authentication would generate a new session that would be returned as a token back to the client.
Let’s see what happens when we call the /login API:
curl -v -u gateway:password localhost:8080/login
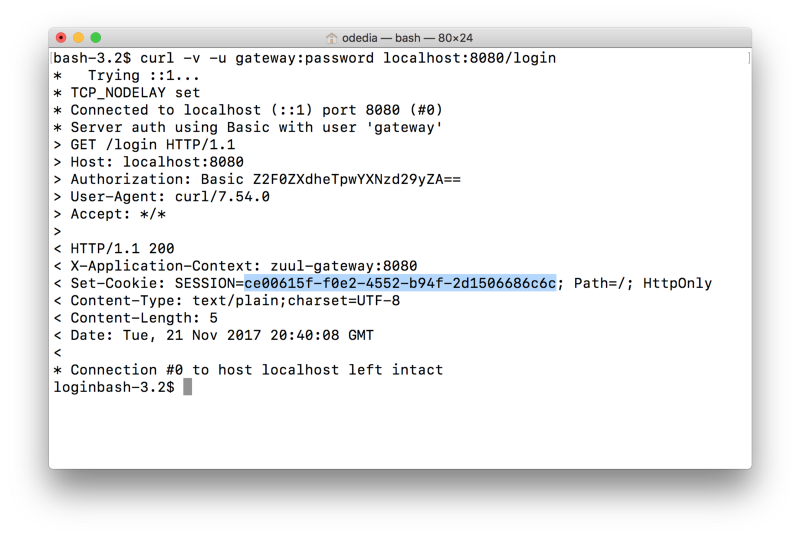
- The server returned a successful response and added a Set-Cookie header with the session ID.
If we’ll connect to redis using redis-cli, we can see the key is in the database:
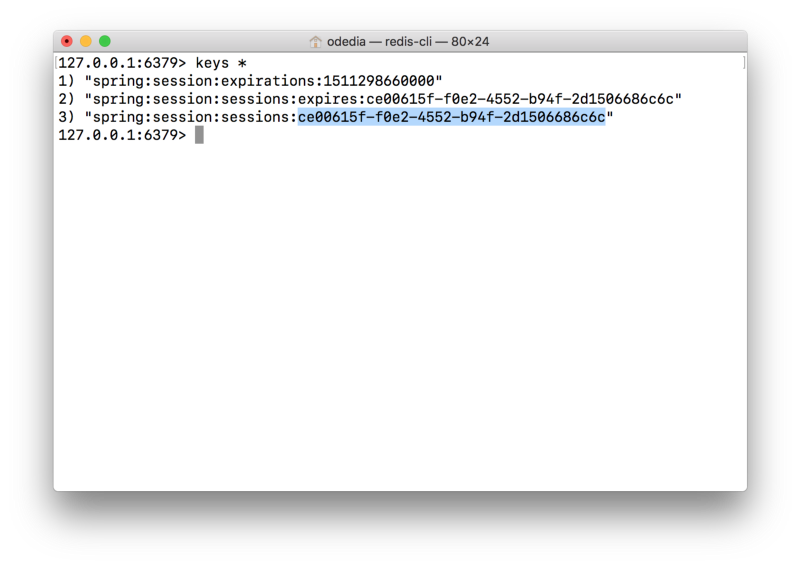
- The same session ID that was returned is part of the redis key in the format spring:session:sessions:.
- We have two additional keys to manage the expiration of the session, based on the server defined timeout. The default is 30 minutes. Redis has a built-in support for expiring keys, however as we’ll see in the next article, there are no guarantees on when these keys will actually be cleared, which could represent a problem for session management.
Order Management Microservice
Our very simple “microservice” simulates a response from a backend system.
- The annotations are very similar to those found on the server, except we don’t have any Zuul dependencies in the microservice layer, so we do not @EnableZuulProxy.
- The application exposes a very simple /orders API that returns some hard coded data for demo purposes.
- The application is protected by Spring Security similar to the gateway.
Let’s review the configuration for the microservice:
- Once again we define the spring session store-type to be redis, to allow the session management to be bound to a redis database.
- Notice that the microservice defines a different username and password. This is a good example of how the session management bypasses the authentication management completely if a valid session ID is present.
Let’s test our call. Using the same session ID as provided in the previous step, we can make a call through the gateway to our microsevice:
curl -v -H “SESSION: ce00615f-f0e2–4552-b94f-2d1506686c6c” localhost:8080/order-management/orders
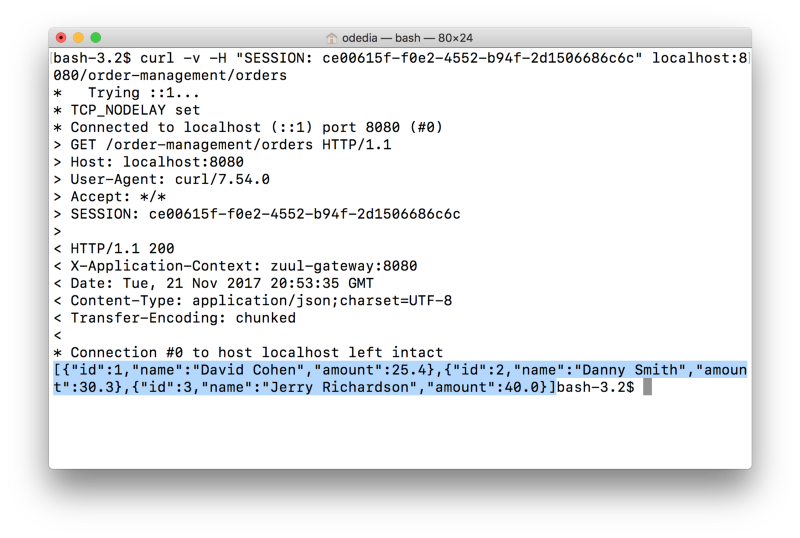
- We pass the session ID as a header using the SESSION key.
- The gateway first validates the session ID with Redis, and makes sure the session is valid.
- The gateway then forwards the request to the order-management microservice.
- The order-management microservice then validates the session against redis as well. Based on your network topology, you might consider checking for sessions at the gateway level only.
- The order-management microservice returns the response to the gateway, which subsequently returns the response to the client.
In this short introduction, I showed you how to use Spring Session Redis to externalise session management from your application executable to a separate DB.
In the next article, we’ll focus on some production considerations when using Spring Session Redis.
Stay tuned and happy coding!
Oded Shopen