Platform Automation for PAS and PKS on GCP

Hi there! I’m Oded.
I work for VMware Tanzu as a Senior Lead Solutions Engineer, spreading the message of cloud native development, cloud native platforms on Kubernetes and app transformation.
I helped design large-scale, cloud-native solutions using the microservices architecture running on Pivotal Cloud Foundry and Kubernetes, using Spring Boot and Spring Cloud.
I’m highly skilled in Kubernetes, Java, Spring Boot, Spring Cloud, Apache Kafka, Event Sourcing and DevOps practices.
I enjoy photography, video editing, and the music of the King of Pop.
What is this?
Credits: This tutorial is largly based on the excellent work by Alan McGinlay on github, my small contributions were:
- One terraform for both PAS and PKS since it’s now supported on the same ops manager.
- Added terraform entries for VMware harbor (it’s not included in the official PKS terraform for some reason)
- Let’s encrypt certificates for concourse and PCF.
- Separation of main pipeline and “fetch artifacts”
- Additional marketplace services
- Some minor fixes and customizations such as triggers of upload-and-configure when new artifacts are downloaded.
The following steps use Control Tower to build a Concourse instance on Google Cloud Platform, then uses a combination of GCS buckets, Credhub, a suite of Platform Automation tools and a single Concourse pipeline to deploy (and upgrade) the entire OpsMan and PCF product stack directly from the Pivotal Network.
This fork was adapted to use a terraform script that paves both Pivotal Application Service and Pivotal Container Service, and an updated pipeline that runs both products on the same Ops Manager.
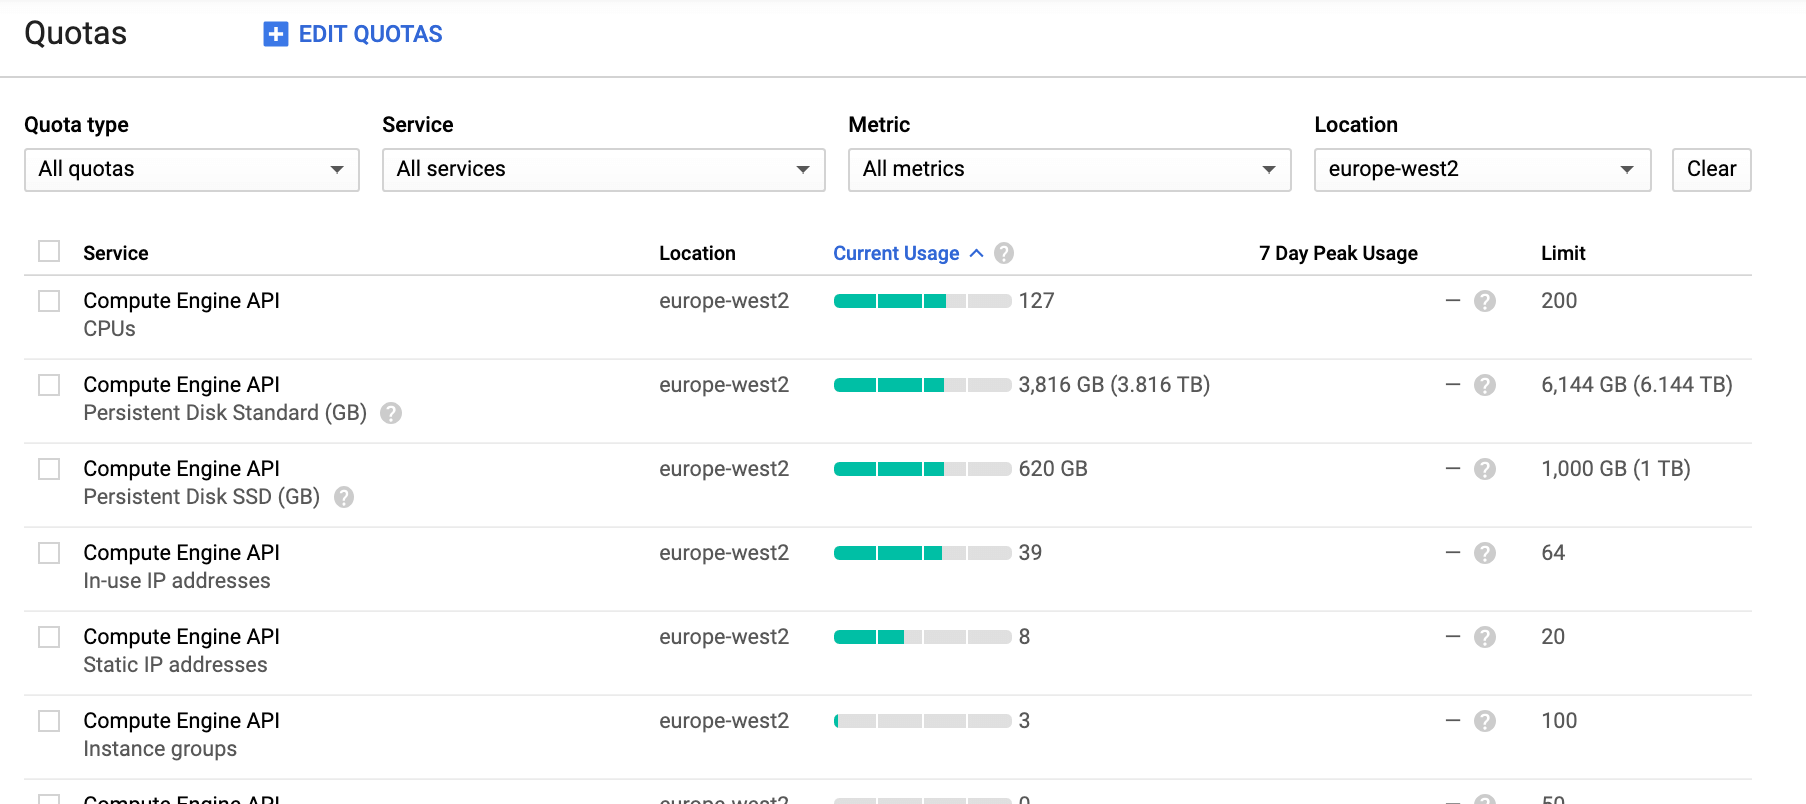
Setup proper quotas
You will need quite a bit of resources for the entire installation of both Pivotal Application Service, Pivotal Container Service and all the included marketplace services in this installation. You can remove services you don't need from the final pipeline below (under ops-manager-automation-cc/ci/pivotal-cloud-foundry/pipeline.yml). The following quotas are required for the full installation in a given region:
Setup DNS namespaces
You need to setup two NS records at your domain registrar for this installation. One will be for concourse and one would be for the platform. You want to seperate the two into different subdomains so there will not be any dependency between them.
Create a new NS record for concourse, for example devops, and give it an NS. Give a different name for the platform, for example cf. Here's an example of setting it on Google domains:
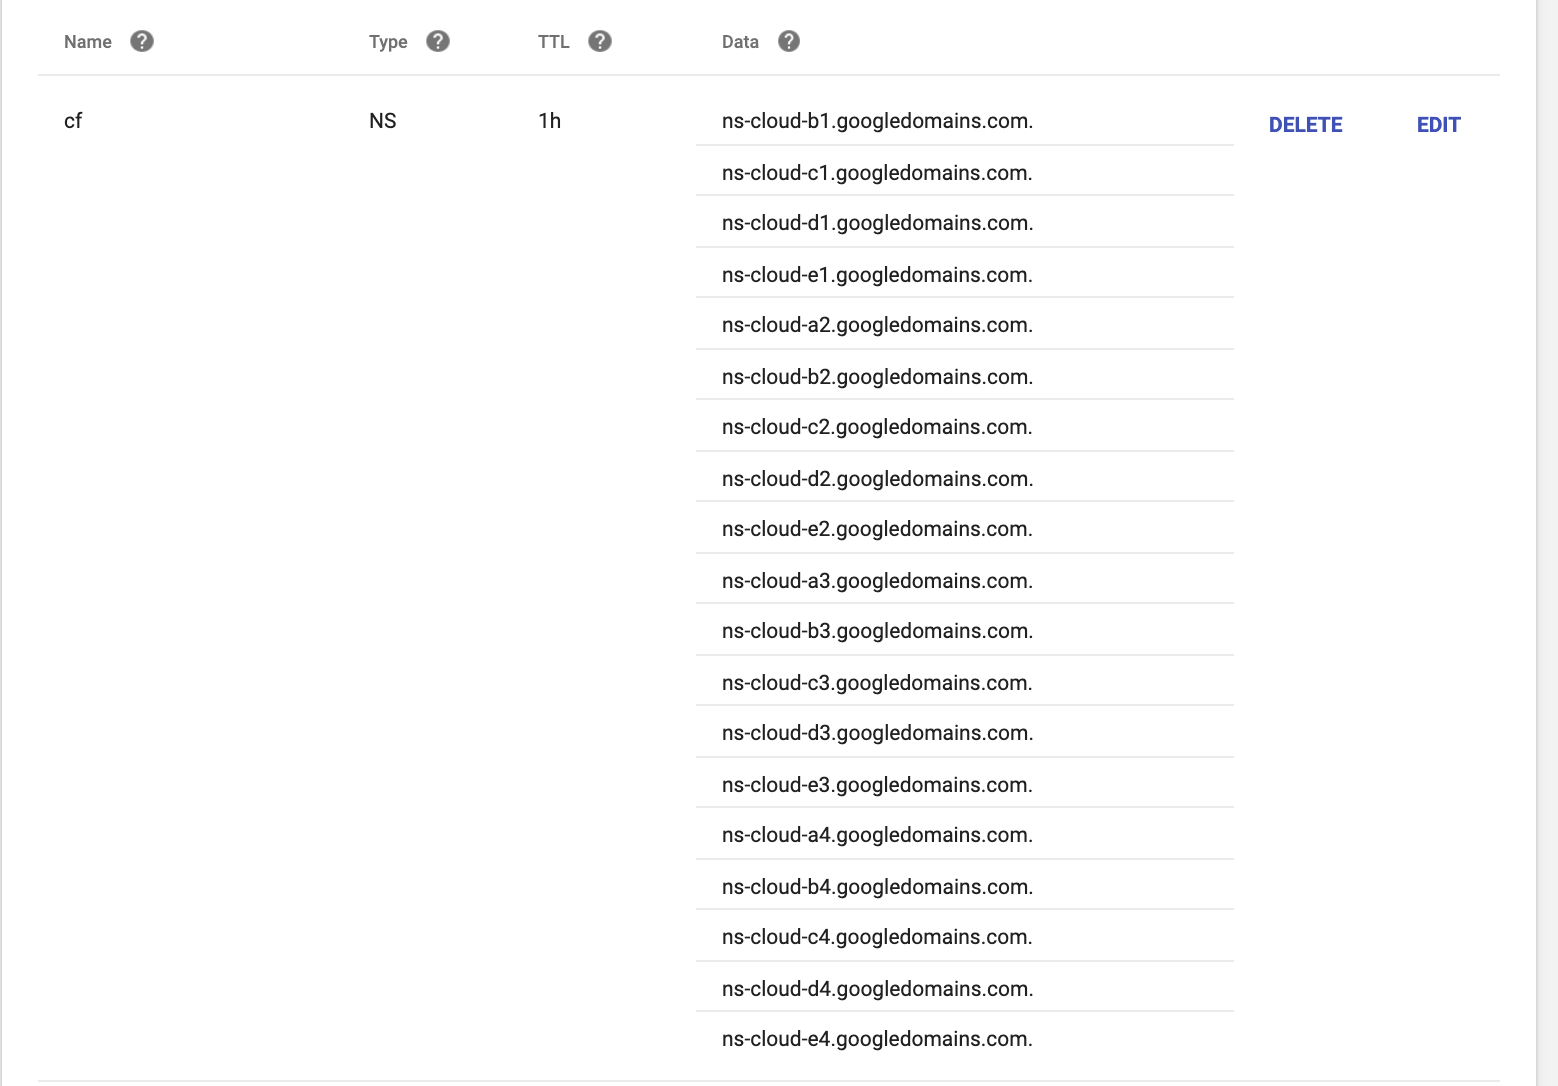
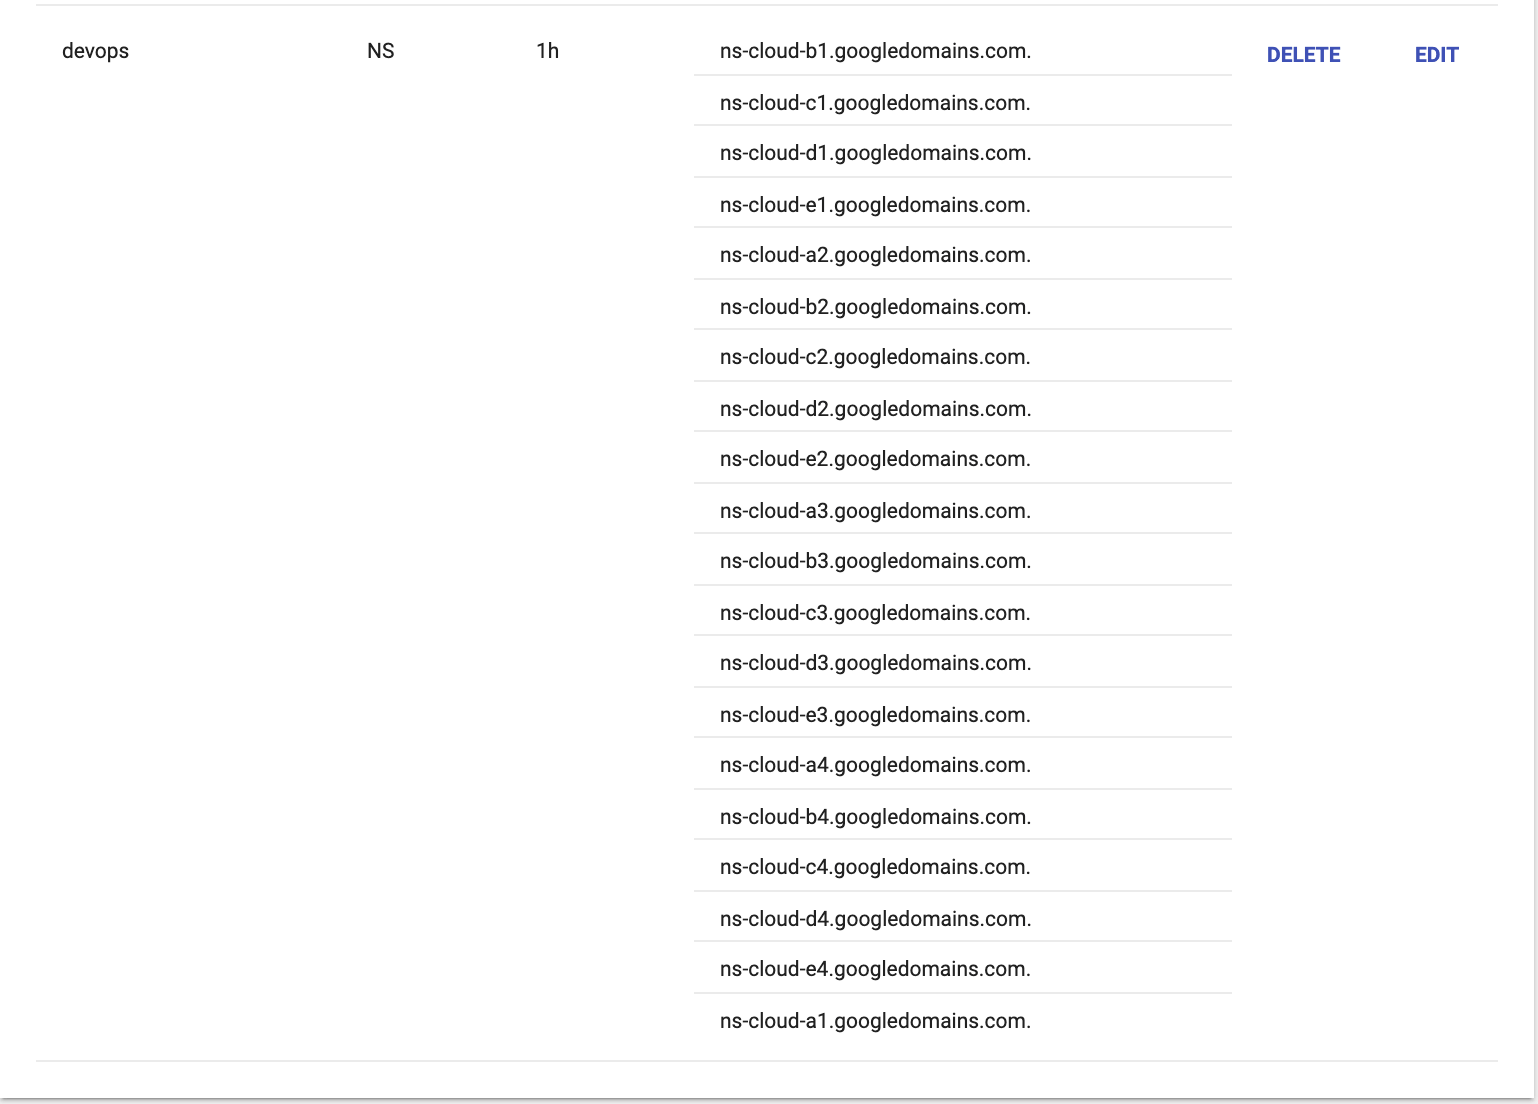
You need to provide all the nameserver records from Google Cloud for each of the NS records. The list is:
ns-cloud-a1.googledomains.com.
ns-cloud-b1.googledomains.com.
ns-cloud-c1.googledomains.com.
ns-cloud-d1.googledomains.com.
ns-cloud-e1.googledomains.com.
ns-cloud-a2.googledomains.com.
ns-cloud-b2.googledomains.com.
ns-cloud-c2.googledomains.com.
ns-cloud-d2.googledomains.com.
ns-cloud-e2.googledomains.com.
ns-cloud-a3.googledomains.com.
ns-cloud-b3.googledomains.com.
ns-cloud-c3.googledomains.com.
ns-cloud-d3.googledomains.com.
ns-cloud-e3.googledomains.com.
ns-cloud-a4.googledomains.com.
ns-cloud-b4.googledomains.com.
ns-cloud-c4.googledomains.com.
ns-cloud-d4.googledomains.com.
ns-cloud-e4.googledomains.com.
Fork this repository
I recommend forking this repository so you can:
- Make modifications to suit your own requirements
- Protect your active pipelines from config changes made here
Recycling GCP projects
If you wish to re-use an existing GCP project for this exercise, it is often useful to clean up any existing resources beforehand. For guidance, follow these instructions.
Create your jumpbox from your local machine or Google Cloud Shell
GCP_PROJECT_ID=<TARGET_GCP_PROJECT_ID>
GCP_REGION=<TARGET_REGION>
gcloud auth login --project ${GCP_PROJECT_ID} --quiet # ... if necessary

gcloud services enable compute.googleapis.com \
  --project "${GCP_PROJECT_ID}"

gcloud compute instances create "jbox-cc" \
  --image-project "ubuntu-os-cloud" \
  --image-family "ubuntu-1804-lts" \
  --boot-disk-size "200" \
  --machine-type=g1-small \
  --project "${GCP_PROJECT_ID}" \
  --zone "${GCP_REGION}"-b
Move to the jumpbox and log in to GCP
gcloud compute ssh ubuntu@jbox-cc \
  --project "${GCP_PROJECT_ID}" \
  --zone "${GCP_REGION}"-b
gcloud auth login --quiet
All following commands should be executed from the jumpbox unless otherwsie instructed.
Prepare your environment file
cat > ~/.env << EOF
# *** your environment-specific variables will go here ***
PIVNET_UAA_REFRESH_TOKEN=CHANGE_ME_PIVNET_UAA_REFRESH_TOKEN  # e.g. xxxxxxxxxxxxxxxxxxxxxxxxxxxxxxxx-r
PCF_DOMAIN_NAME=CHANGE_ME_DOMAIN_NAME                        # e.g. "mydomain.com", "pal.pivotal.io", "pivotaledu.io", etc.
PCF_SUBDOMAIN_NAME=CHANGE_ME_SUBDOMAIN_NAME                  # e.g. "mypks", "mypas", "cls66env99", "maroon", etc.
GITHUB_PUBLIC_REPO=CHANGE_ME_GITHUB_PUBLIC_REPO              # e.g. https://github.com/odedia/pivotal-platform-automation-gcp.git
GCP_REGION=CHANGE_ME_GCP_REGION                              # e.g. europe-west2, us-central1 etc.
CONCOURSE_SUBDOMAIN_NAME=CHANGE_ME_CONCOURSE_SUBDOMAIN       #e.g. "devops"
GCP_AZ1=CHANGE_ME_GCP_AZ1                              # e.g. europe-west2-a, us-central1-a etc.
GCP_AZ2=CHANGE_ME_GCP_AZ2                              # e.g. europe-west2-b, us-central1-b etc.
GCP_AZ3=CHANGE_ME_GCP_AZ3                              # e.g. europe-west2-c, us-central1-c etc.
PRODUCT_SLUG=pivotal-cloud-foundry
MY_EMAIL=CHANGE_ME_EMAIL_ADDRESS                      #email address for Lets Encrypt

export OM_TARGET=https://opsman.\${PCF_SUBDOMAIN_NAME}.\${PCF_DOMAIN_NAME}
export OM_USERNAME=admin
export OM_PASSWORD=$(uuidgen)
export RABBITMQ_MULTITENANT_ADMIN_PASSWORD=$(uuidgen)
export OM_DECRYPTION_PASSPHRASE=\${OM_PASSWORD}
export OM_SKIP_SSL_VALIDATION=true
EOF
Before continuing, open the .env file and update the CHANGE_ME values accordingly.
Ensure these variables get set into the shell every time the ubuntu user connects to the jumpbox:
echo "source ~/.env" >> ~/.bashrc
Load the variables into your shell with the source command so we can use them immediately:
source ~/.env
Prepare jumpbox and generate service account
gcloud services enable iam.googleapis.com --async
gcloud services enable cloudresourcemanager.googleapis.com --async
gcloud services enable dns.googleapis.com --async
gcloud services enable sqladmin.googleapis.com --async

sudo apt update --yes && \
sudo apt install --yes jq && \
sudo apt install --yes build-essential && \
sudo apt install --yes ruby-dev && \
sudo apt-get install software-properties-common --yes && \
curl https://packages.cloud.google.com/apt/doc/apt-key.gpg | sudo apt-key add -  && \
sudo apt-get update --yes && \
sudo apt-get install software-properties-common  --yes && \
sudo add-apt-repository ppa:certbot/certbot --yes && \
sudo apt-get update --yes && \
sudo apt-get install certbot --yes && \
sudo apt-get install python-minimal --yes && \
sudo apt-get install python-pip python-dev build-essential --yes && \
sudo apt-get install python-setuptools --yes && \
sudo pip install cryptography && \
sudo pip install certbot-dns-google
cd ~

FLY_VERSION=5.6.0
wget -O fly.tgz https://github.com/concourse/concourse/releases/download/v${FLY_VERSION}/fly-${FLY_VERSION}-linux-amd64.tgz && \
  tar -xvf fly.tgz && \
  sudo mv fly /usr/local/bin && \
  rm fly.tgz

CT_VERSION=0.8.3
wget -O control-tower https://github.com/EngineerBetter/control-tower/releases/download/${CT_VERSION}/control-tower-linux-amd64 && \
  chmod +x control-tower && \
  sudo mv control-tower /usr/local/bin/

OM_VERSION=0.51.0
wget -O om https://github.com/pivotal-cf/om/releases/download/${OM_VERSION}/om-linux && \
  chmod +x om && \
  sudo mv om /usr/local/bin/

PN_VERSION=0.0.55
wget -O pivnet https://github.com/pivotal-cf/pivnet-cli/releases/download/v${PN_VERSION}/pivnet-linux-amd64-${PN_VERSION} && \
  chmod +x pivnet && \
  sudo mv pivnet /usr/local/bin/

BOSH_VERSION=5.4.0
wget -O bosh https://s3.amazonaws.com/bosh-cli-artifacts/bosh-cli-${BOSH_VERSION}-linux-amd64 && \
  chmod +x bosh && \
  sudo mv bosh /usr/local/bin/

CHUB_VERSION=2.6.1
wget -O credhub.tgz https://github.com/cloudfoundry-incubator/credhub-cli/releases/download/${CHUB_VERSION}/credhub-linux-${CHUB_VERSION}.tgz && \
  tar -xvf credhub.tgz && \
  sudo mv credhub /usr/local/bin && \
  rm credhub.tgz

BBL_VERSION=7.6.0
wget -O bbl https://github.com/cloudfoundry/bosh-bootloader/releases/download/v7.6.0/bbl-v${BBL_VERSION}_linux_x86-64 && \
  chmod +x bbl && \
  sudo mv bbl /usr/local/bin

TF_VERSION=0.11.13
wget -O terraform.zip https://releases.hashicorp.com/terraform/${TF_VERSION}/terraform_${TF_VERSION}_linux_amd64.zip && \
  unzip terraform.zip && \
  sudo mv terraform /usr/local/bin && \
  rm terraform.zip

git clone https://github.com/odedia/terraforming-gcp && \
  mv terraforming-gcp terraforming
gcloud iam service-accounts create p-service --display-name "Pivotal Service Account"

gcloud projects add-iam-policy-binding $(gcloud config get-value core/project) \
  --member "serviceAccount:p-service@$(gcloud config get-value core/project).iam.gserviceaccount.com" \
  --role 'roles/owner'

cd ~
gcloud iam service-accounts keys create 'gcp_credentials.json' \
  --iam-account "p-service@$(gcloud config get-value core/project).iam.gserviceaccount.com"
Clone this repo
The scripts, pipelines and config you need to complete the following steps are inside this repo, so clone it to your jumpbox:
git clone ${GITHUB_PUBLIC_REPO} ~/ops-manager-automation-cc
Create a certificate signed by Let's Encrypt
Create a Google Cloud Zone DNS entry:
Run the following script to create a certificate and key for the installation:
gcloud dns managed-zones create ${PCF_SUBDOMAIN_NAME}-zone --dns-name ${PCF_SUBDOMAIN_NAME}.${PCF_DOMAIN_NAME}. --description "PCF ZONE"
DOMAIN=${PCF_SUBDOMAIN_NAME}.${PCF_DOMAIN_NAME} EMAIL=${MY_EMAIL} ~/ops-manager-automation-cc/bin/certbot.sh
gcloud dns managed-zones delete ${PCF_SUBDOMAIN_NAME}-zone
Note: If you face issues with AttributeError: 'module' object has no attribute 'Locale', please remove parsedatetime 2.6 by running pip uninstall parsedatetime and then run pip install parsedatetime==2.5.
Configure Terraform
cat > ~/terraform.tfvars <<-EOF
dns_suffix             = "${PCF_DOMAIN_NAME}"
env_name               = "${PCF_SUBDOMAIN_NAME}"
region                 = "${GCP_REGION}"
zones                  = ["${GCP_AZ1}", "${GCP_AZ2}", "${GCP_AZ3}"]
project                = "$(gcloud config get-value core/project)"
opsman_image_url       = ""
opsman_vm              = 0
create_gcs_buckets     = "false"
external_database      = 0
isolation_segment      = 0
ssl_cert            = <<SSL_CERT
$(sudo cat /etc/letsencrypt/live/${PCF_SUBDOMAIN_NAME}.${PCF_DOMAIN_NAME}/fullchain.pem)
SSL_CERT
ssl_private_key     = <<SSL_KEY
$(sudo cat /etc/letsencrypt/live/${PCF_SUBDOMAIN_NAME}.${PCF_DOMAIN_NAME}/privkey.pem)
SSL_KEY
service_account_key = <<SERVICE_ACCOUNT_KEY
$(cat ~/gcp_credentials.json)
SERVICE_ACCOUNT_KEY
EOF
Note the opsman_image_url == "" setting which prohibits Terraform from downloading and deploying the Ops Manager VM.
The Concourse pipelines will take responsibility for this.
Terraform the infrastructure
The PKS and PAS platforms have different baseline infrastructure requirements which are configured from separate dedicated directories.
Terraform is directory-sensitive and needs local access to your customized terraform.tfvars files so symlink it in from the home directory.
cd ~/terraforming/terraforming-pcf
ln -s ~/terraform.tfvars .
Launch Terraform
Confirm you're in the correct directory for your chosen platform and terraform.tfvars is present, then execute the following:
terraform init
terraform apply --auto-approve
This will take about 2 mins to complete.
Install Concourse
We use Control Tower to install Concourse, as follows:
gcloud dns managed-zones create ${CONCOURSE_SUBDOMAIN_NAME}-zone --dns-name ${CONCOURSE_SUBDOMAIN_NAME}.${PCF_DOMAIN_NAME}. --description "Devops zone"
GOOGLE_APPLICATION_CREDENTIALS=~/gcp_credentials.json \
  control-tower deploy \
    --region ${GCP_REGION} \
    --iaas gcp \
    --workers 2 \
    --domain concourse.${CONCOURSE_SUBDOMAIN_NAME}.${PCF_DOMAIN_NAME} \
    pautomation
This will take about 20 mins to complete.
Persist a few credentials
INFO=$(GOOGLE_APPLICATION_CREDENTIALS=~/gcp_credentials.json \
  control-tower info \
    --region ${GCP_REGION} \
    --iaas gcp \
    --json \
    pautomation
)

echo "CC_ADMIN_PASSWD=$(echo ${INFO} | jq --raw-output .config.concourse_password)" >> ~/.env
echo "CREDHUB_CA_CERT='$(echo ${INFO} | jq --raw-output .config.credhub_ca_cert)'" >> ~/.env
echo "CREDHUB_CLIENT=credhub_admin" >> ~/.env
echo "CREDHUB_SECRET=$(echo ${INFO} | jq --raw-output .config.credhub_admin_client_secret)" >> ~/.env
echo "CREDHUB_SERVER=$(echo ${INFO} | jq --raw-output .config.credhub_url)" >> ~/.env
echo 'eval "$(GOOGLE_APPLICATION_CREDENTIALS=~/gcp_credentials.json \
  control-tower info \
    --region ${GCP_REGION} \
    --iaas gcp \
    --env pautomation)"' >> ~/.env

source ~/.env
Verify BOSH and Credhub connectivity
bosh env
credhub --version
Check Concourse targets and check the pre-configured pipeline:
fly targets
fly -t control-tower-pautomation pipelines
Navigate to the url shown for fly targets.
Use admin user and the value of CC_ADMIN_PASSWD to login and see the pre-configured pipeline.
Note control-tower will log you in but valid access tokens will expire every 24 hours. The command to log back in is:
fly -t control-tower-pautomation login --username admin --password ${CC_ADMIN_PASSWD}
Set up dedicated GCS bucket for downloads
gsutil mb -c regional -l ${GCP_REGION} gs://${PCF_SUBDOMAIN_NAME}-concourse-resources
gsutil versioning set on gs://${PCF_SUBDOMAIN_NAME}-concourse-resources
Add a dummy state file
The state.yml file is produced by the create-vm platform automation task and serves as a flag to indicate that an Ops Manager exists.
We currently store the state.yml file in GCS.
The install-opsman job also consumes this file so it can short-circuit the create-vm task if an Ops Manager does exist.
This is a mandatory input and does not exist by default so we create a dummy state.yml file to kick off proceedings.
Storing the state.yml file in git may work around this edge case but, arguably, GCS/S3 is a more appropriate home.
echo "---" > ~/state.yml
gsutil cp ~/state.yml gs://${PCF_SUBDOMAIN_NAME}-concourse-resources/
If required, be aware that versioned buckets require you to use gsutil rm -a to take files fully out of view.
Store secrets in Credhub
credhub set -n pivnet-api-token -t value -v "${PIVNET_UAA_REFRESH_TOKEN}"
credhub set -n domain-name -t value -v "${PCF_DOMAIN_NAME}"
credhub set -n subdomain-name -t value -v "${PCF_SUBDOMAIN_NAME}"
credhub set -n gcp-project-id -t value -v "$(gcloud config get-value core/project)"
credhub set -n opsman-public-ip -t value -v "$(dig +short opsman.${PCF_SUBDOMAIN_NAME}.${PCF_DOMAIN_NAME})"
credhub set -n gcp-credentials -t value -v "$(cat ~/gcp_credentials.json)"
credhub set -n om-target -t value -v "${OM_TARGET}"
credhub set -n om-skip-ssl-validation -t value -v "${OM_SKIP_SSL_VALIDATION}"
credhub set -n om-username -t value -v "${OM_USERNAME}"
credhub set -n om-password -t value -v "${OM_PASSWORD}"
credhub set -n om-decryption-passphrase -t value -v "${OM_DECRYPTION_PASSPHRASE}"
credhub set -n domain-crt -t value -v "$(sudo cat /etc/letsencrypt/live/${PCF_SUBDOMAIN_NAME}.${PCF_DOMAIN_NAME}/fullchain.pem)"
credhub set -n domain-key -t value -v "$(sudo cat /etc/letsencrypt/live/${PCF_SUBDOMAIN_NAME}.${PCF_DOMAIN_NAME}/privkey.pem)"
credhub set -n region -t value -v "${GCP_REGION}"
credhub set -n az1 -t value -v "${GCP_AZ1}"
credhub set -n az2 -t value -v "${GCP_AZ2}"
credhub set -n az3 -t value -v "${GCP_AZ3}"
credhub set -n rabbitmq-multitenant-password -t value -v "${RABBITMQ_MULTITENANT_ADMIN_PASSWORD}"
Take a moment to review these settings with credhub get -n <NAME>.
Build the pipeline
Create a private.yml to contain the secrets required by pipeline.yml:
cat > ~/private.yml << EOF
---
product-slug: ${PRODUCT_SLUG}
config-uri: ${GITHUB_PUBLIC_REPO}
gcp-credentials: |
$(cat ~/gcp_credentials.json | sed 's/^/  /')
gcs-bucket: ${PCF_SUBDOMAIN_NAME}-concourse-resources
pivnet-token: ${PIVNET_UAA_REFRESH_TOKEN}
credhub-ca-cert: |
$(echo $CREDHUB_CA_CERT | sed 's/- /-\n/g; s/ -/\n-/g' | sed '/CERTIFICATE/! s/ /\n/g' | sed 's/^/  /')
credhub-client: ${CREDHUB_CLIENT}
credhub-secret: ${CREDHUB_SECRET}
credhub-server: ${CREDHUB_SERVER}
EOF
Set and unpause the pipelines:
Create the "fetch artifacts" pipeline. You want this pipeline separate from your main pipeline because you are less likely to destroy it and it can work in parallel to the master pipeline
fly -t control-tower-pautomation set-pipeline -p fetch-artifacts -n   -c ~/ops-manager-automation-cc/ci/fetch-artifacts/pipeline.yml -l ~/private.yml

fly -t control-tower-pautomation  unpause-pipeline -p fetch-artifacts
Run the master pipeline with the commands below:
fly -t control-tower-pautomation set-pipeline -p ${PRODUCT_SLUG} -n \
  -c ~/ops-manager-automation-cc/ci/${PRODUCT_SLUG}/pipeline.yml \
  -l ~/private.yml

fly -t control-tower-pautomation unpause-pipeline -p ${PRODUCT_SLUG}
This should begin to execute in ~60 seconds.
Be aware that you may be required to manually accept the PivNet EULAs before a product can be downloaded so watch for pipeline failures which contain the necessary URLs to follow.
You may also observe that on the first run, the export-installation job will fail because the Ops Manager
is missing.
Run this job manually once the install-opsman job has run successfully.
Teardown
You have a "delete-installation" pipline that can be setup with this command:
fly -t control-tower-pautomation set-pipeline -p delete-installation -n \
  -c ~/ops-manager-automation-cc/ci/${PRODUCT_SLUG}/delete-installation.yml \
  -l ~/private.yml

fly -t control-tower-pautomation unpause-pipeline -p delete-installation
You will need to manually run this pipeline.
The following steps will help you when you're ready to dispose of everything.
Use the om tool to delete the installation (be careful, you will not be asked to confirm this operation):
om delete-installation
Delete the Ops Manager VM:
gcloud compute instances delete "ops-manager-vm" --zone "${GCP_AZ1}" --quiet
Unwind the remaining PCF infrastructure:
cd ~/terraforming/terraforming-pcf
terraform destroy --auto-approve
Uninstall Concourse with control-tower:
GOOGLE_APPLICATION_CREDENTIALS=~/gcp_credentials.json \
  control-tower destroy \
    --region ${GCP_REGION} \
    --iaas gcp \
    pautomation
If you just want to destroy the current installation and "start clean" you can run this command that would teardown the entire PCF environment and reset the pipeline:
om delete-installation && \
gcloud compute instances delete ops-manager-vm --delete-disks all --zone ${GCP_AZ1} --quiet && \
cd ~/terraforming/terraforming-pcf && \
terraform destroy --auto-approve && \
terraform init && \
terraform apply --auto-approve && \
sleep 70 && \
credhub set -n pivnet-api-token -t value -v "${PIVNET_UAA_REFRESH_TOKEN}" && \
credhub set -n domain-name -t value -v "${PCF_DOMAIN_NAME}" && \
credhub set -n subdomain-name -t value -v "${PCF_SUBDOMAIN_NAME}" && \
credhub set -n gcp-project-id -t value -v "$(gcloud config get-value core/project)" && \
credhub set -n opsman-public-ip -t value -v "$(dig +short opsman.${PCF_SUBDOMAIN_NAME}.${PCF_DOMAIN_NAME})" && \
credhub set -n gcp-credentials -t value -v "$(cat ~/gcp_credentials.json)" && \
credhub set -n om-target -t value -v "${OM_TARGET}" && \
credhub set -n om-skip-ssl-validation -t value -v "${OM_SKIP_SSL_VALIDATION}" && \
credhub set -n om-username -t value -v "${OM_USERNAME}" && \
credhub set -n om-password -t value -v "${OM_PASSWORD}" && \
credhub set -n om-decryption-passphrase -t value -v "${OM_DECRYPTION_PASSPHRASE}" && \
credhub set -n domain-crt -t value -v "$(sudo cat /etc/letsencrypt/live/${PCF_SUBDOMAIN_NAME}.${PCF_DOMAIN_NAME}/fullchain.pem)" && \
credhub set -n domain-key -t value -v "$(sudo cat /etc/letsencrypt/live/${PCF_SUBDOMAIN_NAME}.${PCF_DOMAIN_NAME}/privkey.pem)" && \
credhub set -n region -t value -v "${GCP_REGION}" && \
credhub set -n az1 -t value -v "${GCP_AZ1}" && \
credhub set -n az2 -t value -v "${GCP_AZ2}" && \
credhub set -n az3 -t value -v "${GCP_AZ3}" && \
credhub set -n rabbitmq-multitenant-password -t value -v "${RABBITMQ_MULTITENANT_ADMIN_PASSWORD}" && \
echo "---" > ~/state.yml && \
gsutil cp ~/state.yml gs://${PCF_SUBDOMAIN_NAME}-concourse-resources/ && \
fly -t control-tower-pautomation destroy-pipeline -n -p ${PRODUCT_SLUG} && \
fly -t control-tower-pautomation set-pipeline -p ${PRODUCT_SLUG} -n -c ~/ops-manager-automation-cc/ci/${PRODUCT_SLUG}/pipeline.yml  -l ~/private.yml

fly -t control-tower-pautomation unpause-pipeline -p ${PRODUCT_SLUG}
If you have some leftover resources, you can clean them up (interactively) with the command below.
WARNING: This is a dangerous command that can wipe out all the resources on your GCP project!
bbl cleanup-leftovers \
  --gcp-service-account-key="$(cat ~/gcp_credentials.json)" \
  --gcp-region=${GCP_REGION} \
  --iaas gcp